Laravel 5.x.x - 4 Steps to Prevent Browser’s Back Button After User Logout

Laravel 5.x.x 4 Steps to Prevent Browser's Back Button After User Logout

Well, have you found out an issue with user logout? If you observe deeply then you can found out this issue that you can logout properly after you click logout link otherwise than if you click on browser’s back button you still able to see the content of the page which actually should not be seen with respect to auth middleware process.

We can prevent this issue by using Laravel middleware. We will create one middleware and prevent back button history. So we have to create new middleware and use that middleware in the route.

Like so, I am going to do from scratch so:

1. Create New Middleware
Create a new middleware using following command:

1
php artisan make:middleware PreventBackHistory

2. Middleware Configuration
Open up PreventBackHistory.php file in app/Http/Middleware folder and replace codes with the following codes below:

PreventBackHistory.php
1
2
3
4
5
6
7
8
9
10
11
12
13
14
15
16
17
18
19
20
21
22
<?php

namespace App\Http\Middleware;

use Closure;

class PreventBackHistory {
  /**
   * Handle an incoming request.
   *
   * @param  \Illuminate\Http\Request  $request
   * @param  \Closure  $next
   * @return mixed
   */
  public function handle($request, Closure $next) {
    $response = $next($request);

    return $response->header('Cache-Control','nocache, no-store, max-age=0, must-revalidate')
            ->header('Pragma','no-cache')
            ->header('Expires','Sun, 02 Jan 1990 00:00:00 GMT');
  }
}

3. Register Middleware
Open Kernel.php in app/Http folder and add a new middleware in $routeMiddleware variable array as below:

Kernel.php
1
2
3
4
5
6
7
8
9
10
11
12
13
14
15
16
17
18
19
20
21
22
23
24
<?php

namespace App\Http;

use Illuminate\Foundation\Http\Kernel as HttpKernel;

class Kernel extends HttpKernel {
  .....
  .....

  /**
   * The application's route middleware.
   *
   * These middleware may be assigned to groups or used individually.
   *
   * @var array
   */
  protected $routeMiddleware = [
    .....

    'prevent-back-history' => \App\Http\Middleware\PreventBackHistory::class,
  ];

}

4. Use Middleware in Route
Now we are ready to use “prevent-back-history” middleware in route file as below:

web.php
1
2
3
4
Route::group(['middleware' => 'prevent-back-history'],function(){
  Auth::routes();
  Route::get('/home', 'HomeController@index');
});

So far so good, That’s it!!! See ya!!! :)

Laravel 5.x.x Route & SEO

Laravel 5.x.x Route and SEO

SEO stands for “search engine optimization”. URLs is an important thing in getting found on the web. In this article I will implement routes and SEO friendly URLs for Laravel project.

Things that Affect SEO
The following are some of the things that search engines such as Google Search consider when evaluating web sites:
1. Website speed
- No one waiting to visit a websites that take forever to load. We all love fast websites. The goal should be to keep the load time under 2 seconds. If you can get it under a second that is even much better. You need to test your web application for speed and optimize if necessary.
2. Responsive designs
- Mobile devices have a market share of internet usage. Since user experience matters to search engines, you need to ensure that the web site displays properly in mobile devices, tablets and desktops as well.
3. Keywords
- Search engines look at keywords when querying billions of indexed websites. As a developer you have to ensure that you provide title tags, meta description and HTML H2 heading that the content writers can use to place keywords.
4. Social media statistics
- If you read something cool on the web, you naturally share it on social media. This is a stamp of approval to search engines. Your have to include tools on the web site that will make it easy for the visitors to share the contents.
5. Website URLs
- The URLs should be keyword rich and words should be separated by dashes and not underscores.

How to Implement SEO Friendly URLS in Laravel
Now we have to cover the basics SEO and we will map routes to controllers and create a single controller for all routes. The following table shows the URLs that will be implemented:

# URLs Method Description
1 / index Home page
2 /products products Products page
3 /products/details/{id} product_details(id) Product detailed based on product id
4 /products/category product_categories Product categories
5 /products/brands product_brands Product brands
6 /blog blog Blog postings list
7 /blog/post/{id} blog_post{id} Blog post content
8 /contact-us contact_us Contact us page
9 /login login Login user
10 /logout logout Logout user
11 /cart cart Cart contents
12 /checkout checkout Checkout shopper
13 /search/{query} search Search results

For this section assumes you have created the tutorial project. If you haven’t done so yet then read this Laravel Hello World. We use the artisan command line tool to generate the codes for ShopController.php controller.

Then open up your terminator and run the following command to browse to the project. Assumed that you are using Laravel plugin web server.

1
php artisan serve

Then run the following command to generate the Shop controller:

1
php artisan make:controller ShopController

Open up /app/Http/Controllers/ShopController.php and replace the generated codes with the following codes below:

ShopController.php
1
2
3
4
5
6
7
8
9
10
11
12
13
14
15
16
17
18
19
20
21
22
23
24
25
26
27
28
29
30
31
32
33
34
35
36
37
38
39
40
41
42
43
44
45
46
47
48
49
50
51
52
53
54
55
56
57
58
59
60
61
<?php

namespace App\Http\Controllers;

use Illuminate\Http\Request;
use App\Http\Controllers\Controller;

class ShopController extends Controller {

  public function index() {
    return 'index page';
  }

  public function products() {
    return 'products page';
  }

  public function product_details($id) {
    return 'product details page';
  }

  public function product_categories() {
    return 'product categories page';
  }

  public function product_brands() {
    return 'product brands page';
  }

  public function blog() {
    return 'blog page';
  }

  public function blog_post($id) {
    return 'blog post page';
  }

  public function contact_us() {
    return 'contact us page';
  }

  public function login() {
    return 'login page';
  }

  public function logout() {
    return 'logout page';
  }

  public function cart() {
    return 'cart page';
  }

  public function checkout() {
    return 'checkout page';
  }

  public function search($query) {
    return "$query search page";
  }
}

The above code defines functions that will responds to the routes.

And then we will add routes that will call the methods in the controllers.

Open up web.php in /routes folder and replace the code with the following:

web.php
1
2
3
4
5
6
7
8
9
10
11
12
13
14
15
16
17
18
19
20
21
22
23
24
25
26
<?php

/*
|--------------------------------------------------------------------------
| Web Routes
|--------------------------------------------------------------------------
|
| Here is where you can register web routes for your application. These
| routes are loaded by the RouteServiceProvider within a group which
| contains the "web" middleware group. Now create something great!
|
*/

Route::get('/','ShopController@index');
Route::get('/products','ShopController@products');
Route::get('/products/details/{id}','ShopController@product_details');
Route::get('/products/categories','ShopController@product_categories');
Route::get('/products/brands','ShopController@product_brands');
Route::get('/blog','ShopController@blog');
Route::get('/blog/post/{id}','ShopController@blog_post');
Route::get('/contact-us','ShopController@contact_us');
Route::get('/login','ShopController@login');
Route::get('/logout','ShopController@logout');
Route::get('/cart','ShopController@cart');
Route::get('/checkout','ShopController@checkout');
Route::get('/search/{query}','ShopController@search');

So far so good, That’s it!!! See ya!!! :)

Laravel 5.x.x Create Custom Helper

Laravel 5.x.x Create Custom Helper

In this article I will show you how to create your own custom helpers in Laravel framework.

Create Project
Run the following composer command to create a new Laravel project:

1
composer create-project laravel/laravel laravel_helper

Customer Helpers’ Dir
Customer helpers files will be located in the app dir.

Create a new directory Helpers in app/Helpers

Define Helper Class
Let’s create a simple helper function that will return the user’s full name format.

Create a new file UserHelper.php in app/Helpers and add the following codes:

UserHelper.php
1
2
3
4
5
6
7
8
9
<?php

namespace App\Helpers;

class UserHelper {
  public static function full_name($first_name, $last_name) {
    return $first_name . ', '. $last_name;
  }
}

- namespace App\Helpers;: defines the Helpers namespace.
- public static function full_name($first_name, $last_name) {...}: defines a static function which return the user’s full name.

Helpers Service Provider Class
Service providers are used to auto load classes in Laravel framework.

We will need to define a service provider that will load all of our helpers classes in app/Helpers directory.

Run the following artisan command to create HelperServiceProvider.php in app/Providers directory:

1
php artisan make:provider HelperServiceProvider

And then add the following code below in HelperServiceProvider.php file:

HelperServiceProvider.php
1
2
3
4
5
6
7
8
9
10
11
12
13
14
15
16
17
18
19
20
21
22
23
24
25
26
27
28
29
30
<?php

namespace App\Providers;

use Illuminate\Support\ServiceProvider;

class HelperServiceProvider extends ServiceProvider {

  /**
   * Bootstrap the application services.
   *
   * @return void
   */
  public function boot()
  {
    //
  }

  /**
   * Register the application services.
   *
   * @return void
   */
  public function register()
  {
    foreach (glob(app_path().'/Helpers/*.php') as $filename){
      require_once($filename);
    }
  }
}

- namespace App\Providers;: defines the namespace provider.
- use Illuminate\Support\ServiceProvider;: imports the ServiceProvider class namespace.
- class HelperServiceProvider extends ServiceProvider {...}: defines a HelperServiceProvider class that extends/inherite the ServiceProvider class. - public function register() {...} is the function that is used to loads the helpers.
- foreach (glob(app_path().'/Helpers/*.php') as $filename) {...}: loops through all the files in app/Helpers directory and loads them.

Configure Helper Service Provider and Class Alias
We need to register the HelperServiceProvider and create an alias for the helpers.

Open up config/app.php file and add the following line in providers array variable.

app.php
1
App\Providers\HelperServiceProvider::class,

And then add the following line in aliases array variable.

app.php
1
'UserHelper' => App\Helpers\UserHelper::class,

Using the Custom Helper
Let create a route that will the custom helper function. Open up routes/web.php and add the following codes:

web.php
1
2
3
Route::get('/users', function () {
  return UserHelper::full_name("Bunlong", "Van");
});

- return UserHelper::full_name("Bunlong", "Van"); calls the static function full_name in UserHelper class.

Open up your browser and type the uri http://localhost:8000/users you will see “Bunlong, Van” text.

So far so good, That’s it!!! See ya!!! :)

Hello Laravel 5.x.x

Hello Laravel 5.x.x

In the previous article, We installed and configured a Laravel application. And in this article We will build on the same project to create a simple Hello Laravel application and look at the key components of Laravel framework.

Artisan Command Line
Artisan is the command line that automates common tasks in Laravel framework. The artisan command line can be used to perform the following tasks and much more:

- Generate boilerplate code – it easily create controllers, models… etc.
- Database migrations – migrations is used to manipulate database objects and can be used to create and drop tables etc.
- Seeding – seeding is a term used to add dummy records to the database.
- Routing
- Run unit tests.

The Way to Use the Artisan Command
Open the terminator and run the following command to view the list of available commands:

1
php artisan list

Artisan Command To Generate Codes for a Controller
Open the terminator and run the following command to generate codes for Hello Laravel controller:

1
php artisan make:controller HelloLaravelController

- php artisan is used to run the artisan command line.
- make:controller HelloLaravelController specifies the command that the should run. This command will create codes for a controller HelloLaravelController in /app/Http/Controllers/HelloLaravelController.php.

And then open up the file HelloLaravelController.php in folder /app/Http/Controllers.

And you will get the following code:

HelloLaravelController.php
1
2
3
4
5
6
7
8
9
10
11
12
13
14
15
16
17
18
19
20
21
22
23
24
25
26
27
28
29
30
31
32
33
34
35
36
37
38
39
40
41
42
43
44
45
46
47
48
49
50
51
52
53
54
55
56
57
58
59
60
61
62
63
64
65
66
67
68
69
70
71
72
73
74
75
76
77
78
79
80
81
82
83
84
85
86
87
<?php

namespace App\Http\Controllers;

use Illuminate\Http\Request;

use App\Http\Requests;
use App\Http\Controllers\Controller;

class HelloLaravelController extends Controller
{
  /**
   * Display a listing of the resource.
   *
   * @return Response
   */
  public function index()
  {
    //
  }

  /**
   * Show the form for creating a new resource.
   *
   * @return Response
   */
  public function create()
  {
    //
  }

  /**
   * Store a newly created resource in storage.
   *
   * @param  Request  $request
   * @return Response
   */
  public function store(Request $request)
  {
    //
  }

  /**
   * Display the specified resource.
   *
   * @param  int  $id
   * @return Response
   */
  public function show($id)
  {
    //
  }

  /**
   * Show the form for editing the specified resource.
   *
   * @param  int  $id
   * @return Response
   */
  public function edit($id)
  {
    //
  }

  /**
   * Update the specified resource in storage.
   *
   * @param  Request  $request
   * @param  int  $id
   * @return Response
   */
  public function update(Request $request, $id)
  {
    //
  }

  /**
   * Remove the specified resource from storage.
   *
   * @param  int  $id
   * @return Response
   */
  public function destroy($id)
  {
    //
  }
}

- namespace App\Http\Controllers;: defines the namespace for the controller.
- use Illuminate\Http\Request;: imports namespaces with the required classes to use in the controller.
- class HelloLaravelController extends Controller: defines the HelloLaravelController class which extends/inherit the base controller.
- public function index(){}: defines the default function for the controller.
- public function create(){}: defines the function that is used to render the create form view.
- public function store(Request $request): defines the function that is used to store/save a newly recode into the table/database.
- public function show($id): defines the function that is used to retrieves a single recode/resource based on the id.
- public function edit($id): defines the function that is used to render the edit form based on the id.
- public function update(Request $request, $id) defines a function that is used to update a record in the table/database base on the id.
- public function destroy($id): defines the function that is used to remove a recode based on the id.

Routing
We will create a new route that will render Hello Laravel in the browser.

Open up file web.php in folder routes and add the following codes below:

web.php
1
2
3
Route::get('/hello_laravel',function(){
  return 'Hello Laravel!';
});

Route::get('/hello',function(){...});: responds to the GET method of the URI hello. function() defines an anonymous function that does the actual work for the requested URI.
return 'Hello Laravel!';: returns and render Hello Laravel! to the requested browser.

And then go to ther browser and type the uri http://localhost:8000/hello you will get the output “Hellow Laravel!”.

Route To Controller
Add the following codes in routes/web.php.

web.php
1
Route::get('hello', 'HelloLaravelController@index');

And then open up app/Http/Controllers/HelloLaravelController.php file and add the following codes below:

HelloLaravelController.php
1
2
3
4
public function index()
{
  return 'Hello Laravel!';
}

And then go to ther browser and type the uri http://localhost:8000/hello you will get the output “Hello Laravel!”.

Loading the View from the Controller
Open up app/Http/Controllers/HelloLaravelController.php file and edit the following codes below:

HelloLaravelController.php
1
2
3
4
public function index()
{
  return view('home');
}

return view('home');: loads a view named hello.blade.php.

And then create a new file home.blade.php in folder /resources/views and add the following codes below:

home.blade.php
1
Hello Laravel!

And then go to ther browser and type the uri http://localhost:8000/hello you will get the output “Hello Laravel!”.

So far so good, That’s it!!! See ya!!! :)

What Is Full Stack Developer?

What is Full Stack Developer?

We live in the world of start-ups and freelancers. If you want to make it in such a world, you need to be equipped with the necessary skills.

Big organizations can afford to have developer, designer, tester etc… and roles assigned to different people.

As the start-up or small organization, such roles assigned to different people may be too costly. It is far much more preferable to have a single person who can work comfortably in all of the above roles.

Gone the days, one needed to know only one language/technology and get with. But these days, you will need to know more than one language/technology. This is where the full-stack developer comes in. A full-stack developer is comfortable working in both the back-end and front-end environments.

BACK-END DEVELOPER

Back-end developers are much more focused on what happens on the server-side. This includes writing the code that responds to front-end user requests, interacting with the database and infrastructure for web server as well. One will need to know more than one of the following.

PROGRAMMING LANGUAGES

The following are some of the languages that you should know.

PHP/Laravel
PHP is a scripting server-side language. You can use PHP to interact with the database, develop APIs and do a hell lot of things. PHP is open source and almost supported by all hosting environments.

As a full-stack developer, having knowledge of PHP is almost a must. It is a massive advantage but you will need to prove yourself to your employers or clients.

Ruby/Rails
Ruby on rails is another popular MVC framework built on ruby. Just like PHP, Ruby on rails is open source. You can use ruby to create web applications and APIs.

ASP.Net
ASP is the acronym for active server pages. It is a web development language developed by Microsoft and runs on the .Net framework.

JSP
JSP is the acronym for Java Server Pages. It is powered by Java and used to create web applications.

DATABASE ENGINES

In today’s world, almost all applications must store data in the database. Data is literally the blood line of all modern businesses. Knowing about databases will help you to go a long way

MySQL
MySQL is a client-server relational database management system. It runs on all operating systems and is mostly used with PHP. It supports tables, views, triggers and stored procedures etc. You can also use it with other programming languages such as Ruby, Java, C# etc.

Microsoft SQL Server
SQL Server is a commercial relational database management systems developed by Microsoft. It is most commonly used with ASP.Net but you can also use it with other languages i.e. Java, PHP etc.

Sqlite
SQLite is an embedded relational SQL database. It is commonly used on mobile devices i.e. smart phones. You can also use it when working with web applications.

Oracle
Oracle is another popular relational database management system developed by Oracle. It is most used by big corporations.

PostgreSQL
PostgreSQL (pronounced “post-gress-Q-L”) is an open source relational database management system ( DBMS ) developed by a worldwide team of volunteers. PostgreSQL is not controlled by any corporation or other private entity and the source code is available free of charge.

DEVELOPMENT METHODOLOGIES

In addition to possessing the technical skills, you will also need to know about project management and development methodologies.

Agile Development Methodologies
Agile development is a term that is used to refer to development methodologies that incremental development practices. Some of the most popular methodologies include Scrum and Extreme Programming (XP).

Development Tools / Techniques
One only needed to know a single programing language, develop something functional and get away with it. Things have changed these days. In additional to knowing at least more than one language. Your skill set should also including: Version Control, Test Driven Development (TDD).

FRONT-END DEVELOPER

The major role of a front-end developer is to create the user interface that the user interacts with. This generally requires knowing HTML, CSS, and JavaScript intimately. Let’s briefly look at some of the skills that you will need to know.

Hyper Text Markup Language (HTML)
As of this writing, the latest version of HTML is 5. It comes with a lot of cool features that you must know. Web pages are literally build using HTML.

Cascading Style Sheets (CSS)
Another component of building web pages. CSS provides you with the styling that makes the web beautiful.

JavaScript (JS)
JavaScript is a client-side scripting language that is used to make web pages interactive and provide a lot of functionality. You can use JavaScript to provide client-side validation, performing Ajax calls etc. apart from doing client-side activities, JavaScript can now be used on the server side as well i.e. Node.JS.

JavaScript Frameworks / Libraries
Pure JavaScript is great for simple tasks but things can and usually tend to get more complex. Frameworks and libraries allow you to focus on the user needs while they take care of the technical needs. Libraries such as jQuery allow you to do more with less. jQuery comes with functionality for things like validation, animations, Ajax calls etc. You will also need to know JavaScript frameworks i.e. ReactJS, AngularJS etc. to create killer interactive interfaces.

Front-End Frameworks
Time is money you don’t want to spent a lot of time on a project focusing on technical details. You can take advantage of front-end frameworks such as twitter bootstrap to make your life sweet. Twitter bootstrap comes with CSS and JavaScript functionality out of the box. Once you have the design mock-ups, you can focus on applying CSS classes to your HTML elements and watch the magic happen instead of writing the CSS code that will translate your mock-ups to cool HTML pages.

CSS Pre-Processors
These enable you to speed up your CSS development. CSS pre-processors such as SASS and LESS process your CSS code before publishing to make the code cross-browser friendly and well formatted.

Template Engines
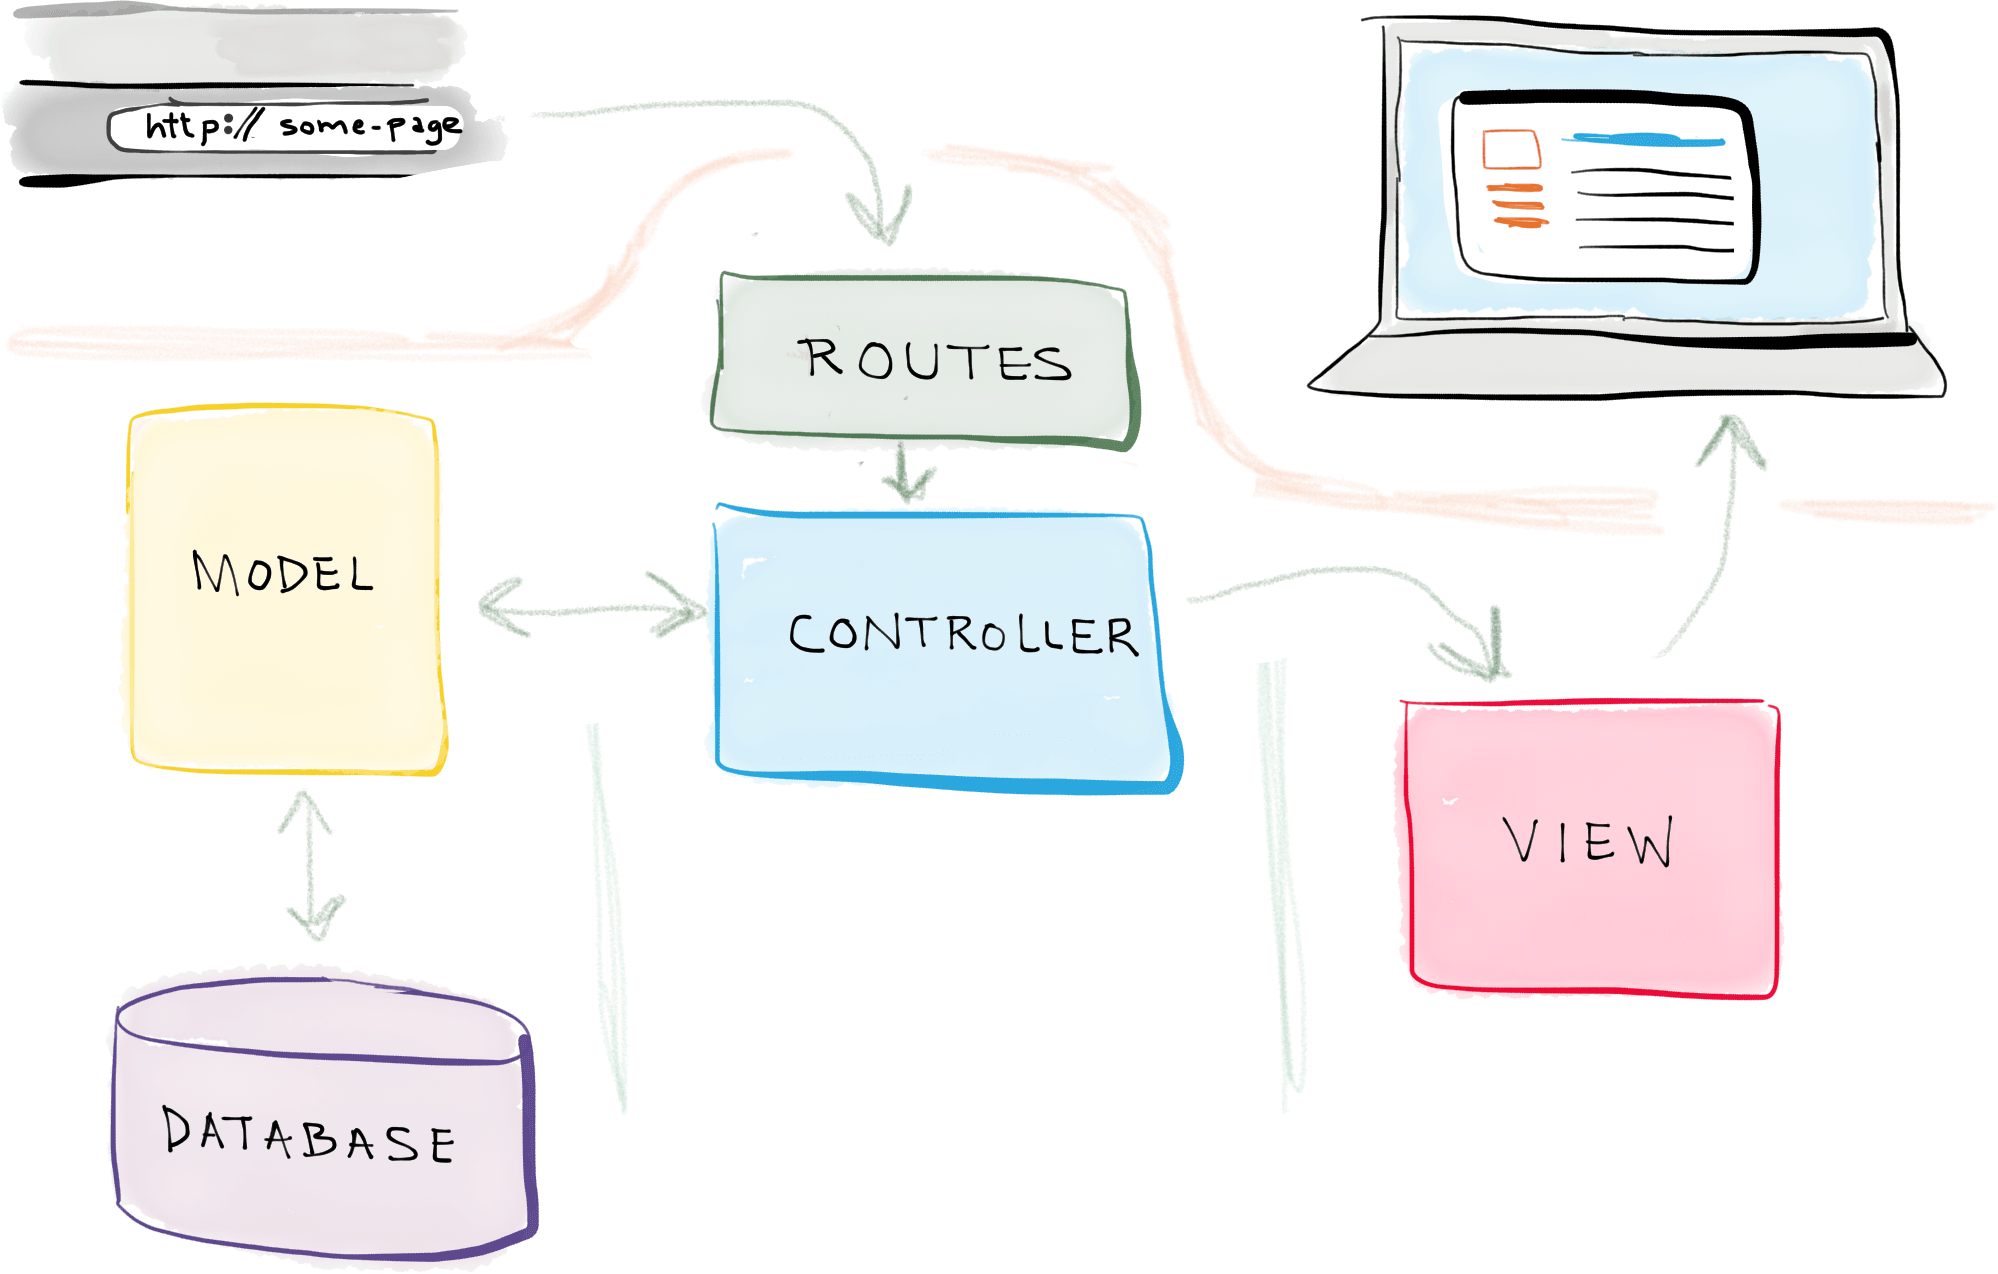
Let’s assume that you are using PHP on the back-end, before template engines, the front-end developers would create the HTML, handle it over to the developers and then they would embed pure PHP code into the HTML. This is no longer acceptable. You need to learn a template engine and they are super easy actually. Laravel uses blade template.

Responsive and Mobile Designs
Your interfaces need to be able to respond to the size of the design and mobile devices.

So far so good, as you can see from the above list, the back-end and front-end developers needs to know a lot of things. A full-stack developer needs to know all things.

Laravel 5.x.x Installation and Configuration

Laravel 5

Laravel is a great PHP framework. Currently, it is the most PHP framework which a lot of companies and people all over the world use it to build amazing applications. In this tutorial, I’ll show you how easy it is to build a web application with Laravel and add authentication to it.

Laravel is a free, open-source PHP framework designed for building web applications with an expressive and elegant syntax. Laravel saves your time and effort because it come with a lot of features.

Well, in this article We are going to take a look on installing, configuration Laravel and explore the Laravel directories structures. And pretty sure We will work with a Ubuntu (Linux) machine.

Pre-requisites for Installing Laravel
Before installing Laravel, ensure that you have installed: Web Server, PHP, MySQL, Composer.

Web Server, PHP & MySQL
For this article, We will use Laravel built-in web server. or if you prefer other kind of web server i.e. XAMPP comes with Apache, MySQL and PHP. The good news is XAMPP come cross platform. If you do not have XAMPP, you can download it from this link.

Composer
Composer is a dependency manager for PHP. You can read more about composer from their official website. We will not cover how to install composer in this article.

Create a New Laravel Project Using Composer
Laravel use Composer to manage its dependencies. So, before using Laravel, ensure you have Composer installed on your machine.

We can install Laravel by issuing the Composer create-project command in the terminal like so:

1
composer create-project --prefer-dist laravel/laravel blog

Wait for the installation to complete then cd into the project and run the command below for running the Laravel built-in web server:

1
php artisan serve

Browser to the following URL http://localhost:300 in your web browser.

Explore Directory Structure
Laravel follow the Model-View-Controller design pattern.

MVC

- Models: query the database and returns the data.
- Views: displays the model data, and sends user actions (e.g. button clicks) to the controller.
- Controllers: handle user requests from the view, retrieve data from the Models and pass them back into the views.

The following table briefly explains the key Laravel directories that you must know about:

Directories Descriptioin
app contains all of your application code.
app/Console contains all of your artisan commands.
app/Events contains event classes.
app/Exceptions contains exception handling classes.
app/Http contains controllers, filters, and requests.
app/Jobs contains jobs that can be queued.
app/Listeners contains handler classes for events.
bootstrap contains files required by the bootstrap framework.
config contains the application configuration files.
database contains database migrations and seeds. It is also used to store the database for SQLite.
public contains the front controllers and assets such as images, CSS, JavaScript etc.
storage contains compiled blade templates, filed based sessions, etc.
tests contains automated unit tests.
vendor contains composer dependencies.


Application Configuration
The application configuration information is located in config/app.php. In this section, we are going to:

1. Set the debugging mode – the debugging mode is used to determine how much information should be displayed when an error occurs.

Open the file config/app.php and upate the following code:

1
'debug' => env('APP_DEBUG', false),

To:

1
'debug' => env('APP_DEBUG', true),

2. Set the time zone – this setting is used for PHP date and date-time functions.

Sets the time zone to UTC. This is the default value If you would like to have a different time zone, you can replace UTC with a value of your preferred time zone.

Locate the following code:

1
'timezone' => 'UTC',

3. Application key – this value is used for encryption purposes.

Update following code:

1
'key' => env('APP_KEY', 'SomeRandomString'),

To:

1
'key' => env('APP_KEY', 'inesindinemwanawabambuyabakoiwe'),

Authentication Configuration
The authentication configuration file is located in /config/auth.php. We will leave the default values as they are. If you want you can change them to meet your requirements.

Database Configuration
The database configuration file is located in config/database.php. By default, MySQL will be used as the database engine. You can set it to a different database management system if you want.

So far so good, That’s it!!! See ya!!! :)

New Way to Develop React App With Create React App (No Build Configuration)

New Way to Develop React App with Create React App (No Build Configuration)

Setting up Gulp, Webpack, Browserify, Babel, JSX, ES6, ES6 modules, hot reloading, … etc. manually - forget about it and no more fuss with it.

Inspired by the cohesive developer experience provided by Ember.js Facebook wanted to provide an easy way to develop React apps, they created create-react-app with the targets zero configuration.

Installation
You may need NPM installed and you can use NVM to easily switch Node versions between different projects.

The Node installation is only required for Create React App itself.

To install create-react-app module, run:

1
npm install -g create-react-app

Creating an App
To create a new app, run:

1
create-react-app geekhmer

It will create a directory called geekhmer inside the current folder. And inside that directory, it will generate the initial project structure and install the transitive dependencies:

1
2
3
4
5
6
7
8
9
10
11
12
13
14
15
geekhmer/
  README.md
  node_modules/
  package.json
  .gitignore
  public/
    favicon.ico
    index.html
  src/
    App.css
    App.js
    App.test.js
    index.css
    index.js
    logo.svg

No configuration or complicated folder structures, just the files you need to build your app.

Run the App
Runs the app in development mode:

1
npm start

Open http://localhost:3000 to view it in the browser.

Run the Test
Runs the test watcher in an interactive mode:

1
npm test

Read more about testing.

Builds the App for Production
Builds the app for production to the build folder. It correctly bundles React in production mode and optimizes the build for the best performance.

The build is minified and the filenames include the hashes. By default, it also includes a service worker so that your app loads from local cache on future visits.

1
npm run build

Your app is ready to be deployed. So far so good, That’s it!!! See ya!!! :)

Installation and Configuration Nginx as Reverse Proxy for Apache on Ubuntu Server

Installation and Configuration Nginx as Reverse Proxy for Apache on Ubuntu Server

In this article, I will show you how to install and configure Nginx as a caching reverse proxy for an Apache web server on Ubuntu, Nginx is used as the front-end and Apache as the back-end.

Nginx will run on port 80 to respond to requests from user/browser, the request will be forwarded to the Apache server that is running on port 7070.

Apache

Install Apache & PHP
Log into your ubuntu server with SSH and switch to root user by running:

1
sudo su

Then install apache with the apt-get command:

1
apt-get install apache2

Once apache is installed, we must install PHP as apache module for this tutorial:

1
apt-get install php5 php5-mysql libapache2-mod-php5

Configure Apache and PHP
By default, apache listens on port 80. We have to configure apache to run on port 7070 for our proxy setup as port 80 will be used by nginx later.

If you want to change the port for apache web server, you must edit the apache configuration file /etc/apache2/ports.conf, and then proceed with the virtual host configuration in the /etc/apache2/sites-available/ directory.

First change the Apache port to 7070 by editing the file ports.conf with the vim editor:

1
vim /etc/apache2/ports.conf

And then change port 80 to 7070:

ports.conf
1
Listen 7070

And then save and exit.

And now go to the virtualhost directory and edit the file 000-default.conf:

1
vim /etc/apache2/sites-available/000-default.conf

And then make sure your configuration is same as below:

000-default.conf
1
2
3
4
5
6
7
8
9
10
11
12
13
14
15
16
17
18
19
<VirtualHost *:7070>
  ServerName www.reverse.com
  ServerAlias reverse.com

  ServerAdmin webmaster@localhost
  DocumentRoot /var/www/html/geekhmer-dev

  <Directory "/var/www/html/geekhmer-dev">
    RewriteEngine On
    RewriteBase /
    RewriteRule ^index\.php$ - [L]
    RewriteCond %{REQUEST_FILENAME} !-f
    RewriteCond %{REQUEST_FILENAME} !-d
    RewriteRule . /index.php [L]
  </Directory>

  ErrorLog ${APACHE_LOG_DIR}/geekhmer-dev_error.log
  CustomLog ${APACHE_LOG_DIR}/geekhmer-dev_access.log combined
</VirtualHost>

And then save and exit.

Next test the configuration and restart apache:

1
2
3
apachectl configtest

systemctl restart apache2

Then we verify that the apache and php is working by creating a new file with the name info.php in the directory /var/www/html/.

1
echo "<?php phpinfo(); ?>" > /var/www/html/info.php

Visit your site www.reverse.com:7070/info.php.

Nginx

Install Nginx
Let install Nginx with the following apt-get command:

1
apt-get install nginx

Configure Nginx
Once Nginx is installed, configure Nginx to act as reverse proxy for the apache web server that running on port 7070.

Go to the nginx configuration directory and edit the file nginx.conf:

1
vim /etc/nginx/nginx.conf

And then enable Gzip compression for Nginx by uncomment the gzip lines below:

nginx.conf
1
2
3
4
5
6
7
8
9
10
11
12
##
# Gzip Settings
##
gzip on;
gzip_disable "msie6";

gzip_vary on;
gzip_proxied any;
gzip_comp_level 6;
gzip_buffers 16 8k;
gzip_http_version 1.1;
gzip_types text/plain text/css application/json application/javascript text/xml application/xml application/xml+rss text/    javascript;

The most important is:
- gzip on : to turn gzip compression.
- gzip_types : is list of MIME-types which you want to turn the compression.
- gzip_proxied any : is enable compression for proxied request.

Under gzip settings, add these proxy cache settings:

nginx.conf
1
2
3
4
##
# Proxy Cache Settings
##
proxy_cache_path /var/cache levels=1:2 keys_zone=reverse_cache:60m inactive=90m max_size=1000m;

The important is:
- The directory for the proxy cache is /var/cache.
- levels : is a directive that tells Nginx how the cache is saved in file system.
- key_zone : is just a name of the cache zone, you can choose it freely, but don’t add special chars or whitespace in the name. I will use the name “reverse_cache” here.

And then save and exit.

And then we will configure proxy params in /etc/nginx/proxy_params file for using in virtualhost later.

1
vim /etc/nginx/proxy_params

Paste the configuration below:

proxy_params
1
2
3
4
5
6
7
8
9
10
11
12
13
14
15
proxy_set_header X-Real-IP $remote_addr;
proxy_set_header X-Forwarded-For $proxy_add_x_forwarded_for;
proxy_set_header Host $http_host;
proxy_set_header X-Forwarded-Proto $scheme;
proxy_set_header X-Forwarded-Host $host;

##
# Cache configuration
##
proxy_cache reverse_cache;
proxy_cache_valid 3s;
proxy_no_cache $cookie_PHPSESSID;
proxy_cache_bypass $cookie_PHPSESSID;
proxy_cache_key "$scheme$host$request_uri";
add_header X-Cache $upstream_cache_status;

And then save and exit.

Now we will configure a virtualhost in the directory /etc/nginx/sites-available. And I will create a new virtualhost configuration file named reverse.conf. Just got to the directory and create new file with vim:

1
vim /etc/nginx/sites-available/reverse.conf

Paste the configuration below:

reverse.conf
1
2
3
4
5
6
7
8
9
10
11
12
13
14
15
16
17
18
19
20
21
22
23
24
25
26
27
28
29
30
31
32
33
34
35
36
37
38
39
40
41
42
server {
  listen 80;

  # Site Directory same in the apache virtualhost configuration
  root /var/www/html/geekhmer_dev;
  index index.php index.html index.htm;

  # Domain
  server_name www.reverse.com reverse.com;

  location / {
    try_files $uri @proxy;
  }

  location @proxy {
    proxy_pass http://127.0.0.1:7070;
    include /etc/nginx/proxy_params;
  }

  location ~* \.php$ {
    proxy_pass http://127.0.0.1:7070;
    include /etc/nginx/proxy_params;
  }

  # Enable Cache the file 30 days
  location ~* .(jpg|png|gif|jpeg|css|mp3|wav|swf|mov|doc|pdf|xls|ppt|docx|pptx|xlsx|css|js)$ {
    proxy_cache_valid 200 120m;
    # expires max;
    expires 30d;
    proxy_cache reverse_cache;
    access_log off;
  }

  # Disable Cache for the file type html, json
  location ~* .(?:manifest|appcache|html?|xml|json)$ {
    expires -1;
  }

  location ~ /\.ht {
    deny all;
  }
}

And then save and exit.

And then activate the new virtualhost configuration:

1
ln -s /etc/nginx/sites-available/reverse.conf /etc/nginx/sites-enabled/

And then we will test the nginx configuration and restart nginx:

1
2
3
nginx -t

systemctl restart nginx

Nginx is configured as reverse proxy now. You can test it with curl:

1
2
3
curl -I www.reverse.com

curl -I www.reverse.com/info.php

Configure Logging

I will configure apache to log the real ip of the visitor instead of the local IP.

Let go to install the apache module libapache2-mod-rpaf and edit the module configuration file:

1
2
3
apt-get install libapache2-mod-rpaf

vim /etc/apache2/mods-available/rpaf.conf

Add the server IP to the line 10. My server IP is: 192.168.1.117.

rpaf.conf
1
RPAFproxy_ips 127.0.0.1 192.168.1.117 ::1

And then save and exit.

And then restart apache:

1
systemctl restart apache2

Test rpaf by viewing the apache access log with the tail command:

1
tail -f /var/log/apache2/geekhmer-dev_access.log

Nginx is installed as reverse proxy in front of the Apache web server. If a visitor requests a php file, the request will be passed to apache on port 7070, and you can see the real IP visitor on the apache log file.

Conclusion

Nginx is fast and popular web server with low memory usage that can act as web server and reverse proxy for HTTP and HTTPS protocol. Nginx reverse proxy for apache is a setup that uses Nginx as front-end, and apache as back-end. Nginx handles the incoming request from the browser and passes it to the apache back-end. In this article, we have setup a configuration for nginx as http cache that caches PHP file requests and images.

Simple Sales Framework for “Sell Me This Pen”

Sell me this pen

I personally never thought anyone would say, “Sell me this pen” in a sales interview. I was wrong. It will happen to you. And you should know exactly what to say back.

I will give you the right sales framework to respond perfectly every time. One day it will happen to you and I want you prepare the script as below:

Here we go:

Interviewer: Do me a favor, sell me this pen. (reaches across to hand me the pen)

Me: (I slowly roll the pen between my index and thumb fingers.) When was the last time you used a pen?

Interviewer: This morning.

Me: Do you remember what kind of pen that was?

Interviewer: No.

Me: Do you remember why you were using it to write?

Interviewer: Yes. Signing a few new customer contracts.

Me: Well I’d say that’s the best use for a pen.

Would not you say signing those new customer contracts is an important event for the business? Then you shouldn’t treate like this. What I mean is, here you are signing new customer contracts, an important and memorable event with a very unmemorable pen.

This is the pen for more important events. This is the tool you use to get deals done. Think of it as a symbol for taking your company to the next level. Because when you begin using the right tool, you are in a more productive state of mind, and you begin to sign more new customer contracts.

Actually. You know? Just this week I shipped ten new boxes of these pens to many office in Phnom Penh.

Unfortunately, this is my last pen today. So, I suggest you get this one. Try it out. If you are not happy with it, I will personally come back next week to pick it up. And it won’t cost you a dime. What do you say?

Interviewer: Yes.

See how simple that was. The Interviewer/Customer loved it. Why?

Here’s the Simple Sales Framework for “Sell me this pen”
1. Gather info - Find out how they last used a pen
2. Respond to info - Emphasize the importance of the activity they last used a pen
3. Delivery info - Sell something bigger than a pen, like a state of mind
4. Closing - Ask for the buy

So far so good, remember it’s not about actually selling a pen. It’s about showing how well you can sell a product. Take 15 minutes today to practice the script above. I promise you will benefit. Share this with person in sales. It could save their career lolzzZ. See ya!

Why Is Website Maintenance Important?

Why Is Website Maintenance Important?

I saw it many times a company has a website delivered, with no changes, no additions, no fresh content and most important of all is no security updates. The website stays as it was delivered, sometimes for many years.

You truly ask yourself: “If I like the design and the website just works, why would I need to be maintained?”. Please go through with me and read on to learn why maintenance is very important:

SECURITY
Probably the most important thing is: keep your site safe! Website software (Content Management Systems, plug-ins and other add-ons to the website’s functionality) are constantly updated. Partly to improve how it works or to add something new and handy, but often also to patch security holes.

Hackers are constantly looking for outdated websites or software (and known security holes). If you don’t keep up with the latest version of the software, your website could be at risk.

ATTRACTIVENESS
A website that is regularly updated with fresh content (blog posts, news articles, promotions, new products, etc.) attracts more visitors. And isn’t that what you want to achieve with your website: attracting visitors? Visitors get a bad impression if there is old data on your website.

Regularly create the new content, text, or images that relate to your business to attract both new and returning visits.

GOOGLE RANKING
Google loves websites that are regularly updated. Keeping your products and services up-to-date shows search engines that your site is fresh. A site with copyright on the bottom and the “Latest News” article years out of date will not be as attractive to Google in terms of quality or usefulness. When new content is added on a regular basis, Google values this and takes that into account with the overall ranking of your website.

Google itself provides a useful tool called “Webmaster Tools” which essentially checks the ‘health’ of your website.

YOUR CORPORATE IMAGE
Your website is an interface into your business and it can have a big impact on how visitors value your products or services. Your website should be kept relevant by regularly refreshing content. Also regularly check that contact forms work, addresses and phone numbers are updated and products, services and price lists are current and correct. This means visitors find what they are looking for quickly and easily, and are more likely to become customers.

Can you do maintenance yourself?
Of course you can. The websites with Content Management Systems (like WordPress) that make it very easy to add or update content yourself. However, ask yourself: will you really do that? Will you really dedicate time every week or month to update your website’s content? And maintain those regular updates year after year? Or do you rather concentrate on your business instead of maintaining your website?

Additionally there is one thing that’s not easy for non-technical people to do software updates. An update to your website’s software can easily break your website. Because (part of) a software is not compatible with another application.

So far so good, let technical people do website maintenance for your business to professionals.