The Web Notifications API is defined as an API for end-user notifications. A notification allows alerting the user outside the context of a web page of an occurrence, such as the delivery of email.
Thinking of some use cases for such an API isn’t very hard. For example, you may want to receive a notification as soon as you receive an email. You may also want to be notified if someone mentions you in a Tweet, or posts a photo of you on Facebook or Google+.
Now that we know what this API is, and what it’s good for, let’s delve into the description of its methods, properties, and events.
Methods
The Web Notifications API is exposed through the notification property of the window object. This is a constructor that allows us to create a notification instance. It accepts two parameters, a string containing the title of the notification, and an optional object of settings.
Syntax:
123456
varnotification=newNotification('Email received',{body:'You have a total of 3 unread emails'});
Properties
- body: A string used to further specify the purpose of the notification.
- lang: Specifies the language of the notification. Its value must be compliant with the BCP 47 standard. Examples of valid strings are en-US and it-IT.
- dir: Defines the direction of the message’s text. Its value can be auto meaning that the direction is based on the browser’s settings, ltr to specify a left-to-right direction (for European languages), or rtl to specify a right-to-left direction (for some Asian languages).
- tag: A string that is used as an ID that can be employed to retrieve, replace, or remove the notification.
- icon: Specifies the URL of an image that will be used as the notification’s icon.
Events
Sometimes we may need to perform an action as soon as the status of the notification changes. For example, we may want to know if the user has clicked the notification, or when it is closed. To do that, we can attach a handler to one of the four events exposed:
- onclick: Fired when the user clicks on the notification.
- onclose: Fired as soon as the user or the brower closes the notification.
- onerror: Fired if an error occurs with the notification.
- onshow: Fired when the notification is shown.
Example:
1234567
varnotification=newNotification('Email received',{body:'You have a total of 3 unread emails'});notification.onshow=function(){console.log('Notification shown');};
Requesting Permission
Before you display a notification you need to ask the user for permission.
Once the user grants you permission you are good to go. At any point you can check the granted permission using Notifcation.permission property. It can have one of the following values :
- granted: The user has granted the permission.
- denied: The user has denied the permission.
- default: The status is unknown. The browser will treat this as if the user denied the permission.
Browser Compatibility
Support for the Web Notifications API isn’t very good on both desktop and mobile. On desktop, Chrome and Firefox implemented the first version of this API a while ago. However, considering only the new version of the API, implementation starts from Chrome 22 and Firefox 22 (both without a vendor prefix). Safari 6+ also supports the Web Notifications API. On the mobile side of things, only Firefox and Blackberry have full support. Testing if a browser supports this API is a matter of writing a check like the one shown below:
12345
if('Notification'inwindow){// API supported}else{// API not supported}
<!DOCTYPEhtml><html><head><metacharset="UTF-8"><metaname="viewport"content="width=device-width, initial-scale=1.0"/><title>WebNotificationsAPI</title></head><body><buttononclick="notifyMe()">Notifyme!</button><scripttype="text/javascript">functionnotifyMe(){// Check if the browser supports notificationsif(!("Notification"inwindow)){alert("This browser does not support desktop notification");}// Check whether notification permissions have alredy been grantedelseif(Notification.permission==="granted"){// If it's okay let's create a notificationvarnotification=newNotification("Hi there!");}// Otherwise, we need to ask the user for permissionelseif(Notification.permission!=='denied'){Notification.requestPermission(function(permission){// If the user accepts, let's create a notificationif(permission==="granted"){varnotification=newNotification("Hi there!");}});}}</script></body></html>
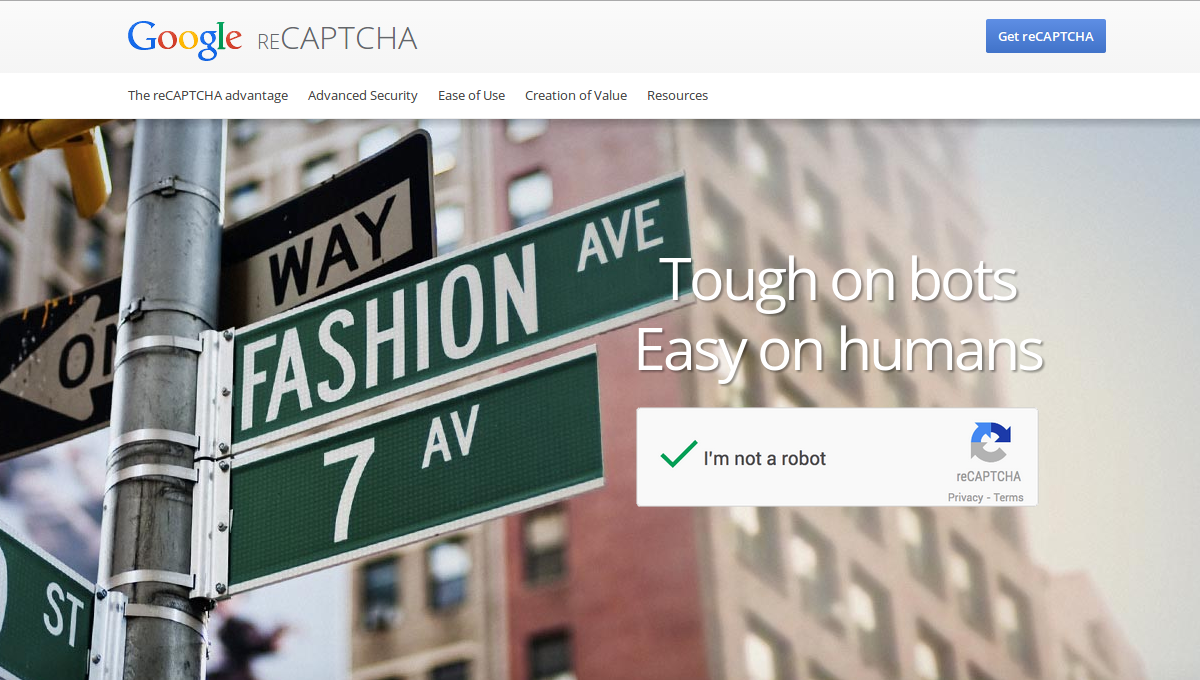
For a site with lots of user generated content, fighting spammers can be a never ending battle. Luckily, we can use a service called reCAPTCHA to help keep spammers off our site. reCAPTCHA works by displaying an image on screen and asking the user to type what they see in the image. This works because, the spammer’s spambots are unable to read the image and unable to proceed with filling out the form. reCAPTCHA is just one of a number of tools we can use to prevent spammers from abusing our websites.
Setup Account
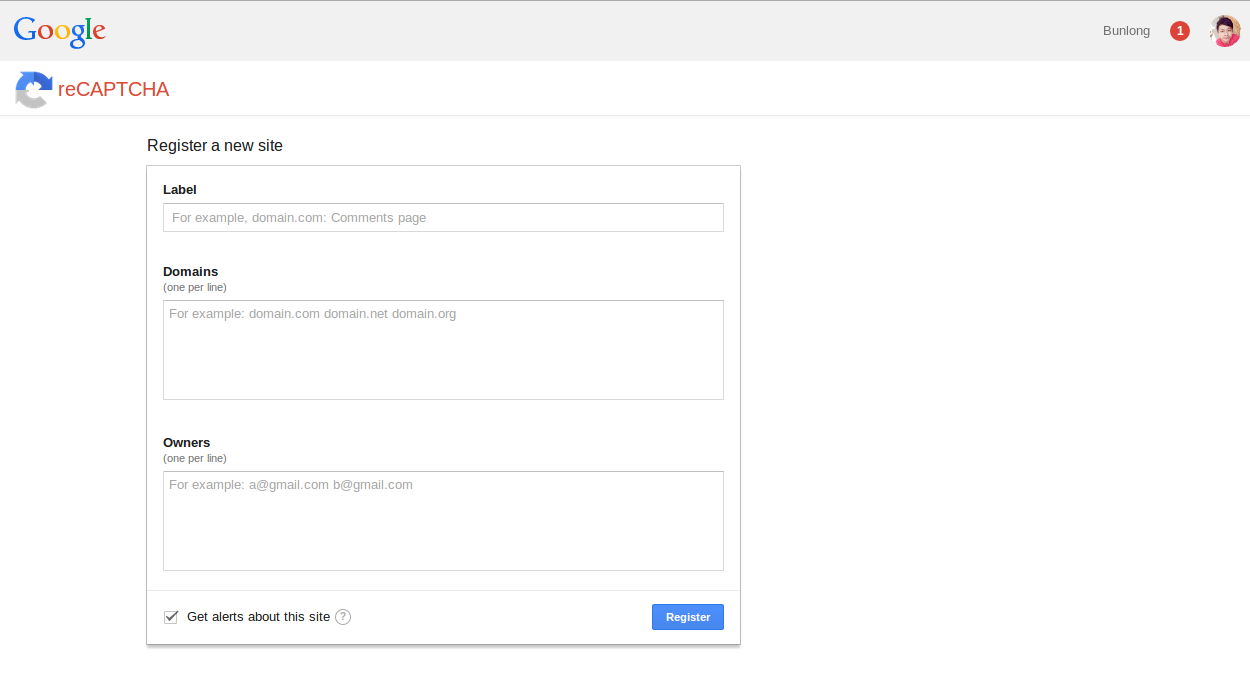
First, we need to create a reCAPTCHA account. Visit the reCAPTCHA website and click the button that says ‘Get reCAPTCHA’.
On the next screen enter your label, domain, owners and check the box that says ‘Get alerts about this site’ then click the ‘Register’ button.
Make sure you copy the public key and private key and save it somewhere, you will need this information when adding reCAPTCHA to your Rails application.
Setup Rails Application
Now we have an account, it’s time to set up our Ruby on Rails application. The first thing we will need to do is include the recaptcha gem in our Gemfile. Add the following lines to your gemfile. Note that the bcrypt-ruby gem is used for our example user signup form. You don’t have to include this in your application if you aren’t using it for user authentication.
Next create an initializer for recaptcha that will contain the public and private keys we mentioned earlier. Create a new initializer called recaptcha.rb and add the code listed below, make sure to modify it to contain your public and private keys.
config/initializers.rb
1234
Recaptcha.configuredo|config|config.public_key='Replace with your public key'config.private_key='Replace with your private key'end
Next create a model called User that we will use to test the reCAPTCHA functionality. Run the following commands to create the user model:
Next create a couple controllers that will handle our user input. The first controller, Home, will provide a simple landing page that contains a sign up link. The second controller, Users, will process the actual user signup request. Run the commands below to create the controllers.
Now edit our routes file to set up a few routes for the controllers we just created. Modify the routes file so that it looks like the code listed below, being sure not to overwrite your application name on the first line:
<h3>NewUserSignUp</h3><% if !@user.errors.empty? %> <ul> <% @user.errors.full_messages.each do |message| %> <li><%= message %></li><% end %> </ul><% end %><%= form_for User.new do |f| %><div><%= f.label :name %> <%=f.text_field:name%> </div><div><%= f.label :email %> <%=f.text_field:email%> </div><div><%= f.label :password %> <%=f.password_field:password%> </div><div><%= f.label :password_confirmation %> <%=f.password_field:password_confirmation%> </div><div><%= recaptcha_tags %> </div> <div> <%=f.submit"Sign Up"%> </div><% end %>
Most of the code is self explanatory, however, you’ll notice the recaptcha_tags method being called. This method is responsible for rendering the reCAPTCHA.
Next open up our users controller and add some code to handle the request. Modify your users controller so that it looks like the code listed below.
app/controllers/users_controller.rb
123456789101112131415161718
classUsersController<ApplicationControllerdefnew@user=User.newenddefcreatecaptcha_message="The data you entered for the CAPTCHA wasn't correct. Please try again"@user=User.new(user_params)if!verify_recaptcha(model:@user,message:captcha_message)||!@user.saverender"new"endendprivatedefuser_paramsparams.require(:user).permit(:name,:email,:password,:password_confirmation)endend
Almost done! Now lets open up our users/create view and add the following code.
app/views/users/create.html.erb
1234
<h3>ThankYou!</h3><p>Thanks for signing up!</p>
Now if you start a rails server and navigate to http://localhost:3000 we will see a sign up link. if you click on the sign up link you will be presented with a sign up form, complete with a captcha to fill out. You’ll notice that filling out the captcha wrongly results in a validation error message, and filling out the correct information allows the user signup to proceed.
HTML5 have many new features. One such feature is the new visibility API. This API allows you to easily detect your page is active, and in addition, you can perform specific events if it’s active. In this article we will show you how implement this feature in your application.
Visibility API
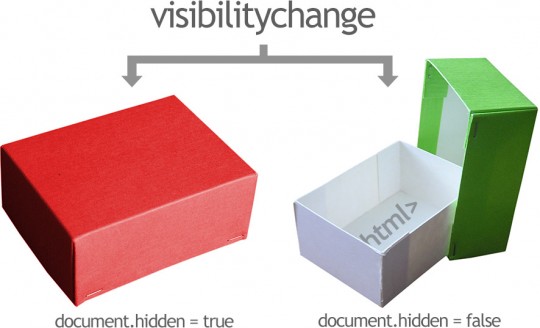
Without worrying about browser compatibility for the moment. There is an event called visibilitychange that gets fired every time window focus changes. In addition, there is a property called document.hidden that will tell your page is visible or not.
For example, the following script will change the document title based on your page is active or not:
Some browsers still require prefixing, such as the Android 4.4 browser. For these browsers, a bit more code is required.
We need some code to detect whether a prefixed version of the property. The code below does exactly that. It loops through each vendor prefix and sees if it is present in the document object. If so, it returns the correct prefixed version:
There are many services that allow you to add social network buttons to your website. The problem with these services is that they are free because they harvest traffic statistics from your site, track your visitors, and in general are a big nuisance. They also have the disadvantage of being slow to load.
In this article we will show you how to add social sharing buttons to your website via a gem called Social Share Button. Unlike most services, Social Share Button has buttons that are hosted locally on your site and don’t go through a third party service. As a result, they are quick to load and extremely customizable.
Setup Application
First we need to add the social-share-button gem to our Gemfile. Open up your Gemfile and add in the line listed below:
Gemfile
1
gem'social-share-button','~> 0.1.6'
Next, we need to run a bundle install to install the gem:
1
bundleinstall
Now we need to run the rails generate social_share_button:install command to install some additional configuration files that the Social Sharing Button gem uses to display the buttons on your site. This includes an initializer called social_share_button.rb in your initializers folder as well as some localization files:
1
railsgeneratesocial_share_button:install
Great, Next we need to do is create a simple Home controller in order to test the social sharing button functionality:
Great, now we need to add some javascript and CSS includes to make things work. Open up your application.js file and modify it so that it looks like the code listed below:
Excellent, now we can add the social sharing buttons to our site. Open up your homes/show view and modify it so that it looks like the code listed below:
app/views/homes/show.html.erb
1
<%=social_share_button_tag("My Site")%>
Great, now if we run rails server and visit http://localhost:3000, we will see the social sharing buttons. However, you’ll notice that there is a problem. About 15 or so buttons are listed, but we only care about a couple. Luckily we can easily resolve this. Open up the social_share_button initializer and modify it so that it looks like the code listed below:
Now if you restart your rails server, you’ll notice that the buttons have been limited to the sites listed above. Note that you can also specify a specific url if needed. Social Share Button detects the current URL by default, but there are times when you may want to customize this. You can do this like so:
1
<%= social_share_button_tag("My Home Page", :url =>"http://mysite.com/sample")%>
However, what if we want to customize the button look/feel? Luckily this is pretty easy. If you inspect the elements in chrome developer tools you’ll notice that they each have a unique css class. We can override this CSS class with our own code. For example, to modify the facebook button to look different, we’d use something like the following CSS (placed into our application.css file):
Options:
-s, –config-script=path Uses the specified mongrel config script.
-p, –port=port Runs Rails on the specified port. Default: 3000
-b, –binding=ip Binds Rails to the specified ip. Default: 0.0.0.0
-e, –environment=name Specifies the environment to run this server under (test/development/production). Default: development
Listen on any Interface
By default versions of Rails is localhost, this prevents users on your local network from accessing your network. You may not want to do this however. You may wish to share your development site with coworker so that they can review the site. Otherwise, you may wish to test the site on other devices such as a mobile device. Fortunately you can easily open the rails server up to all interfaces using the -b argument. Simple run the rails s command below:
1
railss-b0.0.0.0
Use a Different Port
Sometimes you want to use a port other than 3000 for your Rails server. For instance, maybe you need to run multiple Rails servers. You can easily do this with the -p argument:
1
railss-p3001
This command line tells rails to start the server on port 3001 instead of 3000.
Run in a Different Environment
You can start a rails server for another environment such as production or staging by using the -e argument along with the name of the environment you wish to start up in:
1
railss-eproduction
The code above starts the Rails server in the production environment. Very handy when you have custom environments or need to debug something.
What is Load Balancing?
Load balancing lets you spread load over multiple servers. You would want to do this if you were maxing out your CPU or disk IO or network capacity on a particular server.
Alternatives to load balancing include ‘scaling’ vertically. e.g. getting faster or better hardware such as quicker disks, a faster CPU or a fatter network pipe.
Implementing Load Balancing
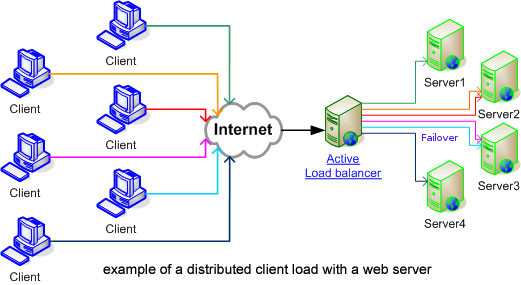
One simple way to implement load balancing is to split services between servers. e.g. running the web server on one server and the database server on another. This way is easy since there are no data replication issues. e.g. all necessary files are on the web servers, all necessary database data is on the database server.
Another common load balancing option is to have multiple front end servers. To distribute requests to multiple servers you could setup multiple IP addresses for a particular domain. Then clients should get all these addresses and to a random one. Spreading the load around.
Another way to distribute requests is to have a single virtual IP (VIP) that all clients use. And for the computer on that ‘virtual’ IP to forward the request to the real servers. eg with haproxy.
People can also implement load balancing via http balancers like mod_proxy_balancer in NGINX or Apache 2.2.
What is Failover?
The goal of failover is to allow work that would normally be done by one server to be done by another server should the regular one fail.
For example, Server A responds to all requests unless it has a hardware failure, or someone trips over its network cable, or the data center it is located in burns to the ground. And if Server A cannot respond to requests, then Server B can take over.
Or if you simply need a service to be highly available, failover allows you to perform maintenance on individual servers (nodes) without taking your service off-line.
For failover server B would ideally be in a separate data center, or if that wasn’t possible you would at least want to try and put it on a separate switch than Server A and on a separate power outlet as well. Basically the more physical separation the better.
For failover server B would ideally be in a separate data center, or if that wasn’t possible you would at least want to try and put it on a separate switch than Server A and on a separate power outlet as well. Basically the more physical separation the better.
Implementing Failover
To implement failover you typically need to have your data replicated across multiple machines. You could do this via rsync+cron for files/directories. And via something like MySQL replication for databases.
One way to trigger the failover is to change the IP address your domain points to. IP address changes can happen within a few minutes of a DNS server update. Though if a client PC is caching an IP then it may take a bit longer for that to notice the change.
What about Shared Storage?
In an ideal world you would have a file system that any server could read/write to and where that filesystem was located on disks spread across multiple servers and where any of those servers or disks could fail and that would not affect the file system’s availability.
In the real world to do this you need a clustered file system. That is a file system that knows it needs to co-ordinate any disk access between other servers in the cluster. To do that you need to have monitoring software (to check when a device goes down) as well as locking software (e.g. DLMs) that ensure that no two servers are writing to the same place, or that one server is not reading something that another server is in the middle of writing.
Google is working hard to improve search, and it’s doing such a great job that the general public doesn’t seem to be noticing. Google search operators help us to search faster, and you can use search operators and other punctuation to get more specific search results. Today we cover some of the basic search operators:
site:
Include “site:”” to search for information within a single website, this one in particular can be a godsend when trying to match styles, specific spellings or usages to a client with a website full of already published works.
Example: site:nbc.com
define:
Include a word or phrase immediately after the operator “define:”” to find the definition of said word or phrase, just like a dictionary.
Example: define:food
related:
Type a URL after “related:”” to be presented with a list of pages that Google considers to be related to the one you’ve entered.
Example: related:geekhmer.github.io
OR
If you want to search for pages that may have just one of several words, include OR (must be capitalized) between the words. Without the OR, your results would typically show only pages that match both terms.
Example: olympics location 2014 OR 2018
info:
Type a URL after “info:” to be presented with a short description of the site and a list links to other information related to the site in question.
Example: info:geekhmer.github.io
”” (double quotes)
Use double quotes to search for an exact word or set of words in a specific order, without normal improvements such as spelling corrections and synonyms. Extremely useful for searching for proper nouns, expressions and examples of usage, etc.
Example: "read a book written over 100 years ago"
* (asterisk)
Use an asterisk (*) within a query as a placeholder for any unknown or “wildcard” terms.
Example: Food * Translators
– (minus sign)
Add a dash (-) before a word to exclude all results that include that word. This is especially useful for synonyms like mountain lion the large cat species and mountain lion the Apple OS.
Example: mountain lion -apple
~ (tilde)
Normally, synonyms might replace some words in your original query. Add a tilde sign (~) immediately in front of a word to search for that word as well as even more synonyms.
Example: ~food facts
filetype:
Include “filetype:” to search for files of a specific type, such as PDFs.
Example: filetype:pdf chicago manual of style facsimile
.. (two periods)
Separate numbers by two periods (with no spaces) to see results that contain numbers in a given range of things like dates, prices, and measurements.
Example: paralympic gold medalists 1996..2012
allintitle:
Use “allintitle” to restrict a search so that all of the keywords must appear in the page title.
Example: allintitle: books for translators
allintext:
Use “allintitle” to restrict a search so that all of the keywords must appear within the body of the text on the page, rather than in any of the titles, etc.
Example: allintext: signs and symptoms of translators dementia
time:
Promised a client that you’ll have a finished piece of work with them before 3pm? Is that 3pm in their country or yours? What time is it in their country now? Or what time is it in your country for that matter? 4am? …isn’t it about time you went to bed?
Example: time:Phnom Penh
1. Higher Pay
By knowing how to design and code, you’ll be worth more to companies. Especially startups! By not only knowing how to design a beautiful UI element, but also implement what you design, you’ll be able work faster and create better work. All of which makes you more valuable and able to demand a higher salary.
2. More Opportunities
Not only will you make more money, but you won’t have a problem getting a job. Your skill set is so rare that everyone will be trying to snatch you up! Startups especially, because they have smaller teams and less resources, a employee who is able to do more than one thing (design and code) is almost a must. Everyone will be fighting over you!
3. Start Your Own Company
One of the reasons these designer/developer combos (Unicorns) are so rare is because they’re usually busy starting their own companies. When you have the knowledge to not only develop a application, but also make it beautiful, you have everything (almost) you need to launch any idea you have!
4. Freedom
There is an incredible freedom that comes from not having to rely on someone else to take care of a part of your project. You can allow someone else to do the design, or the development, but by being able to design & code you have the ability to do it yourself. Freedom!
5. Build from Start to Finish
By knowing how to do both the design and the development of a project, you have the ability to take an idea from concept to completion all by yourself. This also gives you greater control over the outcome of the project because you make every decision. This brings me to my next point:
6. Experimentation
Since you can build both sides of any given project, you won’t need to hire someone else to do either the design or the development. This means it won’t cost you thousands of dollars, or a percentage of your project or company ownership, just to validate the idea. Putting a project out and seeing if it gains any traction costs nothing more than your time… Which of course means you can put out more work! It’s experimentation without the risk.
7. Work More Efficiently
Design & code go hand in hand. They’re so tightly integrated that it’s important to know what is possible on both sides. By knowing how to design & how to code you can make smart decision about one side that would later effect the other.
8. Higher Quality of Work
There are so many decisions that are made between the initial concept and launch. It’s very easy for things to get lost in the communication between the designer and the developer. By knowing how to design and code you can make smart decisions for both sides as you work, leading to a higher quality end product.
9. Work Better on a Team
As I mentioned in the previous point, you’ll know what both sides need. This means when you are working with another designer or another developer, you can avoid making decisions that will negatively affect the other side. For example, a designer creating a UI element that he/she thinks (wrongly assuming) will be simple to implement, but not fully understanding the effort it will take to create it. (I did this when I was only a designer… I designed something assuming it wouldn’t be too much work only to find out from he developer it was very complicated. All of which could have been avoided if I understood what it took to do the development).
10. Make a Better Leader
So not only will you make a great team member, but you’ll also make a great team leader. You’ll have the understanding and empathy you need because you know what is required to do this work. You know if a project timeline could happen quicker, but you also know if the deadline is unrealistic because you’ve been there.
AngularJS is an extremely popular JavaScript library that enables you to quickly and easily create rich web applications. In this article we will show you how to integrate AngularJS with your Rails app. We will also build a simple AngularJS application called VisitorsCenter. The VisitorsCenter application allows the user to track visitors that are coming and going from a building such as an office building.
Setup Rails Application
Before we begin, we will need to add a couple gems to our Gemfile. The angularJs-rails gem provides integration with the AngularJS library and our Rails application. The bootstrap-sass gem merely adds bootstrap support so we can focus on the code rather than the style of the app. Add these gems to your gemfile now as listed below.
Next, we need to create a model called Visitor. The Visitor model will represent a visitor that visits. Run the command below to create the visitor model now:
Great, now we need to create a Visitors controller that will give us a way to interact with our model. The Visitors controller will have 3 different actions in this example application. The first action, index will return either the visitors page or a json list of visitors depending on how it is accessed. The second action, create will be responsible for creating the visitor. The final action, destroy will destroy the visitor. Run the command below to create this controller now:
1
railsgcontrollerVisitorsindexcreatedestroy
Now let’s modify our routes file to set up the proper paths and add a site root. Open up your routes file and modify it so that it looks like the code listed below:
The code fragment that says defaults: {format: :json} tells Rails that we wish to return json by default for our actions. We do this because most of the interaction in our application will be via JSON.
By default, AngularJS knows nothing of the cross site request forgery (CSRF) protections in our applications. We need a way to tell AngularJS how to interact with our application while obeying the CSRF protections that we have in place. Luckily we have a way to do this. Open up your ApplicationController and add in the code listed below.
If you are using Rails 4.2 and up, use the code below:
The code listed above will create a cookie called XSRF-TOKEN that will contain our form_authenticity_token. Any time a request is made, AngularJS will present that token in the HTTP headers for the request.
Now let’s modify our VisitorsController to allow for access to the Visitor model. Open up your VisitorsController and modify it so that it looks like the code listed below:
The code above is typical Rails code, with the exception being that we return JSON as a result. Since our application will be communicating primarily via AJAX we have no need for HTML other than the index action, which will return either html or json depending on the request type.
Next we need to add support for both AngularJS and Bootstrap to our application.js file. Open up your application.js file and modify it so that it looks like the code listed below.
In the code above we add support for AngularJS as well as Bootstrap. We also add support for a library called angular-resource which allows us to easily talk to our Rails application.
Now let’s add a bit of CSS for bootstrap. Create a new file called bootstrap_config.scss and add in the code listed below:
bootstrap_config.scss
12
@import"bootstrap-sprockets";@import"bootstrap";
The next thing we need to do is create our AngularJS application. AngularJS applications typically consists of JavaScript code that glues together various bits of HTML. To get started doing this, the first thing we must do is rename our visitors.js.coffee file to visitors.js and modify it so that it looks like the code listed below. You can also rewrite this in CoffeeScript, but I use JavaScript for those that haven’t yet learned CoffeeScript.
defines an AngularJS module. AngularJS modules can be thought of as individual components in your application. You’ll notice we include ngResource as an argument. ngResource provides easy access to RESTful resources such as our Rails application.
define a controller. Controllers tell AngularJS how to interact with our application similar to how Rails controllers are used to tell Rails how our views interact with our models.
ow that we’ve written the JavaScript application, we need to create our view to tie everything together. Open up the index view for your Visitors controller and modify it so that it looks like the code listed below:
The outer div on the first line has an attribute called ng-app. The ng-app attribute tells AngularJS that this is part of our AngularJS application. In this case we specify the name of our AngularJS module, VisitorCenter.
123
<divng-controller="visitorsController">...</div>
The next inner div contains an attribute called ng-controller. This attribute tells AngularJS that we wish to use our visitorsController as the controller for this portion of the application.
The ng-submit attribute on our form tells AngularJS that we wish to use the addVisitor() method on our controller to process the form request. Each of the input elements contain an ng-model attribute. This attribute maps the input elements to our model.
The ng-show attribute on the first row tells AngularJS that we only want to show the row if the condition mentioned is matched. In this case we only want to show the first row if there are no visitors.
123
<trng-repeat="visitor in visitors">...</tr>
The ng-repeat attribute is a loop. This particular loop tells AngularJS that we want to loop through each visitor.
The ng-click button tells AngularJS to run the specified controller function when the html tag in question is clicked. In this case we run the code to delete the specified user.
So far so good, That’s it!!! for this introduction to AngularJS and Rails. See ya!!! :)
In Ruby and many other languages, you write private methods to implement internal logic you don’t want to expose. You want the freedom to rename, repurpose or even delete them without worrying about impacting anything else. The private keyword signals other developers: Don’t rely on this; don’t call it; it might change. This is especially important when writing framework or library code that many other developers will use.
But which methods should you make private? Sometimes this is obvious; sometimes it isn’t. A good rule of thumb to use is: If you’re not testing a method, it should be private.
But wait a minute! Aren’t we supposed to test everything? Isn’t 100% code coverage the every Ruby developer seeks? Let me clarify. You should mark methods private when you test them indirectly by calling the other, public methods in the same class. Use the private keyword to help organize your code, to remind yourself what you still need to test, and what you don’t.
Three Paintings
A simple example will make this clear. Suppose I have a class that describes a painting:
1
Painting=Struct.new(:name,:year)
Now I can create a list of three paintings in a Minitest::Spec file like this:
1234
let(:one){Painting.new("Spanish Couple In Front Of Inn",1900)}let(:two){Painting.new("Guernica",1937)}let(:three){Painting.new("Petite Fleurs",1958)}let(:paintings){[one,two,three]}
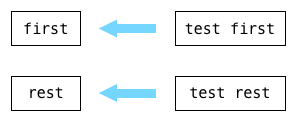
Suppose my first requirement is to return the first painting from the list. Simple enough:
123
deffirst(list)list.firstend
123
it"should return the first element"dofirst(paintings).must_equaloneend
I just call Array#first and I’m done. Returning the rest of the list is slightly more interesting:
1234
defrest(list)_,*rest=listrestend
123
it"returns the rest of the elements"dorest(paintings).must_equal[two,three]end
Rest always returns an array even if the input list was empty or had only one element. So far, so good. I’ve written two methods and two tests:
A New Requirement
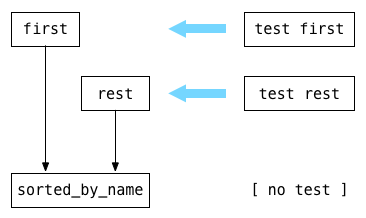
Now suppose my business requirement changes slightly and I instead need to return the first painting sorted alphabetically by name. Once again, it’s not hard to do:
it"returns the element with the first name"dofirst(paintings).name.must_equal"Guernica"endit"returns the rest after the first name"dorest(paintings).map(&:name).must_equal["Petite Fleurs","Spanish Couple In Front Of Inn"]end
Here I’ve simply moved the call to sort into a utility method called sorted_by_name. Now first and rest both call sorted_by_name, making the code a bit clearer and DRY-er. But now I have three methods and only two tests:
Mark Methods Private When You Don’t Test Them
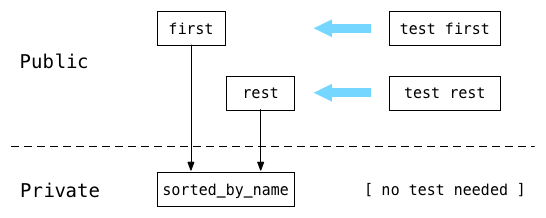
Notice I didn’t bother writing a test for sorted_by_name. I know it works because my other tests still pass. The existing tests are sufficient; I am testing sorted_by_name indirectly. Because I extracted sorted_by_name from first and rest, because I refactored my code without adding any new behavior, no new test were required.
In this scenario, take the time to mark the new, untested method as private:
it"returns the element with the first name"dofirst(paintings).name.must_equal"Guernica"endit"returns the rest after the first name"dorest(paintings).map(&:name).must_equal["Petite Fleurs","Spanish Couple In Front Of Inn"]end
The private keyword here reminds me I’ve already tested sorted_by_name, that I don’t need to write new tests for it. Now private is helping me organize my code; it’s helping me remember which methods I don’t need to test… and which methods are missing important tests.
f my tests don’t need to know about sorted_by_name, then certainly other developers don’t. It should be private. Marking it private reminds me that it is being tested indirectly, that I didn’t just forget to write a test for it. Marking it private tells other developers about what I’ve learned from my own test suite.