Use Message Queue in Rails

Use Message Queue in Rails

This article describes the application architecture pattern which is (in general) nothing new, but (from my experience) rarely applied in the Rails world. I’m talking about the nice and simple abstraction – message queue. But let me start by describing the goals I want to achieve and some alternative solutions.

Goals

Split application into a few smaller applications
Smaller applications are easier to reason about. You don’t have to go through 50 classes, you can just read 10, because it’s all you’ve got. When a new developer joins the team he has nice onboarding if you can tell him: “hey, start with this small piece of code, everything you need to know to implement this new feature is encapsulated here”.

Separate code for concepts which are not logically connected
Smaller applications are easier to reason about. You don’t have to go through 50 classes, you can just read 10, because it’s all you’ve got. When a new developer joins the team he has nice onboarding if you can tell him: “hey, start with this small piece of code, everything you need to know to implement this new feature is encapsulated here”.

Use new languages and frameworks
We, developers, want to try and learn new languages, libraries, frameworks and technologies. If you make a small application with a shiny new tool and fail – the consequences are less severe, because you can quickly rewrite this small application. If you are going to make one big application, you will think twice before introducing a new tool. So, in some way, smaller applications minimize the risk.

Solution1 - One database, multiple apps

This is the very first idea which may come to your mind – just point multiple applications to the one shared database. Been there, done that, won’t do that again! Data is associated with validation logic. Either you duplicate this logic in every app or you extract it to Rails engine gem. Both solutions are hard to maintain (think about running migrations…) and you still have strong coupling in your system.

One case when this approach may work – one read-write app and many read-only apps, but I haven’t tried it.

Solution2 - Expose REST API

As Rails devs we are pretty familiar with REST, so we can expose REST API in one of our apps and call this API in the other. This approach has many solid use cases so here I’m just listing some weak points to take into consideration:

- Usually requests in Ruby are blocking – calling app has to wait for the response even if it’s not interested in it.
- Requires authentication – we have to somehow ensure that our internal API is not used… well, externally.
- Everything happens in server process – if you are calling your internal API you may end up using the same server process which is used for handling requests of your “real users”. You would like to give your “real users” priority.
- Calling app has knowledge about receiving app – you have to know which endpoints should be called and which parameters be passed. This introduces coupling.

Solution3 - Message queue

Message queue is a really nice abstraction. Publisher just leaves messages at one end of the “pipe”, consumer reads messages from the other end of the “pipe”. It is asynchronous, because publisher does not wait for his message to be processed. Moreover, it decouples publisher from consumer, because publisher does not care what happens with his message and who will read it.

This architecture is also resistant to outages, at least when we assume that the queue service rarely breaks. If the consumer is not processing messages, nothing prevents publisher from adding more of them to the queue. When consumer starts to function again, it will process messages from the buffer (if they didn’t take all of your memory).

When it shines?

Message queue is really useful if we have some processing which happens out of the main business flow and the main business flow does not have to wait for the results of this processing. The most common example is custom event tracking – own analytics module. We just publish an event and continue execution without slowing anything down.

RabbitMQ

RabbitMQ is a popular choice for message queue service, especially in Rails world. Honestly, I haven’t tried different implementations, because RabbitMQ really has everything I need.

There are Ruby gems for communicating with RabbitMQ and it’s also easy to install and configure.

Use Message Queue in Rails

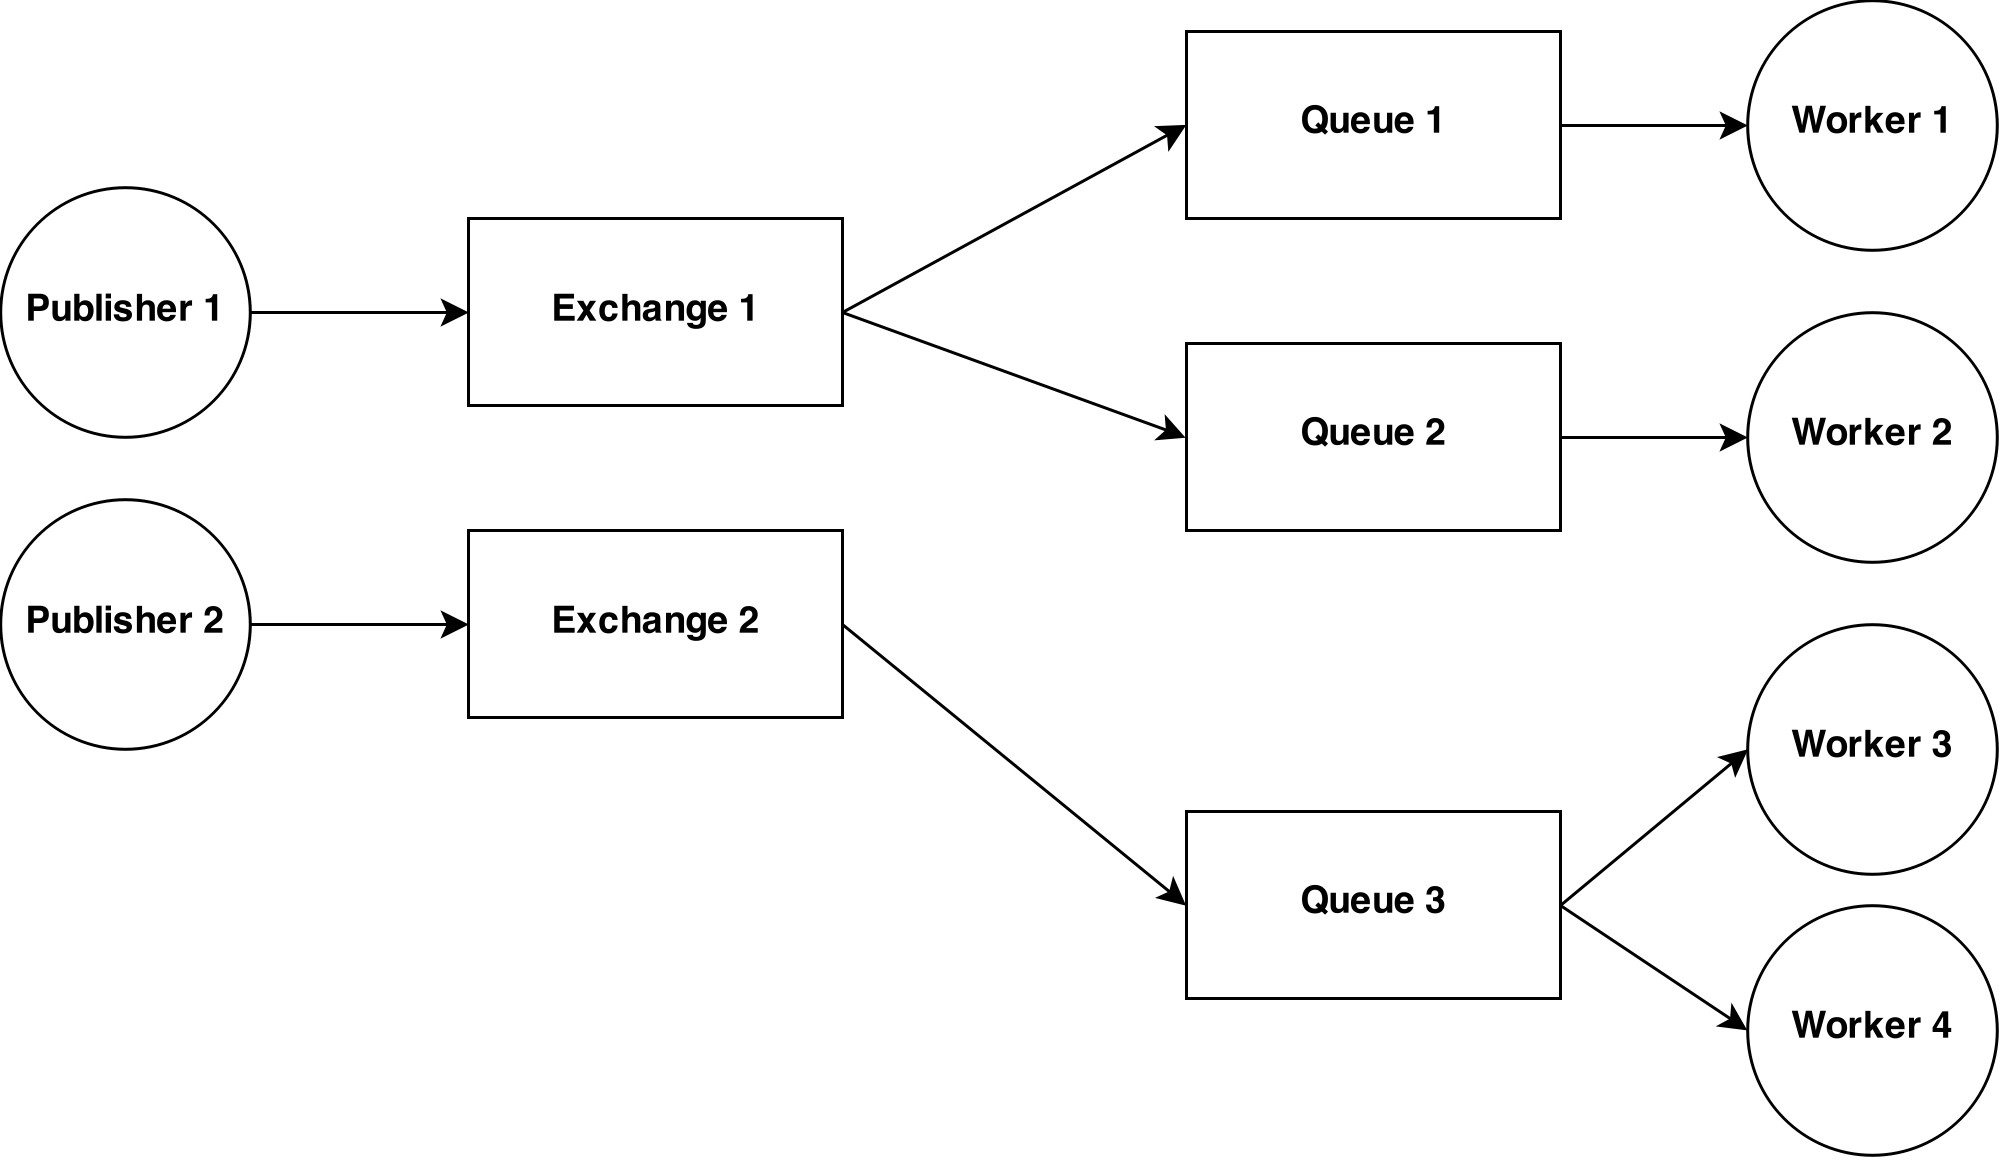
In this diagram there are presented some concepts introduced by RabbitMQ. Publisher leaves messages in the exchange. Then they are routed from the exchange to multiple queues. There are many routing algorithms available – https://www.rabbitmq.com/tutorials/amqp-concepts.html#exchanges

Workers grab messages from queue. If there are multiple workers connected to one queue, they will be load balanced and the message will be delivered only to one of them.

Easy case

If you feel overwhelmed – don’t worry. Here is what you should start with:
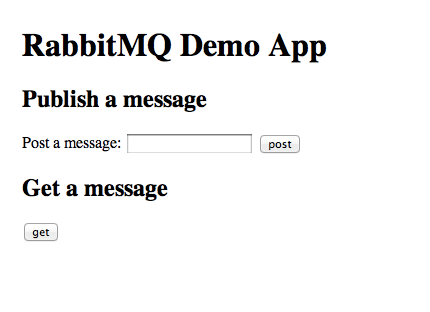
Use Message Queue in Rails

Publishing

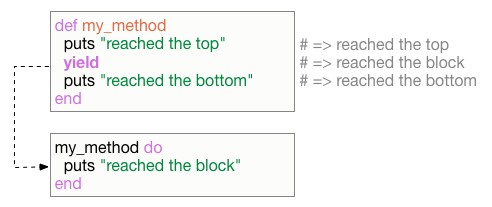
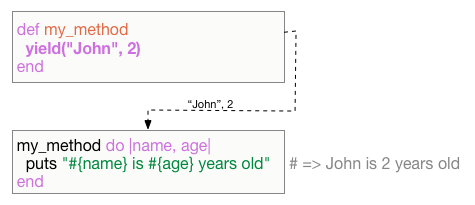
Now it’s time for some code. It’s really simple, because integration with RabbitMQ is simple. We will use two gems – bunny and sneakers.

1
2
3
4
5
6
7
8
9
10
11
12
13
14
15
16
17
18
19
20
21
22
23
# Gemfile
gem 'bunny'

# an initializer
connection = Bunny.new(host: 'localhost')
connection.start
channel = connection.create_channel

# a service
class RabbitPublisher

  def initialize(channel)
    self.channel = channel
  end

  def publish(exchange_name, message)
    exchange = channel.fanout(exchange_name, durable: true)
    exchange.publish(message.to_json)
  end

  private
  attr_accessor :channel
end

Receiving

1
2
3
4
5
6
7
8
9
10
11
12
13
14
15
16
17
18
19
20
21
22
# Gemfile
gem 'sneakers'

# an initializer
Sneakers.configure  daemonize: true,
                    amqp: "amqp://localhost",
                    log: "log/sneakers.log",
                    pid_path: "tmp/pids/sneakers.pid",
                    threads: 1,
                    workers: 1

# app/workers/events_worker.rb
class EventsWorker
  include Sneakers::Worker
  from_queue "events", env: nil

  def work(raw_event)
    event_params = JSON.parse(raw_event)
    SomeWiseService.build.call(event_params)
    ack!
  end
end

For details refer to documentation of bunny and sneakers.

If you enjoyed this article you can consider ping me for more details.

So far so good, That’s it!!! See ya!!! :)

Ajax on Rails

Ajax on Rails

This is a tutorial for ajax use with Rails conventions. For illustrative purposes, we’ll build a single-page Product list app.

About Ajax
Ajax (Asynchronous JavaScript and XML) is used as a mechanism for sending and retrieving data asynchronously (in the background). While XML can certainly be used with ajax, it is not limited to this format. The JSON format, for example, is more commonly used today, especially in the Rails community. There are significant advantages in using Ajax, which include better user interactivity. Ajax allows content on a page to be updated without having to re-render the entire page, making it a “seamless” experience.

Create a New Product on the Index Page
Before we start, let’s take a quick look at our schema so that we know what we’re working with:

1
2
3
4
5
6
7
8
ActiveRecord::Schema.define(version: 20140620130316) do
  create_table "products", force: true do |t|
    t.datetime "created_at",  null: false
    t.datetime "updated_at",  null: false
    t.string   "name",        null: false
    t.string   "description", null: false
  end
end

After creating a Product model and then create some products to play with, our Product Controller should look like this:

products_controller.rb
1
2
3
4
5
class ProductsController < ApplicationController
  def index
    @products = Product.all
  end
end

Instead of creating new.html.erb, let’s add a button somewhere on our index.html.erb that users can use to display a hidden form:

index.html.erb
1
2
3
4
5
...

<%= link_to 'New Product', new_product_path, remote: true %>

...

Here we pass the remote: true option to disable the default Rails mechanism that would have otherwise navigated us to /products/new.

Before moving on, let’s quickly revisit our Product Controller and set it up to create new products with ajax:

products_controller.rb
1
2
3
4
5
6
7
8
9
10
11
12
13
14
15
16
17
18
19
20
21
22
class ProductsController < ApplicationController
  before_action :all_product, only: [:index, :create]

  # index action has been removed

  def new
    @product = Product.new
  end

  def create
    @product  = Product.create(product_params)
  end

  private
  def all_products
    @products = Product.all
  end

  def product_params
    params.require(:product).permit(:name, :description)
  end
end

I have removed the index action because I created a before_action filter that creates the @products instance variable for us automatically. Because we no longer have any logic in our index action, it is not necessary. Rails will automatically render the correct template, even without the presence of the action.

Noteworthy here is the respond_to method invoked near the top that will allow us to render both html and javascript responses with all of our controller actions. The respond_to method provides the ability to respond to the requests with many formats(i.e. csv, xml, etc…). This can be done for one or all actions in a controller. If we wanted to provide json only in our index action, we would write something like this:

1
2
3
4
5
6
7
8
def index
  @products = Product.all

  respond_to do |format|
    format.html
    format.json
  end
end

Now, choose a place on the index page to hide your form by passing a style attribute with the following:

index.html.erb
1
2
3
4
5
...

<div id="product-form" style="display:none;"></div>

...

which will hide our form when the page is initially visited.

Next, create new.js.erb:

new.js.erb
1
2
$('#product-form').html("<%= j (render 'form') %>");
$('#product-form').slideDown(350);

This is just an ERB template that generates Javascript instead of the HTML we’re used to. It basically translates to: “Find the element with an id attribute of product-form and at that point render the html in the form partial.” We typically do this in new.html.erb with:

new.html.erb
1
<%= render 'form' %>

Since render is a Rails method, JavaScript doesn’t understand it and it has to be interpreted with ERB. The ‘j’ is syntactic sugar for <%= escape_javascript (render ‘form’) %>

_form.html.erb
1
2
3
4
5
<%= simple_form_for @product, remote: true do |f| %>
  <%= f.input  :description %>
  <%= f.input  :deadline %>
  <%= f.button :submit %>
<% end %>

This is the ‘form’ being rendered in new.js.erb with a remote: true option being passed in. In our form partial, we also pass the remote: true option that will execute an ajax POST request.

Finally, we can wrap things up by rendering our new Product list and hiding our form. This final step includes identifying where to render our list. Using the rai-jax app as an example, let’s look at what our final index.html.erb should look like at this stage:

index.html.erb
1
2
3
4
5
6
7
8
9
10
11
12
13
14
15
16
17
18
19
<div class="row">
  <div class="col-md-5 col-md-offset-1">
    <h2>Products</h2>
  </div>

  <div class="col-md-2 col-md-offset-4">
    <%= link_to new_product_path, remote: true do %>
      <button class="btn btn-default">New</button>
    <% end %>
  </div>
</div>

<div class="row">
  <div class="col-md-6 col-md-offset-2" id="product-form" style="display:none;"></div>
</div>

<div class="row">
  <div class="col-md-7 col-md-offset-1" id="products"><%= render @products %></div>
</div>

And we update our product list and hide our form with create.js.erb:

create.js.erb
1
2
$('#products').html("<%= j (render @products) %>");
$('#product-form').slideUp(350);

Update a Product on the Index Page
As in Part One, let’s start by visiting our Product Controller and setting it up for updates:

products_controller.rb
1
2
3
4
5
6
7
8
9
10
11
12
13
14
15
16
17
18
19
20
21
22
23
class ProductsController < ApplicationController
  before_action :all_products, only: [:index, :create, :update]
  before_action :set_products, only: [:edit, :update]

  ...

  def update
    @product.update_attributes(product_params)
  end

  ...

  private
  ...

  def set_products
    @product = Product.find(params[:id])
  end

  def product_params
    params.require(:product).permit(:name, :description)
  end
end

Similar to Part One, we add an edit button with a remote: true option:

_product.html.erb
1
2
3
4
5
6
7
...

  <%= link_to edit_product_path(product), remote: true do %>
    <button>Edit</button>
  <% end %>


And, finally, our edit.js.erb and update.js.erb are the same as our new and update templates: edit.js.erb corresponds to new.js.erb and create.js.erb corresponds to update.js.erb.

Delete a Product on the Index Page
Our final updates to our Product Controller involves us providing the destroy action:

product_controller.rb
1
2
3
4
5
6
7
8
9
10
class ProductsController < ApplicationController
  before_action :all_products, only: [:index, :create, :update, :destroy]
  before_action :set_products, only: [:edit, :update, :destroy]

  ...

  def destroy
    @product.destroy
  end
end

When adding our delete button, two additional steps are required:

_product.html.erb
1
2
3
4
5
6
7
...

<%= link_to product, remote: true, method: :delete,  data: { confirm: 'Are you sure?' } do %>
  <button>Delete!</button>
<% end %>


First, we pass in a method: :delete option; Second, we provide a courtesy confirmation to the user making sure they don’t delete anything by accident.

The last file we’ll create is destroy.js.erb and it will contain one line:

destroy.js.erb
1
$('#products').html("<%= j (render @products) %>");

Seriously, Rails makes ajax easy. As I mentioned above.

So far so good, That’s it!!! See ya!!! :)

The 10 Best Project Management Tools for Freelancers

You just heard back from your Client No 1: He likes your pitch and wants a first draft within seven days. Client No 2 just sent you his comments on your piece and would like to see revisions by Friday. Client No 3 needs an invoice for the projects you’ve already completed this month. Meanwhile, you’re waiting on checks from Client Nos 4, 5, and 6. Oh, and you’re still putting together some ideas for Client No 7.

Sound familiar?

The nature of freelancing means you’re constantly juggling projects in different stages of completion. And you have to be keenly away of letting any accidentally drop because your reputation depends on meeting your deadlines, while your livelihood depends on making sure you get paid.

Luckily, there are some great online tools out there that’ll allow you to carefully track the progress of every project on your docket. Check out my top 10.

Asana


Not only does Asana’s clean, simple layout make it incredibly easy on the eyes, it also makes using and mastering this app a breeze. When you create a project, which can be broken down into sub-tasks with individual deadlines, it’s really easy to monitor exactly what you’ve done and what still needs to be taken care of.

I suggest making every assignment a separate project and using Asana’s “Highlight” feature to color-code them based on the client. Then, you can outline everything that needs to happen from pitching to getting paid.

Asana also allows you to upload attachments and share your projects with other people—meaning you can loop in your clients or collaborators depending on the situation.

Trello


Trello is a good choice if you handle a lot of recurring projects for different clients or if you’re a very visual thinker. Its basic organizational tool is the “board”. Each board is separated into lists, and each list is composed of one or more “cards”, which represent separate tasks.

I recommend making a different board for every client. Then, depending on how each client handles submission and payment, you can make individualized lists for each step of the process. Maybe your first list is “Pitched”, your next list is “Approved”, and so on until a list for “Paid.”

Once you’ve made a card for each task you need to complete, you can give it a deadline, add an attachment, choose labels, make a checklist, write notes, and even share it with other Trello users.

Wrike


At first, Wrike seems pretty similar to Asana and Trello: You set up folders, create tasks, and assign task deadlines. However, Wrike has a few unique features really set it apart.

First, it automatically tracks how much time you spend on each task, which is really helpful if you charge by the hour or need to see how long a project is taking. Second, it lets you create and share your project schedule. Once you’ve planned out a project, all you have to do is click the “Share timeline” button, and Wrike will send snapshots of your schedule to anyone you want, even if they don’t have a Wrike account. And third, Wrike integrates with a bunch of third-party apps, like Chrome, your email, cloud storage, and iCal.

Solo


Solo belongs on this list because it was specifically designed for freelancers. In addition to creating projects and setting due dates, you can also create a client roster, which analyzes how many returning clients you have, what sectors they’re in, and how profitable you are working with them. You can easily see which clients are your most valuable while also keeping track of basic contact info like phone numbers and emails.

This is also cool: When you can make invoices in the app, the software tracks which clients have paid you, which clients have overdue payments, and which clients you still need to bill.

Solo also comes with a “Quotes” feature that logs how many quotes you’ve sent out and tracks how many have been accepted.

WunderList


This tool is definitely the way to go if you want a quick and easy way to keep all your assignments organized. You start out on Wunderlist by making folders—I give each client their own—then adding “to-dos.” The program offers reminders in addition to deadlines. The reminder feature is super helpful—for example, maybe you need to interview someone for a story in the next eight days, so you can easily add a reminder at the four-day mark.

Plus, Wunderlist pulls to-dos from emails. Let’s say you get a message from a client asking for revisions; just forward it to Wunderlist, and “make revisions on X article” will become a task.

Podio


When it comes to personalization, most project management tools are fairly limited—you can adjust names and color-code, but that’s pretty much it. Not so with Podio, which lets you completely control the design of each project outline.

You can add endless fields to each, from links or numbers to text boxes, categories, and even maps. So if your typical assignments are pretty detailed and complex (or you just want an app that gives you lots of customization power), Podio is worth checking out.

You can also make project templates, which comes in handy if your freelance process can be replicated. Let’s say you write a similar set of articles every month for the same magazine; rather than creating a new project each time, you can use the template option to clone the first one and reuse it in the future.

RedBooth


Thanks to its email and desktop notifications, Redbooth is ideal for people juggling a lot of deadlines. Suppose you’ve created a task like “Turn in website copy for approval” and set the deadline for August 14. If you haven’t marked the task as completed by that day, Redbooth will either ping you on your browser, send you an email, or both. In other words, you’ll never miss a deadline because of forgetfulness.

There’s also a useful “Reporting” section. This tab will show you when you’re finishing tasks, from “early” to “more than 1 week,” and record all your activity from the past seven days.

Flow


Want a project management tool that’s functional without all the bells and whistles? Go with Flow. It has all the basic functionality of the others (separate workspaces for separate projects, project and task creation, work history, etc.), but without some of the busy interfaces. In fact, its design is nearly Mac-like in its minimalism and friendliness for new users.

In addition to the computer-based platform, you can also use Flow’s iPhone and Android apps. Plus, the software also comes in a specific version for Macs so you don’t have to go through the brief hassle of opening Flow in your Internet browser.

Quire


Quire’s setup is pretty traditional: You’ve got projects composed of tasks that can be drilled down into sub-tasks. Furthermore, you can set due dates, add tags, and track your progress.

However, Quire has a few qualities stands out. It has a ton of keyboard shortcuts, which means after a week or two of using the platform, you’ll be navigating really quickly. Also, you can make individual projects viewable by URL—so if you have a client who wants to know exactly what the status is for an assignment, you can conveniently share the project specs. This feature can also be helpful if the project scope expands and you’d like to renegotiate your price.

And if you like looking at physical to-do lists, rather than virtual ones, Quire automatically formats your tasks for printing.

TaskBoard


Unlike the other tools above, Taskboard is a completely free, open-source project. You don’t make an account to access Taskboard; you just download it.

My favorite Taskboard feature is the “automatic option.” When specific criteria are met, items will automatically update. For example, you can tell Taskboard to clear the deadline if you mark a task as complete before its deadline. The automation saves you from having to constantly fiddle with all the different details to keep your board clean.

Taskboard’s Markdown compatibility makes it even simpler to use. (If you’ve never heard of Markdown, it’s a plain text style that converts to HTML and saves you tons of time formatting your work) Thanks to this feature, you can seamlessly transition your comments, notes, and reminders from documents to Taskboard to a website, and back again.

So far go good, That’s it!!! See ya!!! :)

Is Ruby Interpreted or Compiled?

Ever since I started to work with Ruby in 2012, I’ve always assumed that it was an interpreted language like PHP or Javascript – in other words, that Ruby read in, parsed and executed my code all at runtime, at the moment my program was run. This seemed especially obvious since the default and most popular implementation of Ruby is called “MRI,” short for “Matz’s Ruby Interpreter.” I always thought it was necessary to use an interpreter to make all of the dynamic features of the language possible.

However, it turns out that both JRuby and Rubinius, two other popular implementations of Ruby, support using a compiler the same way you would with a statically typed language like C or Java. Both JRuby and Rubinius first compile your Ruby code to byte code into machine language, and later execute it.

Today I’m going to show you how to use these Ruby compilers, and I’ll also take a peek under the hood to see what they produce internally. Possibly you’ll rethink some of your assumptions about how Ruby works along the way.

Use the Rubinius Compiler
Using the Rubinius compiler is as simple as running any Ruby script. Here’s a very silly but simple Ruby program I’ll use as an example today:

1
2
3
4
5
6
7
class Adder
  def add_two(x)
    x+2
  end
end

puts Adder.new.add_two(3)

Now if I save that into a file called “simple.rb,” switch to Rubinius using RVM, and run the script I’ll get the number “5” as expected:

1
2
3
$ rvm rbx-1.2.4-20110705
$ ruby simple.rb
5

Not very interesting, I know. But what is interesting is that when I ran simple.rb Rubinius created a new, hidden directory called “.rbx” with a strange, cryptically named file in it:

1
2
3
4
5
6
$ ls -a
.         ..        .rbx      simple.rb
$ find .rbx
.rbx
.rbx/a7
.rbx/a7/a7fc1eb2edc84efed8db760d37bee43753483f41

This vaguely reminds me of how git saves the git repository data in a hidden folder called “.git,” also using cryptic hexadecimal names. What we are looking at here is a compiled version of simple.rb: the “a7fc1eb2e…” file contains my Ruby code converted into Rubinius byte code.

Whenever you run a Ruby script, Rubinius uses a two step process to compile and run your code:

On the top you can see that first Rubinius compiles your code into byte code, and then below later executes it using the Rubinius Virtual Machine, which can compile the byte code into native machine language. Rubinius also caches the byte code using the hexadecimal naming scheme I showed above, avoiding the need for the compile step entirely if the Ruby source code file didn’t change.

You can actually run the Rubinius compiler directly like this:

1
$ rbx compile simple.rb -o simple.bytecode

This compiles my Ruby code and saves the byte code in the specified file. If we look at the simple.bytecode file, we’ll see a series of alphanumeric tokens that don’t make any sense. But if you run the compiler using the “-B” option you can see an annotated version of the Rubinius byte code:

1
2
3
4
5
6
7
8
9
10
11
12
13
14
15
16
17
18
19
20
21
22
23
24
25
26
27
28
29
$ rbx compile simple.rb -o simple.bytecode -B
============= :__script__ ==============
Arguments:   0 required, 0 post, 0 total
Arity:       0
Locals:      0
Stack size:  6
Lines to IP: 1: 0..26, 7: 27..63

0000:  push_rubinius
0001:  push_literal               :Adder
0003:  push_nil
0004:  push_scope
0005:  send_stack                 :open_class, 3

... etc ...

=============== :add_two ===============
Arguments:   1 required, 0 post, 1 total
Arity:       1
Locals:      1: x
Stack size:  3
Lines to IP: 2: -1..-1, 3: 0..5

0000:  push_local                 0    # x
0002:  meta_push_2
0003:  meta_send_op_plus          :+
0005:  ret

... etc ...

At the bottom here we can see the compiled version of my silly add_two method. It’s actually somewhat easy to understand the byte code, since it’s annotated so well:

- First “push_local” saves the value of the “x” parameter on the virtual machine stack.
- Then it pushes the literal value 2.
- Then it executes the + operation.
- And finally it returns.

The Rubinius virtual machine reminds me of those old “reverse polish” calculators from the 1980s, in which you would enter values on a stack in a similar way. The Rubinius source code is actually quite easy to understand since a large portion of it is actually written in Ruby, while the rest is written in well documented C++. The Rubinius compiler is no exception: it’s actually written in Ruby too! If you’re interested, you can see how the Rubinius compiler works without having to understand C++ at all. To get started take a look in the “lib/compiler” directory.

The Rubinius virtual machine, which runs the Rubinius byte code, is implemented in C++ and leverages an open source project called LLVM. Like JRuby, it uses a “Just In Time” compiler to convert the byte code to machine language at runtime. This means that your Ruby code, for example the add_two method above, ends up being converted into native machine language and run directly by your computer’s hardware.

Use the JRuby Compiler
Now let’s take a look at how JRuby compiles Ruby code; I’ll start by using RVM to switch over to JRuby, and then I’ll run the same simple.rb script:

1
2
3
$ rvm jruby-head
$ ruby simple.rb
5

No surprise, we get the same result. At a high level, JRuby uses the same two step process to run your script – first it compiles the Ruby code into byte code, and then executes the byte code using the Java Virtual Machine (JVM).

Here’s another diagram showing the two step process, this time for JRuby:

Like with Rubinius, it’s possible to run the JRuby compiler directly using the “jrubyc” command… following the Java executable naming pattern (“java” –> “javac”). Running “jrubyc” will create a Java .class file, which we can inspect using the Java decompiler like I did last week:

1
2
3
4
$ jrubyc simple.rb
$ ls
simple.class simple.rb
$ javap -c simple.class > simple.bytecode

Now the simple.bytecode file will contain an annotated version of the Java byte code the JVM will execute. Unlike Rubinius, which creates byte code that is fairly clean, simple and easy to understand, Java byte code is much more cryptic and confusing. Searching through the simple.bytecode file for my method add_two, I found the following snippet of byte code:

1
2
3
4
5
6
7
8
9
 public static org.jruby.runtime.builtin.IRubyObject method__1$RUBY$add_two(simple, org.jruby.runtime.Thread...
    Code:
       0: aload_3
       1: astore        9
       3: aload_1
       4: aload_2
       5: aload         9
       7: invokedynamic #80,  0             // InvokeDynamic #1:"fixnumOperator:+":(Lorg/jruby/runtime/Thread...
      12: areturn

Although quite difficult to understand, there are a couple of important details to notice:

First, JRuby has compiled my Ruby add_two method into a byte code method called method__1$RUBY$add_two. This proves that my Ruby script has been compiled! That is, when JRuby ran simple.rb above, it did not read the Ruby code, interpret it and just follow the instructions like the MRI interpreter would do. Instead, it converted my Ruby script into byte code, and specifically my add_two method into the byte code snippet above.

Second, notice the use of the “invokedynamic” byte code instruction. This is a new innovation of the Java Virtual Machine, making it easier for the JVM to support dynamic languages like Ruby. Here you can see it’s used by the add_two method to call the + operator of the Ruby Fixnum class, for my x+2 Ruby code. This use of invokedynamic is actually new for Java 1.7 and JRuby 1.7, so if you’re using the current release version of JRuby (1.6.4) or earlier you won’t see it appear in the byte code.

All of the byte code you see above – in other words my Ruby script including the add_two method – will be compiled directly into native machine language if the JVM notices that it is called enough times, that it’s in a “hotspot”.

Who cares how Ruby works?
Today I’ve shown you some of the internal, technical details of Rubinius and JRuby. Many of you might find this boring and unimportant: who cares how Ruby works internally? All I care about is that my Ruby program works. And from one point of view that is all that really matters.

However, I find Ruby internals to be fascinating… I really do like having at least a small understanding of what’s going on inside of Ruby while it’s running my code. I also believe it will help me to become a more effective and knowledgeable Ruby developer, even if I never contribute a line of internal code to Rubinius, JRuby or MRI. And studying Ruby internals has definitely lead me to a number of surprising discoveries, and forced me to rethink the mental model I have always had of the Ruby interpreter… or should I say, the Ruby compiler!

How the Hash Works in Ruby?

How the Hash Works in Ruby?

A brief overview of the hash data structure, how it is implemented in Ruby and a peek at the history of changes made to the hash in MRI Ruby.

What is a Hash?
A Hash is a data structure that organizes data in key-value pairs. It is also referred to as a dictionary or associative array. It stores these key-value pairs of associated data in a way that enables efficient insertion and lookup, in constant O(1) time. These properties of a hash make it is one of the most useful tools in a programmer’s toolbox and it is available in the core libraries of most if not all, programming languages.

In Ruby a hash can be declared literally as:

1
2
h = {color: "black", font: "Monaco"}
h = {:color=>"black", :font=>"Monaco"}

Or declaratively with the new method:

1
2
3
h = Hash.new
h[:color] = "black"
h[:font] = "Monoco"

How does a Hash store data and why is it efficient?
o understand how data is stored in a hash and why it is efficient, let’s revisit the basic linear data structure, the array. An array allows us to randomly access any element that it stores if we know the index of that element beforehand.

1
2
a = [1,2,4,5]
puts a[2]  # => 4

If the key-value pairs we were trying to store were integers within a limited range such as 1-20 or 1-100, we would simply use an array and our key would be the integer.

For example, given that:
- we need to store the names of the students in a classroom with 20 students
- each student has a student id between 1 and 20
- no two students have the same student id.

We could simply store their names represented by the table below in an array:

Key Value
1 Bunlong
2 Jinglong
3 Mickey Mouse

1
students= ['Belle', 'Ariel', 'Peter Pan', 'Mickey Mouse']

But, what if the student id was a 4-digit number? Then we would have to assign a 10000 element table to access the names by the id. To solve this we simplify the key to the last 2 digits of the 4 digit number and use that as the location inside the table, so we can get random access to the record. Now, if we have another student with id “3221”, also ending in “21”, we would have to save two values at that location resulting in a collision.

Key Hash(key) = last 2 digits Value
4221, 3221 21 Bunlong
1357 57 Jinglong
4612 12 Mickey Mouse

1
2
3
4
5
students= Array.new(100)
students[21]=['Belle','Sofia']
students[57]='Ariel'
students[12]='Peter Pan'
students[14]='Mickey Mouse'

What if the id was a 10-digit number or an alphanumeric string? This gets inefficient and unwieldy quickly. Unfortunately, too simple a hashing strategy can lead to problems.

How Ruby’s hash function works?
So, now we have an understanding that the purpose of a hash function is to convert a given a key into an integer of limited range. In order to reduce the range, a commonly used technique is the division method. In the division method, the key is divided by the size of the storage or table and the remainder is the location inside that table where a record can be stored. Therefore, in the example above, if the table size was 20, the locations would be 1, 17, 12, 14 derived from the computation below.

4221 % 20 = 1
1357 % 20 = 17
4612 % 20 = 12
1514 % 20 = 14

But in real life programming the keys are not always nice integers, they are strings, objects, or some other data type. This is solved by using a one-way hash function(digest) over the key and then applying the division method to get the location. The hash function is a mathematical function that takes a string of any length and produces a fixed length integer value. The hash data structure derives it’s name from this hashing mechanism. Ruby uses the murmur hash function and then applies the division method with a prime number M, which Ruby determines based on the table size that is needed for storage.

murmur_hash(key) % M

The code for this can be found in Ruby language’s source code in st.c file.

In case two keys return the same number, also known as a hash collision, the value is chained on to the same location or bucket in the table.

How Ruby handles hash collisons and growth?
One of the problems faced by hash functions is distribution. What if most remainders fall into the same bucket? We would have to first find the bucket in the table from computing over the key, and then look through all the chained data in the location to find the matching record. That would defeat the purpose of creating a hash data structure for random access and O(1) time, because now we have to iterate over all these values to find the record which puts us back to O(n) time.

It has been found that if divisor M is prime, the results are not as biased and more evenly distributed. But, even with the best divisor, collisions will occur as the number of records being added increases. Ruby adjusts the value of M based the density. Density is the number of records chained at a location in the table. In the above example, the density is 2, since we have 2 records that have the index/location 1.

Ruby sets the maximum allowed density value to 5.

1
#define ST_DEFAULT_MAX_DENSITY 5

When the density of the records reaches 5, then Ruby adjusts the value of M, re-computes and adjust the hash for all the records that are in that hash. “The algorithm that computes M is one that generates prime numbers near powers of 2”, from Data Structures using C. Look at the function new_size in st.c at line 158. This is where the size of the new hash is computed.

1
2
3
4
5
6
7
new_size(st_index_t size) {
  st_index_t i;
  for (i=3; i<31; i++) {
    if ((st_index_t)(1<<i) > size) return 1<<i;
  }
  return -1;
}

This is easier to read in the JRuby’s implementation of Hash where the prepared prime number values are statically used from an int array. As you can see the next values are 11, 19 and so on.

1
2
private static final int MRI_PRIMES[] = {
8 + 3, 16 + 3, 32 + 5, 64 + 3, 128 + 3, 256 + 27, ....};

This rehashing as the data grows larger causes a spike in the performance when the hash reaches certain specific sizes.

Ruby hashes are unique for each process
One interesting thing to note is hashes are unique for each Ruby process. The murmur hash seeds it with a random value, which results in a different hash for a particular key for each Ruby process.

Ruby has packed hashes for up to 6 entries since Ruby 2.0
Another interesting thing to note is that Ruby hashes that are very small(less than or equal to 6) are saved in one bucket and not spread over several buckets based on computed hash of the key. Instead, they are simply an array of values. This was added recently and is referred to as a packed entry in the code in st.c. On the pull request in which this change was submitted, the commiter has made the following comment.

“Investigation shows, that typical rails application allocates tons of small hashes. Up to 40% of whole allocated hashes never grows bigger than 1 element size.”

Ruby hash keys are ordered
Starting with Ruby 1.9.3, a property of the hash is that the keys are ordered based on how they are inserted into the hash. An interesting question was posted on the Ruby-forum questioning the reasoning behind it and how it would effect performance. The reply by Matz, creator of Ruby, on that thread, which explains the change is below.

Could anybody explain why this feature was added?

“Useful for some cases, especially for keyword arguments.”

Isn’t it going to slow down the operations on the Hash?

“No. hash reference operation does not touch order information, only for iteration. Memory consumption increased a bit.”

Note: Keyword arguments were added to Ruby in 2.0, and an example is below:

1
2
3
4
5
6
def books(title: 'Programming Ruby')
  puts title
end

books # => 'Programming Ruby'
books(title: 'Eloquent Ruby') # => 'Eloquent Ruby'

Two potential upcoming changes in Hash
1- The next version of Ruby, will most likely introduce syntax sugar for a literal declaration of the hash that will allow spaces in symbols. Take a look at this commit on ruby-trunk. You may recall, that the first change from hashrocket to colon was introduced in Ruby 1.9 bringing the syntax closer to JSON’s syntax. With this upcoming change the hash will looks even more so like JSON.

Currently we need to declare a symbol with a space using a hash rocket:

1
h = {:"a perfect color" => "vermilion"} #=> {:"a perfect color"=>"vermilion"}

With the change it will simply be the symbol within quotes followed by a colon:

1
h = {"a perfect color": "vermilion"}

2- Another interesting change that is in the works is a method that will allow returning default values for missing keys in a hash.

Currently you can return the default value of only one key using hash.fetch, however the hash.values_at method allows returning multiple values for keys:

1
2
3
h = {color: "black", font: "monaco"}
h.fetch(:fontsize, "12pt") #=> "12pt"
h.values_at(:color, :font) #=> ["black", "monaco"]

The change proposed is to combine these two methods into one. It might work something like the fetch_values method shown below. Please note the new method name is still being voted on and the example is hypothetical.

1
2
3
4
h.fetch_values(:color, :font, :fontsize, :border) do |k|
k == "fontsize" ? "12pt" : "#{k} is missing"
end
#=> ["black", "monaco", "12pt", "border is missing"]

So far so good, That’s it!!! See ya!!! :)

Master Ruby Blocks

Master Ruby Blocks

Blocks are one of the most powerful and often overlooked feature of ruby. I must confess that it took me a while to figure out how ruby blocks work and how they can be useful in practice.

There is something about yield that makes blocks very hard to understand at first. I’m going to talk about some of the concepts and provide a few examples so by the end of this post you’ll have a solid understanding of ruby blocks.

The basics: What are ruby blocks?
1. What are ruby blocks?
2. How yield works?
3. What does &block mean?
4. Return value
5. How does .map(&:something) work?
6. Iterators and how to build one yourself
7. Initialize objects with default values using blocks
8. Ruby block examples

What are ruby blocks?
A block is basically just code that you put inside do and end. That’s it. “But where’s the magic?” you might ask. We’ll get there in just a minute but first things first.

You can write the block in two ways:
1. Multi-line, between do and end
2. Inline, between { and }

Both versions will do the exact same thing so it’s up to you which one you choose. As a general style-guide, it’s better to use the multi-line version if your code has more than one line, just to make it easier to read.

Here’s a basic example of a multi-line block:

1
2
3
[1, 2, 3].each do |n|
  puts "Number #{n}"
end

It’s called a multi-line block because it’s not inline, not because it’s got more than one line of code (which is not the case here). The same example can be written with an inline block:

1
[1, 2, 3].each {|n| puts "Number #{n}"}

Both versions will print numbers 1, 2 and 3 in order. The little n letter you see between the pipes (|n|) is called a block parameter and it’s value in this case is going to be each of the numbers in turn, in the order they are listed inside the array. So for the first iteration, the value of n will be 1, then for the second iteration, the value will be 2, and then 3.

1
2
3
4
Number 1
Number 2
Number 3
 => nil

How yield works?
Here’s the bad wolf. This guy is responsible for all the confusion and magic around ruby blocks. I think most of the confusion comes from the way it calls the block and how it’s passing parameters to it. We’ll be looking at both scenarios in this section.

1
2
3
4
5
6
7
8
9
def my_method
  puts "reached the top"
  yield
  puts "reached the bottom"
end

my_method do
  puts "reached yield"
end
1
2
3
4
reached the top
reached yield
reached the bottom
 => nil

So basically when the execution of my_method reaches the line with the call to yield, the code inside the block gets executed. Then, when the code inside the block finishes, the execution of my_method continues.

Ruby Block Flow

Passing blocks to methods
A method doesn’t need to specify the block in it’s signature in order to receive a block parameter. You can just pass a block to any function but unless that function calls yield, the block won’t get executed.

On the other hand, if you do call yield in your method, then the block parameter becomes mandatory and the method will raise an exception if it doesn’t receive a block.

If you want to make the block an optional parameter, you can use the block_given? method which will return either true or false depending on if a block was passed in to the method or not.

Yield takes parameters too
Any parameter passed to yield will serve as a parameter to the block. So when the block runs, it can use the parameters passed in from the original method. Those parameters can be variables local to the method in which yield lives in.

The order of the arguments is important because the order you use to pass in the parameters is the order in which the block receives them.

Ruby Block Arguments

One thing to note here is that the parameters inside the block are local to the block (unlike those passed in from the method to the block).

What does &block (ampersand parameter) mean?
You’ve probably seen this &block all over the place in ruby code. It’s how you can pass a reference to the block (instead of a local variable) to a method. In fact, ruby allows you to pass any object to a method as if it were a block. The method will try to use the passed in object if it’s already a block but if it’s not a block it will call to_proc on it in an attempt to convert it to a block.

Also note that the block part (without the ampersand) is just a name for the reference, you can use whatever name you like if it makes more sense to you.

1
2
3
4
5
6
def my_method(&block)
  puts block
  block.call
end

my_method { puts "Hello!" }
1
2
#<Proc:0x0000010124e5a8@tmp/example.rb:6>
Hello!

Return value
yield returns the last evaluated expression (from inside the block). So in other words, the value that yield returns is the value the block returns.

1
2
3
4
5
6
7
8
def my_method
  value = yield
  puts "value is: #{value}"
end

my_method do
  2
end
1
2
value is 2
  => nil

How does .map(&:something) work?
You’ve probably used shortcuts like .map(&:capitalize) a lot, especially if you’ve done any Rails coding. It’s a very clean shortcut to .map { |title| title.capitalize }.

But how does it really work?

It turns out that the Symbol class implements the to_proc method which will unwrap the short version into it’s longer variant. Nice right?

Iterators and how to build one yourself
You can call yield as many times as you want inside a method. That’s basically how iterators work. Calling yield for each of the elements in the array mimics the behavior of the built in ruby iterators.

Let’s see how we can write a method similar to the map method in ruby.

1
2
3
4
5
6
7
8
9
10
11
12
13
def my_map(array)
  new_array = []

  for element in array
    new_array.push yield element
  end

  new_array
end

my_map([1, 2, 3]) do |number|
  number * 2
end
1
2
3
2
4
6

Initialize objects with default values
A cool pattern we can use with ruby blocks is to initialize an object with default values. You’ve probably seen this pattern if you’ve ever ventured into a .gemspec file from any ruby gem.

The way it works is, you have an initializer that calls yield(self). In the context of the initialize method, self is the object being initialized.

1
2
3
4
5
6
7
8
9
10
11
12
13
14
class Car
  attr_accessor :color, :doors

  def initialize
    yield(self)
  end
end

car = Car.new do |c|
  c.color = "Red"
  c.doors = 4
end

puts "My car's color is #{car.color} and it's got #{car.doors} doors."
1
My car's color is Red and it's got 4 doors.

Ruby blocks examples
Examples are all the rage these days so let’s try to find a few interesting ways of using blocks in real world (or as close to real world as possible) scenarios.

Wrap text in html tags
Blocks are the perfect candidate whenever you need to wrap a chunk of dynamic code within some static code. So for example if you want to generate an html tag for some text. The text is the dynamic part (cause you never know what you’ll want to wrap) and the tags are the static part, they never change.

1
2
3
4
5
6
7
8
9
10
11
def wrap_in_h1
  "<h1>#{yield}</h1>"
end

wrap_in_h1 { "Here's my heading" }

# => "<h1>Here's my heading</h1>"

wrap_in_h1 { "Ha" * 3 }

# => "<h1>HaHaHa</h1>"

Note that the power of using blocks over methods is when you need to reuse some of the behavior but do something slightly different with it. So let’s say we have a string we want to wrap inside html tags and then do something different with it.

1
2
3
4
5
6
7
def wrap_in_tags(tag, text)
  html = "<#{tag}>#{text}</#{tag}>"
  yield html
end

wrap_in_tags("title", "Hello") { |html| Mailer.send(html) }
wrap_in_tags("title", "Hello") { |html| Page.create(:body => html) }

In the first case we’re sending the Hello string via email and in the second case we’re creating a Page record. Both cases use the same method but they do different things.

Take a note
Let’s say we want to build a way to quickly store ideas into a database table. For that to work we want to pass in the note and have the method deal with the database connections. Ideally we’d like to call Note.create { "Nice day today" } and not worry about opening and closing database connections. So let’s do this.

1
2
3
4
5
6
7
8
9
10
11
12
13
14
15
16
17
18
19
20
21
22
23
24
25
26
27
28
29
30
class Note
  attr_accessor :note

  def initialize(note=nil)
    @note = note
    puts "@note is #{@note}"
  end

  def self.create
    self.connect
    note = new(yield)
    note.write
    self.disconnect
  end

  def write
    puts "Writing \"#{@note}\" to the database."
  end

  private
  def self.connect
    puts "Connecting to the database..."
  end

  def self.disconnect
    puts "Disconnecting from the database..."
  end
end

Note.create { "Foo" }
1
2
3
4
Connecting to the database...
@note is Foo
Writing "Foo" to the database.
Disconnecting from the database...

The implementation details of connecting, writing and disconnecting to and from the database were left out since they’re out of the scope of this article.

Find divisible elements of an array
It seems like I’m getting further and further away from “the real world scenario” but anyways, I’m gonna shoot one last example. So let’s say you want to get every element of an array that is divisible by 3 (or any number you choose), how would you do that with ruby blocks?

1
2
3
4
5
6
7
8
9
10
class Fixnum
  def to_proc
    Proc.new do |obj, *args|
      obj % self == 0
    end
  end
end

numbers = [1, 2, 3, 4, 5, 6, 7, 8, 9, 10].select(&3)
puts numbers
1
2
3
3
6
9

You can think of blocks as simply a chunk of code, and yield allows you to inject that code at some place into a method. That means you can have one method work in different ways, you don’t have to write multiple methods (you can reuse one method to do different things).

How to Use Link_to in Ruby on Rails?

How to Use link_to in Ruby on Rails?

Even after many years of using Ruby on Rails I still have trouble remembering how to properly use all those options available for the link_to helper. Three out of five times I have to fire up the docs and search for the examples (cause that’s how I like to read the docs).

Having Documentation in Hand
Using documentation locally is helpful, especially if you can integrate it into your editor. Personally I’m using the ri docs with Vim but I guess all those other editors can be configured to access it. If not you can always use ri in your terminal of choice.

Another favourite of mine is the awesome ApiDock. You can even see other people’s comments on the docs and in many cases there you can find examples that are not present in the official docs.

Another very good option (if you’re on a mac) is to use Dash. It’s easy to integrate in your editor or you can just fire it up with a system shortcut whenever you need to access the docs.

That being said, I’m gonna list out a few of the more common examples I use in hopes that they will be useful for both you and me whenever I need to revisit link_to’s docs again.

The Simplest Form
The most common and straightforward way of using link_to is to create a barebones (no magic) link. So, assuming your root route points to ‘/’, the way you would use the helper is:

1
2
<%= link_to "Home", root_path %>
# => <a href="/">Home</a>

Link-ing to a Resource
Another common variant is linking to a resource (a user’s profile for example). Let’s say the user’s model is called User and that a @user ivar points to the user record who’s id is 1. Creating a link to the user’s profile will look like the following:

1
2
<%= link_to "Profile", user_path(@user) %>
# => <a href="/users/1">Profile</a>

There’s also a shorter version that will do the same thing. It’s got some magic to it (like most things in Rails) but it also looks prettier and there’s less to type (two stones with one bird).

1
2
<%= link_to "Profile", @user %>
# => <a href="/users/1">Profile</a>

Using link_to with a Block
This is somewhat of a lesser known/used option of link_to but it’s useful nonetheless and it also makes the code more readable. So in those cases where the link text is long and/or ugly, or it doesn’t really fit on a 80 chars line, you can pass the link text inside a block.

To make the example more obvious, I’m gonna do a before and after kind of thing.

Before:

1
2
<%= link_to "<span class='home-link'>Home</span>".html_safe, root_path %>
# => <a href="/"><span class="home-link">Home</span></a>

After:

1
2
3
4
<%= link_to root_path do %>
  <%= content_tag :span, "Home", :class => "home-link" %>
<% end %>
# => <a href="/"><span class="home-link">Home</span></a>

In this case I’ve purposely chosen a less uglier link text, but usually the link text will be something like an image tag or a span with an icon inside it (or any other ugly html code you can think of).

Adding html classes and/or id to Your Link
Another very common task you’ll use is to add a html class or id to your links.

1
2
<%= link_to "Section", root_path, :class => "my-class", :id => "my-id" %>
# => <a href="/" class="my-class" id="my-id">Section</a>

How to Delete a Record with link_to
Calling the destroy action of a REST-ful controller requires a DELETE request and that can be easily achieved by passing the :method => :delete hash as an option to the link_to helper.

1
2
<%= link_to "Remove", @user, :method => :delete %>
# => <a rel="nofollow" data-method="delete" href="/users/1">Remove</a>

Note that the rel="nofollow" is auto-magically added by Rails as an SEO bonus.

Require Confirmation for Deleting a Record
You will probably want some sort of confirmation when removing objects to prevent accidental deletes. The easiest way to add that is with a simple javascript alert box that will ask the user to confirm his delete request.

1
2
<%= link_to "Remove", @user, :method => :delete, :data => {:confirm => "You Sure?"} %>
# => <a data-confirm="You Sure?" rel="nofollow" data-method="delete" href="/users/1">Remove</a>

Link-ing to an Image with link_to
It might be that you want to make your links prettier or that you want to have some nice buttons, or even a logo click-able or whatever the reason for using click-able images is, you’ll want to add your image inside the link. Making an image link-able is pretty straight forward. Just add the image_tag where the link text would go and you’re done.

1
2
<%= link_to image_tag('logo.png'), root_path %>
# => <a href="/"><img src="/assets/logo-c88948e05e11587af2c23747862ca433.png" alt="Logo"></a>

You can also pass the image in a block if you like that style better.

1
2
3
4
<%= link_to root_path do %>
  <%= image_tag('logo.png') %>
<% end %>
# => <a href="/"><img src="/assets/logo-c88948e05e11587af2c23747862ca433.png" alt="Logo"></a>

A nice side-effect of using the image_tag helper is that it will add the asset digest to your image.

Adding an alt Attribute to the Image
As you’ve seen in the previous example, I didn’t specify an alt attribute but the link_to helper generated one. The generated alt tag is just the name of the image file, capitalized. In case you want (and you should want) to override the alt attribute, it’s very easy to do; just add your own alt attribute like so:

1
2
<%= link_to image_tag('logo.png'), root_path, :alt => "MyLogo" %>
# => <a href="/"><img src="/assets/logo-c88948e05e11587af2c23747862ca433.png" alt="MyLogo"></a>

Alt attributes are beneficial for SEO purposes and they also aid those visitors who use text readers or non graphical browsers.

Link-ing to an Image
There are times when you might want to link to an image (not necessarily with an image). This can be confusing because you need your image to contain the image digest generated by the asset pipeline. There’s a helper that provides just that and it’s called image_path.

1
2
<%= link_to "Logo", image_path('logo.png') %>
# => <a href="/assets/logo-c88948e05e11587af2c23747862ca433.png">Logo</a>

Anchors with link_to
You might need to point to a specific section (anchor) in the page which you can identify by it’s dom ID. So let’s say on the target page we have a section that has the id="interesting-section". In order to point our link to that section, we’ll need to add the anchor to the generated link.

1
2
<%= link_to "Section", root_path(:anchor => "interesting-section") %>
# => <a href="/#interesting-section">Section</a>

Ajax Links with link_to Remote
You can add the :remote => true option to the link to tell Rails that you want to handle the link via javascript. This option will automatically send an ajax request (handled via the jQuery UJS adapter).

1
2
<%= link_to "Ajax", root_path, :remote => true %>
# => <a data-remote="true" href="/">Ajax</a>

Opening the link in a new tab or window
For a good user experience and because you’ll want your user not to leave your website if possible, you should make all your external links open in a separate tab or window. You can achieve this by using the target="_blank" html attribute which in Rails speak will look like this:

1
2
<%= link_to "Google", "http://google.com", :target => "_blank" %>
# => <a target="_blank" href="http://google.com">Google</a>

POST-ing Using link_to
Sending a post request via a link is something that the html cannot do. You can only use it to make GET requests, not POST. That being said, Rails has some magic tricks for you.

By providing the :method => :post option, Rails will create a form and submit it via javascript. Note that you need the jquery-rails gem for this to work, if you don’t have it, there won’t be any magic happening and your links will default to a GET request.

1
2
<%= link_to "Post", root_path, :method => :post %>
# => <a rel="nofollow" data-method="post" href="/">Post</a>

Adding More Params to the POST Request

1
2
<%= link_to "Create User", users_path(:email => "jdoe@email.com", :password => "secret"), :method => :post %>
# => <a rel="nofollow" data-method="post" href="/users?email=jdoe%40email.com&amp;password=secret">Create User</a>

These are some of the more common ways I’ve used link_to but I’m sure there are many others. So if you have any other examples I could add to the article.

So far so good, That’s it!!! See ya!!! :)

How to Spend Less Time and Money on Growing Your Business?

How to Spend Less Time and Money on Growing Your Business?

We all have ideas we would like to validate yesterday if possible but of course in reality that rarely happens. The constant lack of developer time makes our wishes become dreams most of which will never see the light of day.

Being able to move fast so that you can put your ideas thru the build/measure/learn loop and iterate all the way to product market fit requires having a solid software foundation that will allow you to achieve fast release cycles.

In this post I will show you how to:
1. Speed up the development cycle
2. Spend less money on developer time
3. Build a more productive team

We Call It Automated Testing
Testing — or automated testing — means you put the machine at work by having it test your application often and making sure everything works as expected. You can imagine someone clicking thru the buttons and links on your website, filling in forms etc. and making sure everything is in good shape.

So by having every corner of your application checked at will and in record time, you will have the confidence that a feature you’ve previously built will stay functional forever — or at least until you decide to nuke it — by being notified immediately when something stopped working for whatever the reason.

How Can Testing Help My Business?
It’s less obvious until you’ve done software development for a while but, the most time spent by developers is not on building new and cool stuff — nor on playing video games. Actually, the most time is spent on fixing bugs (previously built features that somehow got broken in the process of increasing the complexity of your application).

Knowing immediately when things got broken, where and why, means developers will spend a lot less time searching for the source of evil before they can actually do the work involved in fixing the issue — which usually amounts to much less then the digging, staring, guessing and searching process.

So having to spend less and less time on fixing broken features as your app becomes more and more complex translates into improving development speed and cutting costs greatly in the long run.

Automated testing gives you a new power; the confidence of changing existing features and adding ones with minimal overhead.

Let’s Get the Product Managers Involved
Another very important aspect of testing is that features need to be described in great detail before the developer’s work can start so in other words, the developer knows exactly what he needs to do in order to deliver the required features to the stakeholders and match their expectations. This is also a good time for the developers to actually see the product from a different perspective.

Instead of going back and forth about what the product manager wanted and what the developer thought he wanted and thus building the wrong feature, more time is spent communicating using a common language, the real expectations and making sure the developer’s efforts are well spent.

The automated testing language is written in plain english — or any other language of your choosing — and it requires both the product manager and the developer to sit down, think thru each step of every feature and put everything on paper before writing the first line of code.

Planing for the Future
In the developer’s world, technology changes extremely fast and thus new tools or new versions emerge with new and shiny features that your business could benefit from. But there’s one thing that stands in the way of all that goodness and that is… the fear of change. Changing a tool or upgrading one to a newer version increases the chance of breaking existing functionality.

As you might’ve expected, this is another area where testing can save you a ton of time. By having a fully tested application, you can have your cake and eat it too — just get the new stuff, run your tests and see precisely what got broken in the process so you can start fixing. The horrible alternative would be to have your developers and QA team go over each and every feature — that they remember — and manually test it, or even worse, users discovering bugs and probably not telling you about them.

Show Me an Example
Let’s see how an automated test might look like in real life.

1
2
3
4
5
6
7
8
9
10
Feature: User login
  In order to see history thats unique to my account
  As a user
  I want to be able to log in

  Scenario: User logs in
    Given I have a user account
    And I am currently logged out
    When I log in
    Then I should see my dashboard

What you see here is a valid automated test that makes sure that a user can log into your site by opening a browser, clicking on the login link, filling in the sign-in form and making sure that when the log in was successful, the user will be on his dashboard page.

As you can see the test is very readable and thus it can be easily used as a communication tool between the product team — or the stakeholders — and the development team.

So my advice to you is to use testing as much as possible and as early in the development process as you can. It saved me and my business countless hours and I can guarantee it will do the same for yours.

So far so good, That’s it!!! See ya!!! :)

My Development Stack

I always try to improve my development stack in order to gain productivity. And during the last few months, there has been a lot of change.

Here is my current development stack that I use to create web apps:

Front-End

Bootstrap: A great HTML/CSS framework. It helps you build MVC very fast. Sass: A language compiled into CSS which adds many features such as variables, imports and functions.
Sass: A language compiled into CSS which adds many features such as variables, imports and functions.
Jquery: Good old Jquery, indeed. I may start to use angular in the next few weeks if I have enough time.

Back-End

Ruby on Rails: The most productive web framework I have ever worked with, much faster than any PHP framework, and enforcing many good software engineering practices.
PostgreSQL: Faster and most powerful than most RDBMS (including MySQL), and free.

Hosting

Heroku: A great PaaS, and free for small apps. I also tried Google App Engine but its lack of flexibility was a problem for me.
Cloudflare: It makes your app load faster and gives you a free SSL certificate.
Mandrill: Very easy to use, yet powerful, EaaS (Email as a Service). I use it to send transactional emails like welcome messages and password resets.

Deployment

Git: I configured it with a pre-commit hook which automatically runs rails tests. And thanks to Heroku a simple push deploys my code. It’s very useful and now I just couldn’t go back.

Monitoring

Pingdom: A great tool to receive alerts if your app goes down (and if you add IFTTT you can receive them by SMS).

Let’s see what it looks like (with the help of a great website I recently found):

My Development Stack

Best Practices for Agile Ruby on Rails Development

Best Practices for Agile Ruby on Rails Development

Ruby on Rails is an open source web application framework built on Ruby. While Rails is 100% free, there is a lot of argument over its effectiveness in comparison with more standard, tried-and-true web applications. Despite its criticism, many big players such as Hulu, Groupon, and Twitter have incorporated its use into their booming platforms, so it is definitely worth at least knowing a little bit more about it.

Like most open-source frameworks, Rails has found a home in the agile community. This modern approach to software development promotes early deliveries, feedback from the client, and adaptation over the course of the development process. Because of its malleable nature, Ruby on Rails development works well with this approach.

Like most open-source frameworks, Rails has found a home in the agile community. This modern approach to software development promotes early deliveries, feedback from the client, and adaptation over the course of the development process. Because of its malleable nature, Ruby on Rails development works well with this approach.

1. Don’t Repeat Yourself
Is this code DRY enough? If a code only exists in one place, changing it later will be much easier. Rails is equipped with helpers and libraries to help implement this approach. More concise and efficient code allows changes to be made easily later on in the development cycle, as is the norm in an Agile methodology.

2. Test-drive Your Code
Not only do tests ensure that features work, but they later come in handy when changes are being made to assure everything runs correctly. Starting tests are automatically generated for you in Ruby, which help to ensure that tests are run at every process in development (which, again, is important in Agile development).

3. Focus on Convention over Configuration
Ruby on Rails comes with conventions to spend less time configuring, such as generators that enable you to setup fast, and a multi-environment setup that is part of the package. Also included are pre-configurations for HTTP servers, meaning changes can be made to the live-site to satisfy the client demands face-to-face. With common web programming tasks out of the way (and more concise and readable), more time can be devoted to catering towards the clients specifications. A project that is easy and fast to modify will work best in an Agile environment.

4. Be Dynamic
Rails is constantly changing and adapting to the tech industry. When other frameworks develop new techniques, Rails is quick to follow through with their ideas. Rails has a thriving online community, consisting of blogs, conferences, IRC channels, and gems, which is the term used for Ruby software packages. All these make it easier to revise and update features for the product so that it is ready for the current environment.

Agile has a strong focus on constant adaption in coordination with the client. Quickness, efficiency, and quality are key factors in implementing development in this method. Ruby on Rails is designed to be fast, simple, and malleable, and because of this has grown to be extremely popular.