Why Ruby?

History
- Ruby was conceived on February 24, 1993 by Yukihiro Matsumoto who wished to create a new language that balanced functional programming with imperative programming.
- purpose of Ruby language help every programmer in the world to be productive, and to enjoy programming, and to be happy.

What is Ruby?
- Ruby is a dynamic, reflective, general-purpose object-oriented programming language that combines syntax inspired by Perl with Smalltalk-like features.
- Interpreted Script Language. - Ruby was first designed and developed in the mid-1990s by Yukihiro ‘Matz’ Matsumoto in Japan.
- The standard 1.8.7 implementation is written in C.

Good point of Ruby

Reduce code

In Java
1
2
3
4
5
public class HelloWorld {
  public static void main(String args[]) {
    System.out.println(Hello World);
  }
}
In Ruby
1
puts Hellow World

Communities
Ruby have large communities.

Code is Human-Readable
The code was designed from the start to be human-readable and this means that non-programmer can have a very easy to understand what a program is designed to do.

Ruby on Rails (www.ruby-lang.org)
A Model-View-Controller framework for creating database-driven websites in Ruby. Rails is build on simple concepts.

RubyGems (www.rubygems.org)
A package manager for the Ruby programming language that provides a standard format for distributing Ruby programs and libraries (in a self-contained format called a “gem”), a tool designed to easily manage the installation of gems, and a server for distributing them.

Command-line
The interactive Ruby shell is a unique feature that allows developers to maintain and experiment with commands. There is no need to write webpages and check their functionality in a browser.

Object-Oriented-Programming (OOP)
Object-Oriented-Programming is a necessity for clean and maintainable code. However, In Ruby, everything is an object.

Ruby is free

Encourage testing
- Test::Unit builds in into standard library
- Other tools: Rspec, MiniTest, …

Why Sass?

Sass is a Cascading Style Sheets (CSS) meta language. It is a scripting language that is interpreted into CSS. SassScript provides the following mechanisms: variables, nesting, mixins, and selector inheritance.

Variables
- Sass allows variables to be defined.
- Variables begin with a dollar sign ($).
- Variable assignment is done with a colon (:).
- SassScript supports four data types: Numbers, Strings, Colors, Booleans.

In CSS
1
2
3
4
5
6
7
8
9
10
.content-navigation {
  border-color: #3bbfce;
  color: #2b9eab;
}

.border {
  padding: 8px;
  margin: 8px;
  border-color: #3bbfce;
}
In Sass
1
2
3
4
5
6
7
8
9
10
11
12
13
14
$blue: #3bbfce;
$margin: 16px;

.content-navigation {
  border-color: $blue;
  color:
    darken($blue, 9%);
}

.border {
  padding: $margin / 2;
  margin: $margin / 2;
  border-color: $blue;
}

Nesting
CSS does support logical nesting, but the code blocks themselves are not nested. Sass allows the nested code to be inserted within each other.

In CSS
1
2
3
4
5
6
7
8
9
10
11
12
13
table.hl {
  margin: 2em 0;
}

table.hl td.ln {
  text-align: right;
}

li {
  font-family: serif;
  font-weight: bold;
  font-size: 1.2em;
}
In Sass
1
2
3
4
5
6
7
8
9
10
11
12
13
14
table.hl {
  margin: 2em 0;
  td.ln {
    text-align: right;
  }
}

li {
  font: {
    family: serif;
    weight: bold;
    size: 1.2em;
  }
}

Mixins
- CSS does not support mixins.
- Any repeated code must be repeated in each location.
- A mixin is a section of code that contains any valid Sass code.
- Whenever a mixin is called, the result of translating the mixin is inserted at the calling location.
- Mixins allow for efficient and clean code repetitions, as well as easy alteration of code.

In CSS
1
2
3
4
5
6
7
8
#data th {
  text-align: center;
  font-weight: bold;
}

#data td, #data th {
  padding: 2px;
}
In Sass
1
2
3
4
5
6
7
8
9
10
11
@mixin table-base {
  th {
    text-align: center;
    font-weight: bold;
  }
  td, th {padding: 2px}
}

#data {
  @include table-base;
}

Mixins also support arguments:

In CSS
1
2
3
4
#data {
  float: left;
  margin-left: 10px;
}
In Sass
1
2
3
4
5
6
7
8
@mixin left($dist) {
  float: left;
  margin-left: $dist;
}

#data {
  @include left(10px);
}

In combination:

In CSS
1
2
3
4
5
6
7
8
9
10
11
12
13
#data {
  float: left;
  margin-left: 10px;
}

#data th {
  text-align: center;
  font-weight: bold;
}

#data td, #data th {
  padding: 2px;
}
In Sass
1
2
3
4
5
6
7
8
9
10
11
12
13
14
15
16
17
@mixin table-base {
  th {
    text-align: center;
    font-weight: bold;
  }
  td, th {padding: 2px}
}

@mixin left($dist) {
  float: left;
  margin-left: $dist;
}

#data {
  @include left(10px);
  @include table-base;
}

For more information sass-lang.com

Why HAML?

Haml (HTML abstraction markup language) is based on one primary principle: markup should be beautiful. It’s not just beauty for beauty’s sake either; Haml accelerates and simplifies template creation down to veritable haiku.

Why do we use HAML?
- Mark up should be beautiful.
- Mark up should be Dry (Because Too much repetition in HTML and template engines like ERB).
- Mark up should be well-indented.
- Mark up structure should be clear.
- Haml to the rescue:

In HTML
1
2
3
4
5
6
7
<ul id="navigation">
 <li class="menu_item">
   <a href="/home" title="Home">
     Home
   </a>
 </li>
</ul>
In HAML
1
2
3
4
%ul#naviatioin
  %li.menu_item
    %a{:href => "/home", :title => "Home"}
      Home

HAML Basic
Syntax:

In HAML
1
2
3
4
5
6
7
8
9
10
!!!
%html
  %head
    %title Haml Test
  %body
    #header
      %h1 Welcome to my blog
      %nav#navigation
    #content
      #yield

Format:
- HTML Tags are prefixed with ” % ”
- ID attributes are prefixed with ” # ”
- Class attributes are prefixed with ” . ”
- Additional attributes are passed as: %a{:title => “Home”, :href => “/home”} Home

HAML Formatting
Remove “ < ” and “ > ”

In HTML
1
2
3
4
<img />
<p>
  Hello Haml
</p>

In HAML
1
2
3
%img
%p
  Hello Haml

Dynamic HAML
– We use the “ = ” sign to evaluate dynamic code and assign the value to the desired tag.
– We use the “ – ” sign to run code without appending a value to any tag.
– We use Ruby interpolation to mix static and dynamic strings.

In HAML
1
2
3
4
5
6
%h2= "posts for #{Time.now}"
%ul#posts
 @posts.each do |post|
  %li.post_item
    %h3= post.title
    %p= post.post

For more information haml.info

Why Erlang?

Erlang is a programming language traditionally used to build massively scalable soft real-time systems with requirements on high availability. Some of its uses are in telecoms, banking, e-commerce, computer telephony, realtime application and instant messaging. Erlang’s runtime system has built-in support for concurrency, distribution and fault tolerance.

High Availability/Reliability
- Simple and consistent error recovery and supervision hierarchiess.
- Built-in fault tolerance.
- Software upgrade (hot code loading) during runtime.

Scalability/Heterogeneity
- Run on a variety of platforms, supports heterogeneous networks.
- Network aware runtime, out-of-the-box distributed architectures.
- Lightweight processes, highly scalable transparent or explicit concurrency.

Less Effort
- Functional programming language, high abstraction level, concise readable programs.
- 4–20 times less code compared to C/C++/Java.
- Suitable for rapid prototyping.
- Powerful middleware and libraries (OTP).

For more information erlang.org

Google Map Draggable Maker

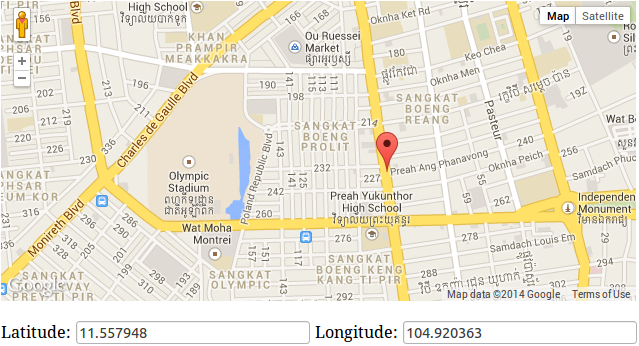
Google’s Maps API offer a vast range of functionality to interact with underlying maps. As opposed to statically setting markers (pins) programmatically sometimes you might want your users to be able to interact with the map by dragging existing markers around the map. Fortunately, Google’s JavaScript API offers this functionality out of the box. Below you’ll find an example based on Google Maps API V3.

Practice

google_map_draggable_maker.js is a small library use to make google map draggable easily:

google_map_draggable_maker.js
1
2
3
4
5
6
7
8
9
10
11
12
13
14
15
16
17
18
19
20
21
22
23
24
25
26
27
28
29
30
31
32
33
34
35
36
37
38
39
40
41
42
// -------------------------------------------------------------------
// @author Bunlong <bunlong.van@gmail>
// Created :  6 Jun 2014 by Bunlong
// -------------------------------------------------------------------

// options = {elementh, lat, lng, zoom, coordsLenght, elementLat, elementLng}

MapDraggableMarker = function(options) {
  this.element = options.element;
  this.lat = options.lat;
  this.lng = options.lng;
  this.zoom = options.zoom;
  this.coordsLenght = options.coordsLenght;
  this.elementLat = options.elementLat;
  this.elementLng = options.elementLng;

  this.map = new google.maps.Map(this.element, {
    zoom: this.zoom,
    center: new google.maps.LatLng(this.lat, this.lng),
    mapTypeId: google.maps.MapTypeId.ROADMAP
  });

  this.marker = new google.maps.Marker({
    position: new google.maps.LatLng(this.lat, this.lng),
    draggable: true
  });
}

MapDraggableMarker.prototype.addListenerToMarker = function() {
  var self = this;

  google.maps.event.addListener(this.marker, 'dragend', function(evt) {
    self.elementLat.val(evt.latLng.lat().toFixed(self.coordsLenght));
    self.elementLng.val(evt.latLng.lng().toFixed(self.coordsLenght));
  });
}

MapDraggableMarker.prototype.init = function() {
  this.addListenerToMarker();
  this.map.setCenter(this.marker.position);
  this.marker.setMap(this.map);
}

index.html is the sample google map draggable:

index.html
1
2
3
4
5
6
7
8
9
10
11
12
13
14
15
16
17
18
19
20
21
22
23
24
25
26
27
28
29
30
31
32
33
34
35
36
37
<!doctype html>
<html lang="en">
<head>
  <meta charset="utf-8" />
  <title></title>
  <link rel="stylesheet" href="styles.css" />
  <script type="text/javascript" src="http://maps.google.com/maps/api/js?sensor=false"></script>
  <script type="text/javascript" src="jquery-1.11.1.min.js"></script>
  <script type="text/javascript" src="google_map_draggable_maker.js"></script>
  <script type="text/javascript">
    $(document).ready(function() {
      var lat = ($("#latitude").val() == "") ? 11.558831 : $("#latitude").val(),
          lng = ($("#longitude").val() == "") ? 104.917445 : $("#longitude").val(),
          zoom = 15,
          coordslenght = 6;

          mapDraggableMarker = new MapDraggableMarker({ element: $("#canvas")[0],
                                                        lat: lat,
                                                        lng: lng,
                                                        zoom: zoom,
                                                        coordsLenght: coordslenght,
                                                        elementLat: $("#latitude"),
                                                        elementLng: $("#longitude")
                                                      });

      mapDraggableMarker.init();
    });
  </script>
</head>
<body>
  <div id="canvas" style="width: 635px; height: 300px;"></div><br />
  <label for="latitude">Latitude:</label>
  <input id="latitude" type="text" value="" />
  <label for="longitude">Longitude:</label>
  <input id="longitude" type="text" value="" />
</body>
</html>

You can download the source code and try it out.

JSRender

What is JsRender?
Many development platforms use templates to reduce code and simplify maintenance, and HTML5 and JavaScript are no exception. JsRender is a JavaScript library that allows you to define a boilerplate structure once and reuse it to generate HTML dynamically. JsRender brings a new templating library to HTML5 development that has a codeless tag syntax and high performance, has no dependency on jQuery nor on the Document Object Model (DOM), supports creating custom functions and uses pure string-based rendering.

Why Templates?
Using templates with JavaScript reduces and simplifies code. Without templates, adding a series of list items and other HTML elements for a set of data might require manipulating a browser’s DOM. This is where templating using a plug-in such as JsRender can be quite useful to do the heavy lifting.

Practice

demo.html
1
2
3
4
5
6
7
8
9
10
11
12
13
14
15
16
17
18
19
20
21
22
23
24
25
26
27
28
29
30
31
32
33
34
35
36
37
38
39
40
41
42
43
44
45
46
47
48
49
50
51
52
53
54
<!DOCTYPE html>
<html>
<head>
  <script src="js/jquery.min.js" type="text/javascript"></script>
  <script src="js/jsrender.js" type="text/javascript"></script>
  <link href="css/bootstrap.min.css" rel="stylesheet" type="text/css" />

  <script id="book_template" type="text/x-jsrender">
    <tr>
      <td>{ {:#index+1} } </td>
      <td>{ {>name} }</td>
      <td>{ {>releaseYear} }</td>
    </tr>
  </script>

  <script type="text/javascript">
    $(document).ready(function() {
      var books = [
        { name: "Erlang", releaseYear: "1986" },
        { name: "Ruby", releaseYear: "1998" },
        { name: "Ruby on Rails", releaseYear: "1999" },
        { name: "Javascript", releaseYear: "1976" }
      ];

      $("#book_list").html(
        $("#book_template").render(books)
      );
    });
  </script>

</head>
<body>
  <div class="container">
    <section id="fluidGridSystem">
      <div class="page-header">
        <h3>Render template against local data</h3>
      </div>
      <div class="row-fluid show-grid">
        <table class="table table-bordered">
          <thead>
            <tr>
              <th>No</th>
              <th>Name</th>
              <th>Release Year</th>
            </tr>
          </thead>
          <tbody id="book_list">
          </tbody>
        </table>
      </div>
    </section>
  </div>
</body>
</html>

You can download the source code and try it out.

Tokeninput Jquery Multiple Select Item

What is Tokeninput?
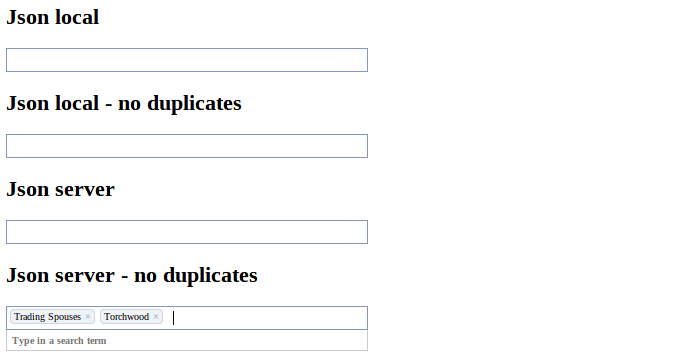
Tokeninput is a jQuery plugin which allows your users to select multiple items from a predefined list, using autocompletion as they type to find each item. You may have seen a similar type of text entry when filling in the recipients field sending messages on facebook.

Practice

demo.html
1
2
3
4
5
6
7
8
9
10
11
12
13
14
15
16
17
18
19
20
21
22
23
24
25
26
27
28
29
30
31
32
33
34
35
36
37
38
39
40
41
42
43
44
45
46
47
48
49
50
51
52
53
54
55
56
57
58
59
60
61
62
63
64
65
<html>
<head>
  <script type="text/javascript" src="https://ajax.googleapis.com/ajax/libs/jquery/1.5.1/jquery.min.js"></script>
  <script type="text/javascript" src="src/jquery.tokeninput.js"></script>
  <link rel="stylesheet" href="styles/token-input.css" type="text/css" />
  <link rel="stylesheet" href="styles/token-input-facebook.css" type="text/css" />
</head>
<body>
  <h2 id="theme">Json local</h2>
  <div>
    <input type="text" id="input-local" />
    <script type="text/javascript">
      $(document).ready(function() {
        $("#input-local").tokenInput([
            {"id":"856","name":"House"},
            {"id":"1035","name":"Desperate Housewives"}
          ], {
          theme: "facebook"
        });
      });
    </script>
  </div>

  <h2 id="theme">Json local - no duplicates</h2>
  <div>
    <input type="text" id="input-local-prevent-duplicates" />
    <script type="text/javascript">
      $(document).ready(function() {
        $("#input-local-prevent-duplicates").tokenInput([
            {"id":"856","name":"House"},
            {"id":"1035","name":"Desperate Housewives"}
          ], {
          theme: "facebook",
          preventDuplicates: true
        });
      });
    </script>
  </div>

  <h2 id="theme">Json server</h2>
  <div>
    <input type="text" id="input-server" />
    <script type="text/javascript">
      $(document).ready(function() {
        $("#input-server").tokenInput("http://shell.loopj.com/tokeninput/tvshows.php", {
          theme: "facebook"
        });
      });
    </script>
  </div>

  <h2 id="prevent-duplicates">Json server - no duplicates</h2>
  <div>
    <input type="text" id="input-server-prevent-duplicates" />
    <script type="text/javascript">
      $(document).ready(function() {
        $("#input-server-prevent-duplicates").tokenInput("http://shell.loopj.com/tokeninput/tvshows.php", {
          theme: "facebook",
          preventDuplicates: true
        });
      });
    </script>
  </div>
</body>
</html>

You can download the source code and try it out.

Autoload All Files in Lib Directory Ruby on Rails

In Ruby on Rails to create your own ruby library you have to create ruby library in /lib directory, so far so good to autoload all ruby library in /lib directory you have to add some code below in /config/application.rb.

application.rb
1
2
3
config.autoload_paths += %W(#{config.root}/lib)
config.autoload_paths += Dir["#{config.root}/lib/**/"]
config.autoload_paths << "#{config.root}/lib"

Reduce Duplication in database.yml Configuration in Ruby on Rails Project

By default rails generate database.yml that have the same attributes in each environment. So to reduce duplication we use aliasing to essentially perform a hash merge on the fly in the code.
So far so good please take a look the below code.

Before refactor

database.yml
1
2
3
4
5
6
7
8
9
10
11
12
13
14
15
16
17
18
19
20
21
22
23
24
25
26
27
28
29
30
31
32
33
34
35
development:
  database: blog_development
  host: localhost
  username: your_database_username
  password: your_database_password
  adapter: mysql2
  encoding: utf8
  collation: utf8_unicode_ci

test:
  database: blog_test
  host: localhost
  username: your_database_username
  password: your_database_password
  adapter: mysql2
  encoding: utf8
  collation: utf8_unicode_ci

staging:
  database: blog_staging
  host: localhost
  username: your_database_username
  password: your_database_password
  adapter: mysql2
  encoding: utf8
  collation: utf8_unicode_ci

production:
  database: blog_production
  host: localhost
  username: your_database_username
  password: your_database_password
  adapter: mysql2
  encoding: utf8
  collation: utf8_unicode_ci

After refactor

database.yml
1
2
3
4
5
6
7
8
9
10
11
12
13
14
15
16
17
18
19
20
21
22
23
24
25
26
defaults: &defaults
  username: your_database_username
  password: your_database_password
  adapter: mysql2
  encoding: utf8
  collation: utf8_unicode_ci

development:
  database: blog_development
  host: localhost
  <<: *defaults

test:
  database: blog_test
  host: localhost
  <<: *defaults

staging:
  database: blog_staging
  host: localhost
  <<: *defaults

production:
  database: blog_production
  host: localhost
  <<: *defaults

RVM - Ruby Version Manager

Ruby is a very popular programming language that has Ruby on Rails or RoR is a popular development framework that allows you to easily get your application up and running with minimal hassle.

Developing applications often times requires that you emulate different environments. Different versions of Ruby may be necessary for different projects. With conventional installations, this would impede your ability to be flexible.

Luckily, the Ruby Version Manager, known more widely as RVM, allows you to easily install multiple, contained versions of Ruby and easily switch between them.

Installing RVM
Run a quick update to make sure that all of the packages we download to our VPS are up to date:
sudo apt-get update

If you do not have curl on your system, you can start by installing it:
sudo apt-get install curl

To install RVM:
bash -s stable < <(curl -s https://raw.github.com/wayneeseguin/rvm/master/binscripts/rvm-installer)

To inject RVM into your environment .bashrc add the bit of bash it mentions at the end of the installation:
echo ‘[[ -s “$HOME/.rvm/scripts/rvm” ]] && source “$HOME/.rvm/scripts/rvm”’ >> .bashrc

Installing Ruby
Let’s go ahead and install Ruby MRI 1.9.3 (this is the default interpreter originally developed by Matz) first, and set that as our default interpreter. Afterwards, we’ll install Ruby 1.8.7, use RVM to easily switch between these two Rubies.
Intall ruby version 1.9.3:
rvm install 1.9.3

To verify it works:
ruby -v

To make ruby version 1.9.3 as default version:
rvm —default 1.9.3

Let’s install ruby version 1.8.7:
rvm install 1.8.7

To switch ruby version:
rvm use 1.8.7 or rvm 1.8.7

Installing Rails
To install the latest Rails:
gem install rails

Gemsets
One common way to distribute code in Ruby is to use a format called gems. Gems can be installed to extend the capabilities of the core Ruby distribution, and there are often gems that are required to be installed to get certain programs to function correctly.

In keeping with RVM’s mission of providing contained Ruby environments, it is also possible to install gems that are only associated with a single Ruby installation. RVM calls this functionality gemsets.

This means that you can have two different versions of the same gem, or you can make gems unaware of other gems on the system.

To see the available gemsets for the current Ruby:
rvm gemset list

If you have more than one Ruby version installed, you can see all of the gemsets:
rvm gemset list_all

By default, you should have two gemsets configured:
– default: the gemset that is applied if no other gemset is specified.
– global: this gemset is inherited by every other gemset that is used. This set generally does not need to be selected because it will be included automatically. You should install shared gems here.

Creating Gemset for Rails Project
1. Create a Rails project:
rails new blog

2. Get in the project:
cd blog

3. Create gemset for the project:
rvm —rvmrc —create ruby_version@gemset_name
rvm —rvmrc —create 1.9.3@blog

4. Get out the project:
cd ..

5. Get in the project:
cd blog

6. To see the gemset that we have created and stand on:
rvm gemset list

So far so good whenever we cd into the project it will automatically switch to project’s gemset.