Online Payment Gateway in Cambodia

Online Payment Gateway in Cambodia

The amount of shops in Cambodia wanna sell product and service online is growing. But you truly don’t know which Online Payment Gateway you consider to choose for implement and do integration right?

The good news is here, take it easy I will do a presentaion for you, let go through with me:
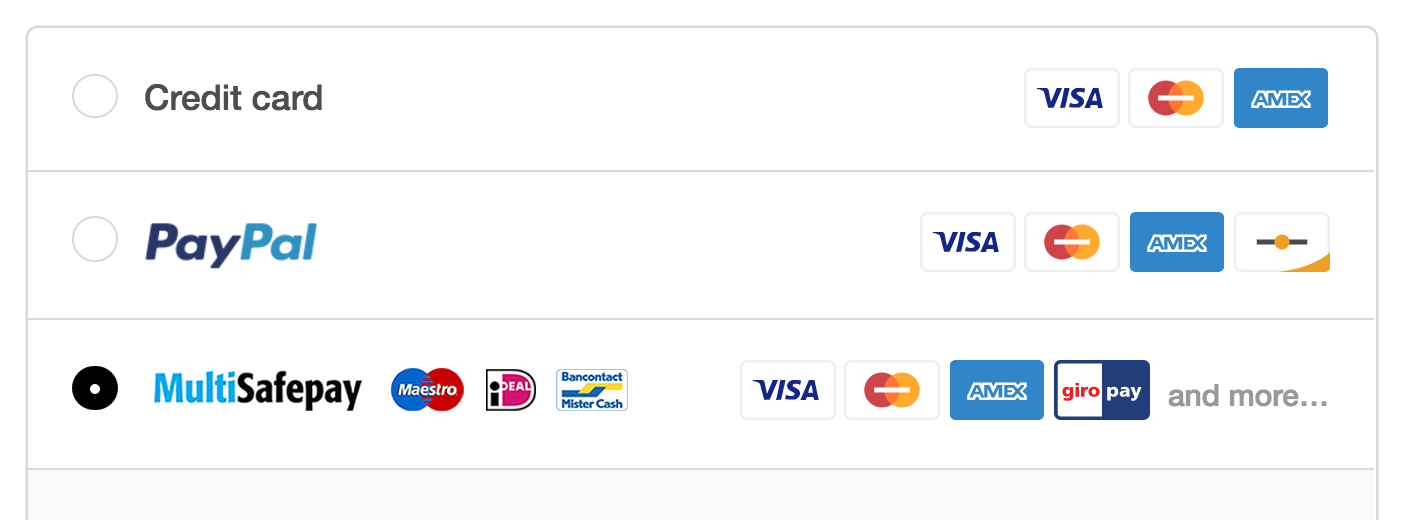
PayPal
PayPal is by far the easiest method to receive online payments made by credit card or via PayPal itself. However, the company has no relations with any bank in Cambodia.

So it’s not possible right? Well, the only possibility is to have a bank account in another country linked to your PayPal account.

Cathay United Bank
Cathay United Bank (formerly SBC Bank) in Cambodia offers an online payment gateway, which is rather easy to implement.

Of course, you need an account with the bank and Cathay United charges a percentage fee for this service. It only can handle credit cards of MasterCard, JCB and VISA, which is a bit limited.

ACLEDA Bank
As a well respected bank, ACLEDA is a bit late to the party, only announcing recently their E-Commerce Payment Gateway.

ACLEDA uses the same MasterCard Internet Gateway Service (MiGS) as Cathay United Bank, so this is just as easy to set up on your website.

WING
WING is primarily a phone-to-phone payment service and very popular among Cambodians. They can send and receive money nationwide, the company has a large network of agents and also offers a solution for online payments. The only thing you have to do is open a free business account. Once that’s done you’ll get instructions on how to implement it on your website to receive online payments in your Wing account. This service is only available for customers within Cambodia.

PayGo
PayGo is a service provided by ABA Bank. To use the service, customers first have to sign up using a mobile phone number. This only works for Cambodian phone numbers, so not suitable for international customers. Although it is convenient for customers in Cambodia, we have some doubts about the security of this system. Only using a phone number as a check seems not very secure.

My suggestion for you is that:

Due PayPal not yet entered in Cambodian market, the services offered by Cathay United Bank and ACLEDA Bank seem the most robust, secure and comparatively easy to implement.

And if you only or primarily target customers within Cambodia, WING and PayGo can be an alternative.

So far so good, That’s it!!! See ya!!! :)

Generating Income on the Internet Using Social Media

Generating Income on the Internet Using Social Media

Once it comes to generating income on the Internet using social media, there are a few principles which you need to understand.

1. INTRODUCE YOURSELF
The first thing you need to know is how to introduce yourself, whether video or article platform.

People are busy, you need to think of how you can introduce yourself in under 15 seconds. Get to the right point.

Take sometime to come up with a way to do it, and remember the words you used because you’ll need to do it the same way every time you introduce yourself on the same platform.

As well, keep in mind that among the people who log into your scope, some might not have heard of you before, so you need to not just introduce yourself quickly, but you need to be able to capture and hold their attention/interest.

Within that 15 seconds of your introduction, you need to be able to make people understand who you are and what you do.

2. HAVE A PRODUCT TO PROMOTE
The second thing that you will need to have is a product to promote.

There are two ways for you to do this:
- Promote your own product for 100% of the profit
- Promote someone else’s product for a commission

You decide – you could sell a product on Amazon, Alibabaor or sell a product yourself on your own website or mobile platform.

You must have a product!

3. HAVE A CALL TO ACTION
The third thing you need is a call to action – What is “A call to action”? It mean that you must tell people what to do next.

If you don’t have a call to action, then no action will be taken.

At the end of the scope tell people that:

“If you like what you have just known, head over or go through to my website.”

Or you could tell them: “If you liked this scope, please follow me on twitter, facebook page… and join me for the next one.”

Every time you present, you must always have a call to action.

So these are the three things that you want to have to really master and get thousands of people to your social media. So far so good, That’s it!!! See ya!!! :)

Copy to Clipboard Without Flash With Clipboard.js

Copy to Clipboard without Flash with Clipboard.js

Well, in this article I gonna show you how to easily implement the ability to copy data to the clipboard. In order to implement it I will clipboard.js javascript library, let get started with me:

Installation

The first thing I need to do is include the clipboard.js library file in head tag of the application:

1
<script src="https://cdn.jsdelivr.net/clipboard.js/1.5.12/clipboard.min.js"></script>

If you don’t wish to use a CDN, you can download the clipboard in other ways:
- Using npm, by running npm install clipboard --save
- Using bower, by running bower install clipboard --save
- By downloading a zip file from the clipboard.js github page and referencing it in your HTML.

Usage

Copy text from another element: A pretty common use case is to copy content from another element. You can do that by adding a data-clipboard-target attribute in your trigger element. The value you include on this attribute needs to match another’s element selector.

1
2
3
4
5
6
7
<!-- Target -->
<input id="foo" value="https://github.com/zenorocha/clipboard.js.git">

<!-- Trigger -->
<button class="btn" data-clipboard-target="#foo">
    <img src="assets/clippy.svg" alt="Copy to clipboard">
</button>

Cut text from another element: Additionally, you can define a data-clipboard-action attribute to specify if you want to either copy or cut content. If you omit this attribute, copy will be used by default.

1
2
3
4
5
6
7
<!-- Target -->
<textarea id="bar">Mussum ipsum cacilds...</textarea>

<!-- Trigger -->
<button class="btn" data-clipboard-action="cut" data-clipboard-target="#bar">
    Cut to clipboard
</button>

As you may expect, the cut action only works on input or textarea elements.

Copy text from attribute: Truth is, you don’t even need another element to copy its content from. You can just include a data-clipboard-text attribute in your trigger element.

1
2
3
4
<!-- Trigger -->
<button class="btn" data-clipboard-text="Just because you can doesn't mean you should — clipboard.js">
    Copy to clipboard
</button>

Events

There are cases where you’d like to show some user feedback or capture what has been selected after a copy/cut operation.

That’s why we fire custom events such as success and error for you to listen and implement your custom logic.

1
2
3
4
5
6
7
8
9
10
11
12
13
14
var clipboard = new Clipboard('.btn');

clipboard.on('success', function(e) {
  console.info('Action:', e.action);
  console.info('Text:', e.text);
  console.info('Trigger:', e.trigger);

  e.clearSelection();
});

clipboard.on('error', function(e) {
  console.error('Action:', e.action);
  console.error('Trigger:', e.trigger);
});

So far so good, That’s it!!! See ya!!! :)

HTTP Status Code and Symbols

HTTP Status Code and Symbols

Thanks to Cody Fauser for this list of HTTP responce codes and their Ruby on Rails or other Framework symbol mappings. Let go through the status code symbol below:

1xx Informational
100 :continue
101 :switching_protocols
102 :processing

2xx Success
200 :ok
201 :created
202 :accepted
203 :non_authoritative_information
204 :no_content
205 :reset_content
206 :partial_content
207 :multi_status
226 :im_used

3xx Redirection
300 :multiple_choices
301 :moved_permanently
302 :found
303 :see_other
304 :not_modified
305 :use_proxy
307 :temporary_redirect

4xx Client Error
400 :bad_request
401 :unauthorized
402 :payment_required
403 :forbidden
404 :not_found
405 :method_not_allowed
406 :not_acceptable
407 :proxy_authentication_required
408 :request_timeout
409 :conflict
410 :gone
411 :length_required
412 :precondition_failed
413 :request_entity_too_large
414 :request_uri_too_long
415 :unsupported_media_type
416 :requested_range_not_satisfiable
417 :expectation_failed
422 :unprocessable_entity
423 :locked
424 :failed_dependency
426 :upgrade_required

5xx Server Error
500 :internal_server_error
501 :not_implemented
502 :bad_gateway
503 :service_unavailable
504 :gateway_timeout
505 :http_version_not_supported
507 :insufficient_storage
510 :not_extended

So far so good, That’s it!!! See ya!!! :)

Why I Do Combining Apache and Nginx Together?

Why I do combining apache and nginx together?

Nginx and apache are powerful and effective servers by nowadays. Apache currently reigns as the number 1 server for websites and since its public release in 2006. And nginx has taken the world by storm and is now the number 2 server for active sites.

The Reason Why I Use Nginx and Apache Together is

Nginx
- nginx serves static files (images, css, html etc.) really fast and efficient and passes php and .htaccess requests to apache for processing.
- nginx needs the help of php-fpm or similar modules for dynamic content.

Apache
- apache is hard on server memory.
- apache serves php and .htaccess (most cms site like wordpress needs it for rewrite) and if you throw in a php opcode cache like zend opcache or xcache it should serve php even faster.

nginx + apache with php opcache = performance and server resource efficiency

So far so good, in the next article I will show you the configurations. That’s it!!! See ya!!! :)

Create Content With Multiple Features With CKEditor Gem

Create content with multiple features with CKEditor Gem

Setup & Usage
First, we need to add the CKEditor gem to our Gemfile. Open up your Gemfile and add the line listed below:

Gemfile
1
gem "ckeditor"

Next, open up the terminal and run a bundle install to install the gem:

1
bundle install

Great, now lets create a sample model and accompanying controller that will be used to store our data. Open up and run the command below to create the Magazine model and migrate the database:

1
2
rails g resource Magazine title body:text
rake db:migrate

Now, open your routes file and add the following line to your routes:

routes.rb
1
root to: "magazines#index"

Now, lets add the CKEditor javascript include to our application.js. Modify your application.js file so that it looks like the code listed below:

application.js
1
2
3
4
5
6
7
8
9
10
11
12
13
14
15
16
17
// This is a manifest file that'll be compiled into application.js, which will include all the files
// listed below.
//
// Any JavaScript/Coffee file within this directory, lib/assets/javascripts, vendor/assets/javascripts,
// or any plugin's vendor/assets/javascripts directory can be referenced here using a relative path.
//
// It's not advisable to add code directly here, but if you do, it'll appear at the bottom of the
// compiled file. JavaScript code in this file should be added after the last require_* statement.
//
// Read Sprockets README (https://github.com/rails/sprockets#sprockets-directives) for details
// about supported directives.
//
//= require jquery
//= require jquery_ujs
//= require ckeditor/init
//= require turbolinks
//= require_tree .

Great, now we need to add some code to the magazines controller. Add the following code to the magazines controller:

magazines_controller.rb
1
2
3
4
5
6
7
8
9
10
11
12
13
14
15
16
17
18
19
20
21
22
23
24
25
26
27
28
29
30
31
32
33
34
35
36
37
38
39
40
class MagazinesController < ApplicationController
  def index
    @magazines = Magazine.order("created_at DESC")
  end

  def show
    @magazine = Magazine.find(params[:id])
  end

  def new
    @magazine = Magazine.new
  end

  def create
    @magazine = Magazine.new(magazine_params)
    if @magazine.save
      redirect_to magazines_path, notice: "The magazines has been successfully created."
    else
      render action: "new"
    end
  end

  def edit
    @magazine = Magazine.find(params[:id])
  end

  def update
    @magazine = Magazine.find(params[:id])
    if @magazine.update_attributes(magazine_params)
      redirect_to magazines_path, notice: "The magazine has been successfully updated."
    else
      render action: "edit"
    end
  end

  private
  def magazine_params
    params.require(:magazine).permit(:title, :body)
  end
end

This code enables the ability to read, write, and update the magazines in our example. Now for the views, first lets create the index view:

index.html.erb
1
2
3
4
5
6
7
8
9
<%= link_to "New Magazine", new_magazine_path %>
<% @magazines.each do |magazine| %>
  <h3><%= magazine.title.html_safe %></h3>
  <p><%= magazine.body.html_safe %></p>
  <%= link_to "Edit Magazine", edit_magazine_path(magazine) %>
  <% if magazine != @magazines.last %>
  <hr />
  <% end %>
<% end %>

Now, lets create a partial to store the form. Create a file called app/views/_form.html.erb and add the code listed below:

_form.html.erb
1
2
3
4
5
6
7
8
9
10
11
12
13
14
15
16
17
18
19
20
21
22
23
24
<% if @magazine.errors.any? %>
  <ul>
    <%= @magazine.errors.full_messages.each do |message| %>
        <li><%= message %></li>
    <% end %>
  </ul>
<% end %>
<%= form_for @magazine do |f| %>
  <div>
    <%= f.label :title %>
  </div>
  <div>
    <%= f.text_field :title %>
  </div>
  <div>
    <%= f.label :body %>
  </div>
  <div>
    <%= f.cktext_area :body, rows: 10 %>
  </div>
  <div>
    <%= f.submit %>
  </div>
<% end %>

Now, lets create the new view. Create the app/views/magazines/new.html.erb file and add the code listed below:

new.html.erb
1
2
<h3> New Magazine</h3>
<%= render "form" %>

Now, if you visit the new magazines page on your development server you will see that CKEditor appears.

Next lets create the edit view. Create the app/views/magazines/edit.html.erb file and add the code listed below:

edit.html.erb
1
2
<%= "Editing #{@magazine.title}" %>
<%= render "form" %>

Great, now when you click ‘edit magazine’ on any magazine, it will show the CKEditor for editing.

Images Using Paperclip
In order to integrate images via paperclip, a few more steps are required. Note that you must have ImageMagick installed for this to work. First, lets include the paperclip gem:

Gemfile
1
gem "paperclip"

Next, we need to run a generator provided by ckeditor. This generator will create the necessary models that will be used to store image data. Run the command below:

1
2
rails generate ckeditor:install --orm=active_record --backend=paperclip
rake db:migrate

So far so good, if you restart your rails server and refresh the page, you will be able to click the images button, upload an image, and insert it into your articles.

Gulp – Markdown

Gulp, Gulp – Markdown

Now for someting new. We are going to use Gulp with Handlebars to create our own CMS system.

First of all, We want to be able to process markdown files and create html files with Gulp with plugin.

1
$ npm install gulp-markdown --save-dev

For more information about gulp-markdown check out https://www.npmjs.org/package/gulp-markdown

We will read all the markdown files in the contents/pages folder and generate html files.

gulpfile.js
1
2
3
4
5
6
7
8
...
var markdown = require('gulp-markdown');
...
gulp.task('generate_pages', function() {
  return gulp.src('content/pages/**.md')
    .pipe(markdown())
    .pipe(gulp.dest("build/pages"));
});

Lets create our first page.

ontents/pages/first_page.md
1
Yes, it makes a **bold** statement.

When We run our gulp generate_pages task, We will take the markdown and convert it into html and place the files in the build/pages directory.

1
2
3
4
$ gulp generate_pages
Using gulpfile ~/js/gulpwalkthru/gulpfile.js
Starting 'generate_pages'...
Finished 'generate_pages' after 22 ms

If We look in our build/pages directory, We should see our new html file.

build/pages/first_page.html
1
p>Yes, it makes a <strong>bold</strong> statement.</p>

If We visit http://localhost:8000/pages/first_page.html we should see our generated webpage.

Gulp – Live Reload

Gulp, Gulp – Live Reload

So far so good, lets link our css file in index.html.

/contents/index.html
1
2
3
4
5
6
7
8
9
10
<!DOCTYPE html>
<html>
  <head>
    <title>Learning Gulp</title>
    <link rel="stylesheet" href="/styles/main.min.css" />
  </head>
  <body>
    <h1>Hello Gulp!</h1>
  </body>
</html>

Now let’s turn on live reload with our gulp-webserver.

gulpefile.js
1
2
3
4
gulp.task('webserver', function() {
  return gulp.src('build')
    .pipe(webserver({ livereload: true }));
});

If we run gulp webserver in one terminator and gulp watch in another, we will have our webserver running and live refreshing on each build.

terminator1:

1
$ gulp webserver

terminator2:

1
$ gulp watch

Update the css file to:

/contents/styles/some_styles.css
1
2
3
h1 {
  color: blue;
}

Go to http://localhost:8000 to watch our webpage.

Gulp – Web Server

Gulp, Gulp – Web Server

We can actually serve our webpages by using a gulp plugin.

1
$ npm install gulp-webserver --save-dev

For more information about gulp-webserver check out https://www.npmjs.com/package/gulp-webserver

gulpfile.js
1
2
3
4
5
6
7
...
var webserver = require('gulp-webserver');
...
gulp.task('webserver', function() {
  return gulp.src('build')
    .pipe(webserver());
});

Now when we run our gulp task webserver we will have a local webserver to view our website.

1
2
3
4
5
6
$ gulp webserver

Using gulpfile ~/YOUR_DIRECTORY/gulpfile.js
Starting 'webserver'...
Webserver started at http://localhost:8000
Finished 'webserver' after 20 ms

If you go to http://localhost:8000 in your web browser you should see our index.html page saying Hello Gulp!.

Gulp – Watch

Gulp, Gulp – Watch

Now for something super amazing. Instead of running the gulp task explicitly, lets have gulp run our tasks when the files change.

First reorganize some of our tasks:
- Rename default task to css.
- Create a new default task to run css, ‘javascript’, and ‘homepage’ tasks.

gulpfile.js
1
2
3
4
5
6
7
8
9
10
11
...
gulp.task('css', ['clean'], function() {
  console.log("Concat, move, and minify all the css files in styles folder");
  return gulp.src("contents/styles/**.css")
    .pipe(concat('main.min.css'))
    .pipe(cssmin())
    .pipe(gulp.dest('build/styles'));
});
...
gulp.task('default', ['css', 'homepage', 'javascript']);
...

Next create our file watching task. Could you guess what?… there isn’t a plugin for this. It is just part of gulp.

We will create a gulp watch task to watch our contents folder and run our default task on file change.

gulpfile.js
1
2
3
4
5
...
gulp.task('watch', [], function() {
  return gulp.watch(['contents/**'], ['default']);
});
...

In the terminal type:

1
2
3
4
5
$ gulp watch

Using gulpfile ~/YOUR_DIRECTORY/gulpfile.js
Starting 'watch'...
Finished 'watch' after 11 ms

If you update any of the css files in the styles folder, you should see gulp run the default task.

1
2
3
4
5
6
7
8
9
10
11
12
13
Starting 'clean'...
Clean all files in build folder
Finished 'clean' after 21 ms
Starting 'css'...
Concat, move, and minify all the css files in styles folder
Starting 'homepage'...
Starting 'javascript'...
Validate, Concat, Uglify, and Move all the javascript files
Finished 'homepage' after 77 ms
Finished 'javascript' after 75 ms
Finished 'css' after 84 ms
Starting 'default'...
Finished 'default' after 14 μs