Gravatar is a Fantastic service that provides a universal avatar for users. Gravatar has designed their service in such a way that the user’s avatar can be rendered on any site free of charge. Gravatar is used on millions of sites across the globe including GitHub, Stack Overflow, Word Press, Disqus, and many more sites. You can easily use gravatar without much effort. Simply add the code below to your application helper:
The first parameter, email, is the email address you wish to obtain the gravatar for. The second parameter, size, is the size of the gravatar you wish to render. To actually get the link to the gravatar, we obtain an MD5 hash of the email and then lowercase it and append it to the end of the gravatar url. The size is specified using the s parameter. To use this function, simple pass the newly generated Gravatar url to an image tag like this:
This will render the gravatar for that email address or a default image if the avatar doesn’t exist. If you wish to specify your default image, you can modify your helper to look like the code listed below, changing the default url to whatever you wish:
Ruby on Rails is my usual framework of choice to build web applications. It is good and easy to use, but let’s face it: it’s massive compared to more lightweight frameworks, such as Sinatra. Why is it bad? There are a few reasons and slow start-up time and high resources usage are just two most common concerns. Slimming down Ruby on Rails applications can allow you to use different components (say Sequel instead of ActiveRecord) and improve system security. Remember the last year’s security dramas related to JSON parameters parsing? It would be largely irrelevant for most applications if everyone who does not use it, disabled it.
Rails Modularity
To enable individual modules, replace the following in config/application.rb:
As you can see above, you can remove ActiveRecord altogether if you use different database, the same with ActionMailer or Sprockets. It probably does not make sense to remove ActionController, however.
Internal Middleware Stack
Each Ruby on Rails applications comes with Internal Middleware Stack Enabled. Check out This Section of Documentation for a list and description of each component. On a fairly small Ruby on Rails application I work on, the stack looks like this:
I can safely disable most of the above by modifying config/application.rb, for example:
config/application.rb
1
config.middleware.disable"Rack::ETag"
The same way, I was able to disable most of the default middleware, without doing any harm to my little app. You will have to be careful, however, what you disable. If you use login system, you will need sessions, if you display flash messages do not remove “ActionDispatch::Flash”… etc.
When it comes to JSON parameters parsing, that was a headache for most Ruby on Rails developers last year, it can be easily disabled. To disable JSON params parsing, put this line into config/application.rb:
Rails API
If you are building only API for your application, you can use nice gem called rails-api.
Put Controllers on a Hunger Slim
If you check out Ruby on Rails source code for ActionController::Base, you will learn that it inherits from ActionController::Metal and includes Bunch of Modules that you might or might not need in your controllers. A way to slim down your controllers stack, is to cherry-pick the ones you need. If all you need is basic rendering, there is nothing stopping you from creating lightweight controllers like this one:
1234567
classSlimController<ActionController::MetalincludeActionController::Renderingdefindexrendertext:"I'm Slim, yes I'm the real Bunlong"endend
There is no ActionController:HipHop I’m afraid, but that will work just as good.
Single File Rails Applications
Okay, they don’t have to be single-file. But you are not forced to use default Rails catalogues structure, and you can make them really slim and custom.
You can, however, create 100% functional Rails application only in config.ru:
# Port of https://gist.github.com/josevalim/1942658 to Rails 4# Original author: Jose Valim## Run this file with:## bundle exec RAILS_ENV=production rackup -p 3000 -s thin## And access:## http://localhost:3000/hello/world## We are using Bundler in this example, but we could also# have used rubygems:## require "rubygems"## gem "actionpack"# gem "railties"## require "rails"# require "rails/all"# The following lines should come as no surprise. Except by# ActionController::Metal, it follows the same structure of# config/application.rb, config/environment.rb and config.ru# existing in any Rails 4 app. Here they are simply in one# file and without the comments.require"rails"require"action_controller/railtie"# require more if neededclassMyApp<Rails::Applicationroutes.appenddoget"/hello/world"=>"hello#world"end# Enable cache classes. Production style.config.cache_classes=true# uncomment below to display errors# config.consider_all_requests_local = true# Here you could remove some middlewares, for example# Rack::Lock, ActionDispatch::Flash and ActionDispatch::BestStandardsSupport below.# The remaining stack is printed on rackup (for fun!).# Rails API has config.middleware.api_only! to get# rid of browser related middleware.config.middleware.delete"Rack::Lock"config.middleware.delete"ActionDispatch::Flash"config.middleware.delete"ActionDispatch::BestStandardsSupport"# We need a secret token for session, cookies, etc.config.secret_token="49837489qkuweoiuoqwehisuakshdjksadhaisdy78o34y138974xyqp9rmye8yrpiokeuioqwzyoiuxftoyqiuxrhm3iou1hrzmjk"end# This is a barebone controller. One good reference can be found here:# http://piotrsarnacki.com/2010/12/12/lightweight-controllers-with-rails3/classHelloController<ActionController::MetalincludeActionController::Renderingdefworldrender:text=>"Hello world!"endend# Initialize the app (originally in config/environment.rb)MyApp.initialize!# Print the stack for fun!puts">> Starting Rails lightweight stack"Rails.configuration.middleware.eachdo|middleware|puts"use #{middleware.inspect}"endputs"run #{Rails.application.class.name}.routes"# Run it (originally in config.ru)runMyApp
Your Gemfile is Fat
Including too many libraries is bad for weight of the app. You need to check your Gemfile, and make sure you do require gems like ‘pry’ only in :development group, ‘rspec’ in :test etc.
There is general tendency of Rails developers of putting together applications together with ready-to-use blocks. You need to consider if that is what you really need. Writing simple authentication is a matter of controller and two actions, you might not need Devise for that. Handling simple file uploads can be almost as easily implemented as with use of Carrierwave, with much less boilerplate code. I do encourage you to build minimal solutions for your needs only, especially when you do not need to use majority of functionality provided by given gem. If there is a hole found in, say, Carrierwave, including the gem might make your application vulnerable too, and heavier than it needs to be, of course.
The will_paginate gem has long since been the most popular gem used when it comes to pagination. However it is not the only gem out there. Kaminari is another very popular pagination gem. In this article we will show you how to use it in your application.
Setup Rails Application
To begin using the kaminari gem, we must first add it to our Gemfile. Open up your Gemfile and add in the line listed below.
Gemfile
1
gem'kaminari'
Now run a bundle install to install the gem.
1
bundleinstall
Next, create a model called Post. The post model in this example will represent a blog post. Run the commands below to create the post model:
12
railsgmodelPosttitlebody:stringrakedb:migrate
We need some seed data. Open your db/seeds.rb file and modify it so that it looks like the code listed below:
db/seeds.rb
12345
(1..100).eachdo|i|Post.create!(title:"Lipsum Post #{i}",body:%{ Nullam hendrerit iaculis sodales. Curabitur varius nibh arcu, id molestie nibh fermentum vitae. Cras quis semper dui. Cras porttitor urna sit amet risus vehicula tempor. Maecenas quis tempor ligula. Donec et nibh eu leo volutpat placerat. Fusce vulputate elit in nisi pretium, vel fermentum mi fermentum. Mauris scelerisque, lectus non luctus ultricies, urna eros tincidunt risus, at varius sapien diam id erat. })end
Now run a rake db:seed to add the seed data:
1
rakedb:seed
We need to add a controller called Posts that we will use to render the posts. Run the command below to create this controller now:
1
railsgcontrollerPostsindex
Let’s modify our routes file to set a site root. Open up your config/routes.rb file and modify it so that it looks like the code listed below.
As you can see, the first bit of our pagination code is here. The page method tells kaminari what page we are on. The per method tells kaminari how many items we wish to have per page.
Let’s open up the index view for our Posts controller and modify it so that it looks like the code listed below:
The paginate helper is the line actually responsible for rendering the pagination links. The page_entries_info helper displays a line similar to Displaying posts 1 - 10 of 100 in total. This can be extremely helpful in letting the user know how many items there are in the list.
Global Configuration
You can also specify global defaults for Kaminari. First, run the following command to generate an initializer file for Kaminari:
1
railsgkaminari:config
If you open up the config/initializers/kaminari_config.rb file you’ll see something similar to the following:
A description of these options can be found below:
Config
Description
config.default_per_page
Specifies the default amount of items to display per page.
config.max_per_page
The maximum amount of items to display per page.
config.window
Specifies the inner window size. The inner window is the number of items in the middle of the pagination block. e.g. « First ‹ Prev … 1 2 3 4 … Next › Last », in the previous example, 1 2 3 4 would be considered the inner window.
config.outer_window
Specifies how many items to display in the outer window. For example: 1 2 3 4 … 8 9 10 11, numbers visible on the outside are the outer window.
config.left
Specifies how many items should be displayed in the left outer window.
config.right
Specifies how many items should be displayed in the right outer window.
config.page_method_name
Changes the page method name from page to whatever you want. Can be used to avoid conflict with other gems that use page.
config.param_name
The default parameter to use when looking for the page number.
I18N
Kaminari can be configured via I18N. The default I18N configuration file looks like the code listed below:
1234567891011121314151617
en:views:pagination:first:"« First"last:"Last »"previous:"‹ Prev"next:"Next ›"truncate:"…"helpers:page_entries_info:one_page:display_entries:zero:"No %{entry_name} found"one:"Displaying <b>1</b> %{entry_name}"other:"Displaying <b>all %{count}</b> %{entry_name}"more_pages:display_entries:"Displaying %{entry_name} <b>%{first} - %{last}</b> of <b>%{total}</b> in total"
To override it, simply modify your locale files under config/locales.
Software Engineer make mistakes. Some of them are just annoying (for others to read) and some are really dangerous. Here is my selection of 10 mistakes done by Ruby / Ruby on Rails developers. These tips are easy to follow and can save you much time of later debugging.
Double negative is hard to read. Every time I encounter it, I spend a couple of seconds on parsing the condition. Use the API which Rails gives you user.present? instead of !user.blank?.
I also rarely see any usage for unless, especially with complex conditionals connected by && and ||. How fast can you decide when unless user.active? || address.confirmed? will fire?
Using Save Instead of save! and Not Checking Return Value
123
user=User.newuser.name="John"user.save
What is wrong with this piece of code? It will fail silently when user cannot be saved. There will be no single trace of this failure in your logs and you will spend time wondering: “why there are no users in the database”. If you expect that data is valid and model should be always saved successfully, then use bang versions – save!, create! and so on. Use save only when you handle the return value:
In this case writing self.first_name is completely unnecessary, because first_name will do. This is of course just matter of style and has no other negative consequences than overly verbose code. Please mind that you need self in assignments: self.first_name = "John".
N + 1 Queries
This is a vast topic, but I will try to give the simplest example. You want to display a list of posts with names of authors. Post model belongs_to :user. If you just do Post.limit(10) and then call post.user.name in your views, you will make a separate database query for each user. That’s because Rails has no single chance to guess that you need users when you make the first query in the controller.
It’s easy to spot N + 1 queries problem just by looking at server’s logs:
You have to be explicit at telling what you need from the database. In the easy cases Rails includes method will do. You can read more about it in Rails guides - Eager Loading
Boolean Field with Three Possible Values
Boolean is supposed to have two possible values – true and false, right? And how about nil? If you do not specify default value and null: false in your migrations, you end up with boolean field with three possible values – true, false and nil. This leads to nasty code like:
1234567891011121314
# post is new, not published, not rejectedifpost.published.nil?# ...end# post is publishedifpost.published# ...end# post is new or rejectedunlesspost.published# ...end
If you need three possible states – use string field with three well-defined values.
Orphaned Records After Destroy
When you destroy a model and it is required by associated records, you should handle it. It’s easy to find such cases:
Leaving puts
Leaving puts in the code after some debugging session pollutes server logs and output of tests. Use Rails.logger.debug so it’s later possible to adjust the desired log level.
Not Using map
I’ve seen such code many times:
12345
users=[]posts.eachdo|post|users<<post.userend
This is exactly the case for using map, which is shorter and more idiomatic:
123
users=posts.mapdo|post|post.userend
Not Using Hash#fetch
1
name=params[:user][:name]
What’s wrong with this code? It will throw NoMethodError: undefined method `[]' for nil:NilClass if there is no user key in the hash. If you expect the key to always be present, use Hash#fetch:
1
name=params.fetch(:user)[:name]
This will give you a meaningful exception – KeyError: key not found: :user.
Using Code from app/ in Migrations
Let’s say you have the following model:
and you want to add points field to it. So you create a migration. But you would also like to handle existing users: 10 points for active and 0 for the rest. You add to your migration:
It works and you are happy. Time passes by and you decide to remove User::ACTIVE constant. Your migrations are now broken, you cannot run them from scratch, because User::ACTIVE is undefined.
Never use code from app/ directory in migrations. If you need to update existing data and do it in a few environments (development, staging, production) create a Rake task and delete it once it’s executed in every environment.
Dealing with JSON in Rails is pretty easy and straight forward. The support is built into the framework, request data is automatically available in params hash. Then we just have to say render :json and we are done.
If JSON is one of the formats which we use. For instance, we can render both JSON and HTML in the same controller action. Or we may create an action intended for AJAX call which changes some model and returns JSON with status field.
On the other hand, we may use Ruby on Rails for building JSON API – app with the assumption that JSON is the only format we support. In such a case we know that the app won’t render HTML. There is no View layer (or you can say that JSON is your View layer). We probably won’t need cookies support and the code specific to handling browser requests.
Rails-API
Ruby on Rails has modular structure – you can opt out of the things which you don’t want to use. But if we are talking about API only Rails app already did it for us and published in the gem called rails-api.
What I care is “Don’t require things which you won’t use”. There might be bugs hiding there or security vulnerabilities connected with it. And of course there are other reasons:
More Lightweight Application
I generated two fresh applications – one using rails-api new and the second using rails new. The environment was consistent – Ruby 2.1.0, Rails 4.0.2. Then I started the server with rails s and measured RAM memory taken by server process. The results are following:
This is 15% less. Obviously when you start adding new gems the relative difference will be smaller.
Faster Application
The same benchmarking environment as above. I created controller action which loads 100 User records from the database and renders them as JSON. I placed exactly the same code in rails-api application and regular rails application. Then I measured the server response time for a bunch of requests and took the avarage value. It looks like:
This is 12% faster.
Useful Generator
The controller scaffold which comes with rails-api is really cool. It disables new and edit actions (they don’t make sense because we do not display forms) and provides sensible default code inside other actions.
Easy Installation and No Maintenance Costs
Last but not least, rails-api is super easy to install and learn. All you have to do to bootstrap new app is:
12
geminstallrails-apirails-apinewmy_app
It’s worth to spend 10 minutes of your time for learning it. Check out the docs.
Active Model Serializers
If you want to build JSON API it’s good to have control over the generated JSON. And here we need the second gem is active_model_serializers.
As you can see UserSerializer is used to serialize User model. Using attributes we define what should be included in the generated JSON. You may think that this is repeating yourself (the fields are already defined in database schema), but in my opinion you rarely render all the fields, more often you want to hide some internals.
As you can see we embed associated records using familiar syntax: has_one and has_many. Serializing Address and Package will be handled using AddressSerializer and PackageSerializer, respectively.
Serializers are just classes which inherit from ActiveModel::Serializer. You can define regular methods and the model being serialized is accessed by object method.
How does the code inside UsersController look like?
Pretty simple, You just say: “I want JSON” and you have JSON rendered with proper serializer.
12345678910111213141516
{"users":[{"id":1,"first_name":"Some String","last_name":"Another String",[...]"address":{"street":"Yet another string"},"packages":[{"id":2,"status":"delivered"},{"id":5,"status":"lost"}]}]}
More about Associations
Let’s imagine following use case, we want to get information about a package given its id. And we want it to contain information about the owner (user).
What’s different here from model code? Package belongs_to user, but here it says has_one user. From the point of view of serializers belongs_to is exactly the same as has_one, hence we have only has_one and has_many.
Now let’s go back to UsersController#index after our changes. We hit the action again and what do we get this time?
We can use :embed option and include only ids of the packages. This has a drawback: if a client of our API wants not only id of the package, but also its status then he will have to make a separate request for each package. Certainly this is a situation which we want to avoid.
We use :serializer option to specify different serializer than that inferred from naming conventions. We create ShortPackageSerializer, which doesn’t contain user embeded. What’s more you can put ShortPackageSerializer and PackageSerializer in the inheritance hierarchy so you DRY.
In my opinion this solution is pretty clean. We have separate class for each representation and we are able to share some pieces of code by using inheritance. Of course, this may become too complex if the inheritance hierarchy grows very big. However if we limit ourselves to 2-3 serializers per model the code should stay clear and maintainable.
Use rails-api if you are building API-only application. It’s easy to learn and maintenance won’t hit you later, because you can opt out without any problems.
Use active_model_serializers for better control over the generated JSON.
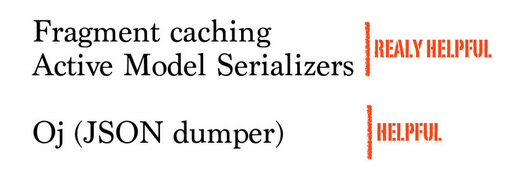
It works well if there are small number of records to be returned. But what happens when we need to return 10,000 records at once? Things slow down dramatically and the most time-consuming parts are JSON serialization and database operations.
Include only Required Attributes
The first obvious thing is generating JSON with only attributes that we need.
There are several JSON libraries available:
- JSON - The default JSON gem with C-extensions (ships with Ruby 1.9).
- YAJL - Yet Another JSON Library.
- OJ - Optimized JSON.
It’s a good idea to use the fastest dumper of them.
Active Record makes database querying so simple. Chain together a few methods and bam, you’ve saved your self lines and lines of T-SQL. The problem is this simplicity masks the underlying operation and it’s very easy to not realize how inefficient your database calls are.
UserLoad(1.1ms)SELECT`users`.*FROM`users`WHERE'id'=1LIMIT1PostLoad(0.7ms)SELECT`posts`.*FROM`blogs`WHERE`blogs`.`user_id` = 2 Comment Load (0.7ms) SELECT `comments`.* FROM `comments` WHERE `comments`.`post_id` = 43 Comment Load (1.7ms) SELECT `comments`.* FROM `comments` WHERE `comments`.`post_id` = 55 Comment Load (2.2ms) SELECT `comments`.* FROM `comments` WHERE `comments`.`post_id` = 32 Comment Load (0.9ms) SELECT `comments`.* FROM `comments` WHERE `comments`.`post_id` = 66 Comment Load (2.2ms) SELECT `comments`.* FROM `comments` WHERE `comments`.`post_id` = 56 Comment Load (4.8ms) SELECT `comments`.* FROM `comments` WHERE `comments`.`post_id` = 65 Comment Load (1.8ms) SELECT `comments`.* FROM `comments` WHERE `comments`.`post_id` = 68 Comment Load (0.8ms) SELECT `comments`.* FROM `comments` WHERE `comments`.`post_id` = 71
The user has commented in 9 different posts, which results in 9 separate queries to the DB. This is a small scale example, but you can see how this can compound into something nasty.
he solution is to user includes method:
1
@user=User.find(id).includes(:posts=>:comments)
When using includes method, Active Record ensures that all of the specified associations are loaded using the minimum possible number of queries. The actual query executed is converted into a more optimal singular query and it is that result set that is iterated over instead of the replicated find(id) style queries.
Our query stack list now looks like:
123
UserLoad(1.0ms)SELECT`users`.*FROM`users`WHERE'id'=1LIMIT1PostLoad(0.4ms)SELECT`posts`.*FROM`posts`WHERE`posts`.`user_id` IN (1)Comment Load (0.5ms) SELECT `comments`.* FROM `comments` WHERE `comments`.`post_id` IN (43, 55, 32, 66, 56, 65, 68, 71)
After you finish the Rails tutorials and start your own app, things get confusing something like where does your non-CRUD and general logic go?
You can’t build the app you’ve been dreaming of without some general, non-Rails logic. So where do you put your code, and still keep things simple?
The Easy Place to Start
when I have logic that feels related to an existing ActiveRecord model, I’ll start by putting it into that model. For example if I had a Game model and I want to import a bunch of games from CSV files, I would put that method right onto the Game class.
You have all the information your methods need right at hand. it’s easily testable. And it’s probably where a new contributor world look for that logic first.
But if you keep adding and changing that model, it’ll get big and complicated. Different parts of the model will interact in strange ways. The more you change it, the harder it will be to change.
In that case, you would probably want to refactor that code out to a non-ActiveRecord model.
Non-ActiveRecord Models
You can write your own Ruby code, in plain Ruby objects, and use them in your Rails app. These objects can still be called models, because they’re modeling part of your problem. They just don’t have an ActiveRecord database storing their data.
The next time I worked on that game CSV parser, the Game class was getting a little too big. So I moved the parser logic into its own GameCSVParser class.
I will go right to creating a new plain Ruby object if the logic I’m adding doesn’t feel related to any specific ActiveRecord model. Of if the code seems like it should be a part of a thing that doesn’t exist yet in the app. Otherwise, they mostly pop up through refactoring.
Chartkick is a charting library for Ruby on Rails that allows you to easily create nice looking charts. Chartkick is compatible with all major browsers and can easily be used to give your Ruby on Rails application some additional flair. In this article we will cover the basics of using Chartkick.
Rails Application Setup
Before we can use Chartkick, we will need to add it to our Gemfile. Open up your Gemfile and add the following code.
Gemfile
1
gem'chartkick','~> 1.2.4'
In addition, let’s include a couple of helper gems that will make life easier when dealing with data. Add the following gems to your Gemfile.
Now let’s run a bundle install to install all three gems.
1
bundleinstall
Now we need to create a model that we will use with our charts. For this example app we will create a simple model called Visit. This model will represent a single user’s ‘visit’ to a website. Run the command below to create this model now.
Now let’s run a rake db:migrate to create the table associated with this model.
1
rakedb:migrate
Now we need to add some data to our seeds file in order to give us some data to play with. Open up your seeds.rb file and add in the code listed below.
Finally, we need to modify our application layout. Open up your application’s layout and modify it so that it looks like the following code. Note the inclusion of the Google API javascript file below. Chartkick can use either Google Charts or Highcharts for charting. In this example we use Google Charts. We also utilize Bootstrap for a cleaner look and feel.
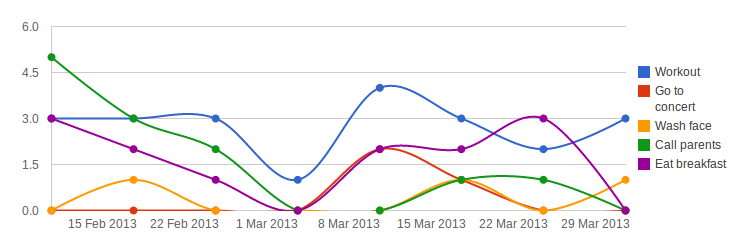
Line Charts
The first chart type we will work with is the line charts Line charts are handy for doing things like plotting out events over time. Open up your show view for the Homes controller and modify it so that it looks like the code listed below.
Refreshing the page results in a new line chart with multiple series listed. You see a line for each country with each point corresponding to the number of visits for that day.
Pie Charts and Area Charts
We can also render a pie chart. Open up your show view again and append the following code to the end of the view.
If you refresh the page a pie chart will render with each slice representing the visits for that particular country. This information can also be represented via a geo chart. Modify your homes view to look like the code listed below.
Great, now if you refresh the page you will see that the area chart has been added.
Bar Charts and Column Charts
Both bar charts and column charts can be easily created. Modify your homes/show view so that it looks like the code listed below.
If you refresh the page you’ll see both column and bar charts at the bottom.
Remote Charts
You can quickly and easily build remote AJAX driven charts. Let’s create a simple series chart. First, we will create a new method on your homes controller called visits_by_day. Open up your homes controller and modify it so that it looks like the code listed below.
If you refresh the page, you’ll notice that the new chart has been rendered. A quick look at your browser’s developer console will show you that the visits_by_day data is pulled down via AJAX and then the site is rendered.
Global Options
You can customize the global options for ChartKick. Create an initializer called chartkick.rb and add in the code listed below.